This guide explains how to install the Gekko trading bot—an open-source crypto trading automation tool originally created by Mike van Rossum—on a typical Linux distribution.
The step-by-step instructions are based on a personal setup (Debian virtual machine on an Intel NUC with vSphere), but will work for most modern Linux (and Windows with WSL) systems able to run Node.js and npm.
Step 1: Install Required Dependencies
Begin by installing the core dependencies. These commands assume you are using a recent Debian- or Ubuntu-based Linux distribution.
Install Node.js
sudo apt-get install nodejsInstall npm (if not already available)
sudo apt-get install npmInstall Git
sudo apt-get install git(Optional) Install PM2 process manager
PM2 is not required, but it helps you run and monitor Gekko instances in the background.
sudo npm install pm2 -gTip: If you want to upgrade npm to the latest version:
sudo npm install -g npm@latest
Step 2: Clone the Gekko Repository & Install Dependencies
Download the Gekko source code:
git clone git://github.com/askmike/gekko.git -b stable
cd gekko
Install Gekko’s production dependencies:
npm install --only=productionWarning:
Do NOT runnpm audit fixornpm audit --forceif npm suggests it after the installation.
Doing so may break Gekko’s dependencies and require a complete reinstall.
Install broker exchange modules:
cd exchange
npm install --only=production
cd ..
Tips:
- Wait for each command to run to completion; errors here typically mean permission issues or Node.js version mismatches.
- If you update Node.js or npm, consider deleting the
node_modulesfolder and re-runningnpm install --only=production.
Step 3: Configure access to Gekko’s Web UI
By default, the Gekko web interface is only accessible from the local machine. To access the UI from another device on your local network, you’ll need to edit some configuration files.
a) Edit web/vue/dist/UIconfig.js
- Open the file in your text editor. Find:
api: {
  host: '127.0.0.1',
  port: 3000,
  timeout: 120000 // 2 minutes
},- Replace with:
api: {
  host: '0.0.0.0',
  port: 3000,
  timeout: 600000 // 10 minutes
},- Next, find:
ui: {
  ssl: false,
  host: 'localhost',
  port: 3000,
  path: '/'
},- Replace with:
ui: {
  ssl: false,
  host: 'x.x.x.x', // replace with the IP address of your Gekko server
  port: 3000,
  path: '/'
},
b) Edit web/vue/public/UIconfig.js
- Find:
api: {
  host: '127.0.0.1',
  port: 3000,
  timeout: 120000 // 2 minutes
},- Replace with:
api: {
  host: '127.0.0.1',
  port: 3000,
  timeout: 600000 // 10 minutes
},
Note: Adjusting the timeout from 2 to 10 minutes is optional, but can help if you experience UI connection drops.
Security Warning:
Gekko’s web UI has no authentication or protection. Expose this interface only on trusted, private (local) networks!
Never forward port 3000 on an internet-facing server, or anyone could access your Gekko.
Once saved, you’ll be able to access the Gekko interface at :http://x.x.x.x:3000
(Replace x.x.x.x with the server’s IP.)
Step 4: Launching and Managing the Gekko Web UI
Start the Gekko UI manually:
node gekko --ui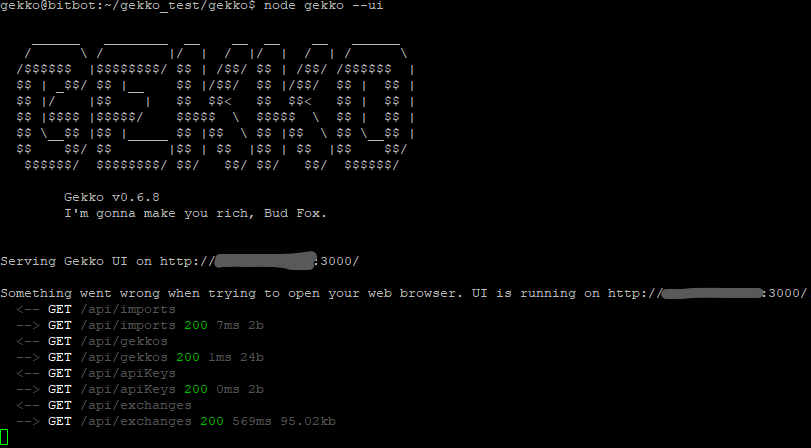
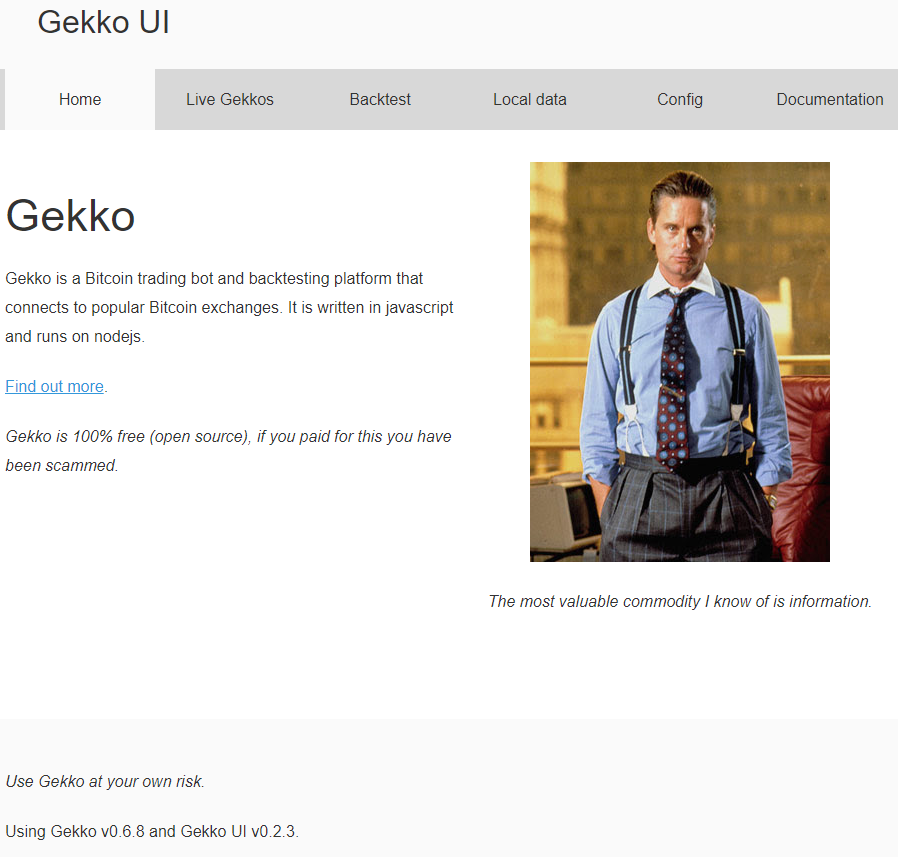
You can now open http://x.x.x.x:3000 in your browser (replace x.x.x.x with your server’s IP).
If the setup was successful, the Gekko web interface should load.
(Optional) Managing Gekko UI with pm2
To run and monitor Gekko in the background—even after logging out or closing your terminal—use pm2.
Example startup script (start_ui.sh):
#!/bin/bash
rm ui_logs/*
pm2 start gekko.js --name gekko_ui --log-date-format="YYYY-MM-DD HH:mm Z" -e ui_logs/ui_err.log -o ui_logs/ui_out.log -- --ui --max_old_space_size=8096- Make the script executable:
chmod 755 start_ui.sh- Use it to launch Gekko UI:
./start_ui.shMonitor and manage with pm2:
- List all pm2 processes and get their names & IDs:
pm2 ls- View process logs:
pm2 log <id>- Stop the UI instance:
pm2 stop gekko_ui
pm2 stop <id>- Remove a stopped process from pm2:
pm2 delete gekko_ui
pm2 delete <id>
Tip:
PM2 offers many more commands—see the official documentation for advanced features.
Optional: Installing Gekko on Windows (Using WSL)
Running Gekko on Windows is easiest (and safest) by using the Windows Subsystem for Linux (WSL). This lets you install a full Debian or Ubuntu environment inside Windows and follow exactly the same steps as for Linux.
1. Install WSL and a Linux distribution
- Follow Microsoft’s official instructions:
2. Open your WSL terminal (Debian/Ubuntu)
You’ll have access to bash and a standard Linux environment.
3. Follow all steps described above
- You can now repeat all the Linux setup instructions: install dependencies, clone the repo, install npm modules, configure, and start the UI.
- Access your browser at
http://localhost:3000(or your Windows local IP) as for Linux.
Note: If you need to access the UI from another device, make sure your firewall settings allow connections on port 3000 in your WSL environment.
Final Steps, Next Moves & Further Resources
Congratulations — your Gekko trading bot is now installed and the web UI is accessible on your local network!
For advanced usages and related automation/trading topics, check out these other resources on this blog:
- Running and tuning trading strategies:
→ Gekko Strategy Customization - Automating backtests and optimization:
→ Automate Gekko Strategy Parameter Backtesting (with Gekkoga) - Cloud deployment & virtualization:
→ How to Create an Amazon EC2 “Small” VM and Automate Gekko’s Deployment
→ Launching Gekkoga on High-End EC2 Spot Machine - Daily Gekko usage and troubleshooting:
→ Gekko Trading Bot Usage
Your comments, feedback, and bug reports are always welcome below:
- Did this guide work for you?
- Were there roadblocks, or would you like a tutorial on another topic?
- Share your tips and results!
Other recommended reads
- Monitoring Electricity Consumption with Jeedom and USB over IP Modem
- Installing and Monitoring an UPS + Local Laptop Battery with Jeedom/Debian
- Quick Tutorial: Installing Debian Raspbian on a Raspberry Pi (Zero)
Happy trading, coding, and automating! Your experience benefits the entire community.
Discover more from SINECU.RE
Subscribe to get the latest posts sent to your email.