This comprehensive guide gathers some effective tips and troubleshooting methods for Philips POS9002 Smart TV owners. It addresses common issues—such as remote control malfunctions, slow menu navigation, or problems appearing after system updates—and provides step-by-step solutions.
You’ll also find advanced techniques for controlling your TV via ADB and Wake-on-LAN. While the instructions are detailed and include screenshots or command-line examples where useful, most steps are accessible to anyone comfortable navigating TV menus.
If you have questions or suggestions for additional tips, feel free to comment below!
Re-pairing the Remote Control
If your remote control stops working correctly—especially if voice commands or the keyboard don’t respond anymore after a firmware update or a battery change—you can simply re-pair it with your TV.
There are two ways to do this:
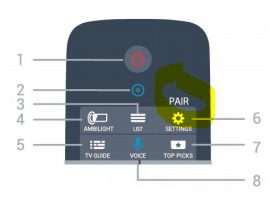
Using the PAIR button - Locate the “PAIR” button at the top right of your remote. - Press and hold for about 3 seconds, until the pairing mode is activated.
Via the TV settings - Go to Settings → Wireless and network → Remote control → Pair remote control - Follow the on-screen instructions.
After either method, a confirmation message will appear when pairing is successful.
After a TV firmware update, there may also be new firmware available for the remote control—however, this update is not always applied automatically.
Keeping your remote firmware up to date may fix unexpected behaviors or unlock new functions.
To manually check and apply any available updates:
Open the TV menu and go to Settings → Wireless and network → Remote control → Update remote control software.
If an update is available, follow the on-screen instructions to install it.
Tips and precautions:
Don’t interrupt the update process or remove the remote batteries during the installation.
If the remote stops responding after the update, try removing and reinserting the batteries.
If you see an error message, check for nearby wireless interference (Bluetooth), make sure the remote is close to your TV, or retry after rebooting the TV.
Reducing Menu Slowness: Limiting Background Processes
If your POS9002 sometimes feels sluggish, especially in menus, you can improve responsiveness by limiting how many processes Android keeps running in the background.
Step-by-step guide:
Open the Settings app (top of the screen or through the “Settings” button on the remote).
Scroll and select Android Settings in the left menu.
Enter the Developer Options menu. If you don’t see this menu, follow the instructions in the ADB section below to unlock developer mode.
Find the setting “Limit background processes” and set it to 1 or 2.
Note: Limiting background processes may help performance, but some features or apps may not behave as expected if they require extensive multitasking.You can increase this limit later if you notice side effects.
Hiding the Philips Apps Tray
If you want a cleaner home screen, you can hide the Philips-branded apps tray (the apps remain installed and accessible, but the tray is no longer displayed).
How to hide the Philips Apps Tray:
Open the Manage Apps menu (at the bottom of your home screen).
Find and select System App, then look for LeanbackCustomiser.
Open it, go to Notifications, and set it to Off.
Return to your home screen—the Philips Apps tray should now be hidden.
Note: This process does not uninstall any apps; it only removes the tray from view.
Advanced: Remote Control via Network and ADB
You can control your POS9002 TV using the Android Debug Bridge (ADB). This enables advanced automation, direct command-line access, or integration with home automation systems.
⚠️ Warning: Misuse of ADB can disrupt your TV’s normal operation. Only proceed if you are comfortable with command-line tools and understand the risks.
Step 1: Enable Android Developer Mode
Open Settings > Android Settings.
Go to the About section (usually at the bottom).
Find ”Build Number“; tap it repeatedly (seven times) until you see a message: “You are now a developer!”.
Step 2: Enable USB Debugging
In Settings > Android Settings, a new entry Developer Options should appear.
Enter Developer Options.
Enable USB Debugging.
Now we’re mostly done on TV side, except one thing: we need to allow the ADB remote device we will use. So we need to install ADB and connect it.
Step 3: Install ADB (on your computer or home automation system)
Download ADB zip file for Linux OR use apt-get if you are running a Debian OR use yum if you are running a Fedora/SUSE
wget https://dl.google.com/android/repository/platform-tools-latest-linux.zip OR
sudo apt-get install adb OR
sudo yum install android-tools
If you just downloaded ADB zip file then Unzip it, it will create a ‘platform-tools’ directory, enter it
unzip platform-tools-latest-linux.zip
cd platform-tools
Step 4: Connect to the TV
A. By USB (recommended for first pairing):
Plug your computer into the TV’s USB port.
Set USB Configuration to MTP (Media Transfer Protocol) if needed (in Developer Options).
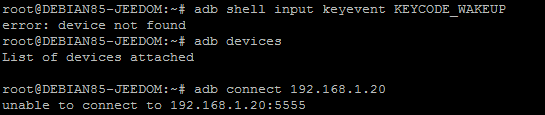
On your computer, start ADB: adb devices
Accept the pairing request on the TV.
Note: You should see on your TV a prompt asking you to allow USB debugging. YES, go ahead: tick the box to always allow it, and validate.
B. Over Ethernet/Wi-Fi:
Find your TV’s IP address through: Settings > Wireless & Networks > Wired/Wi-Fi > Display Network Parameters
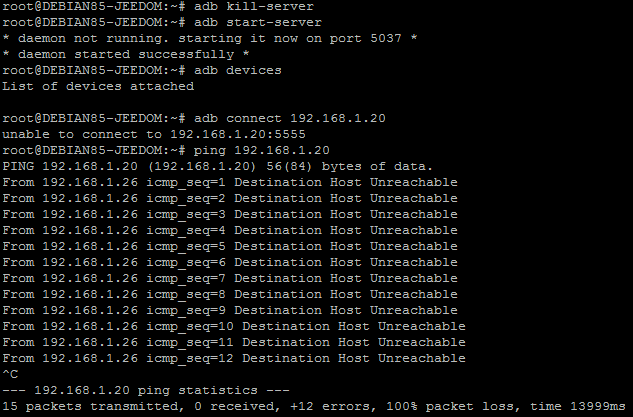
On your computer: adb connect <TV_IP_ADDRESS>
Accept requests on the TV if prompted.
Tip: After reconnecting, run adb devices to confirm your TV appears in the device list with the “attached” status.
💡 Integrating your Philips POS9002 with Jeedom Home Automation
If you use Jeedom, you can automate your Philips POS9002 using custom commands, scenarios, or scripts—by leveraging ADB over your home network.
You can use the Script plugin to interact directly with your ADB installation to reach your TV
The TV Remote plugin also allows you to send key events, launch or close apps, and schedule actions directly from your Jeedom interface.
Common use-cases include: - Triggering “cinema mode” scenes that turn your TV on/off or change input source automatically - Automating source switches when other smart devices (like soundbars or game consoles) are used - Waking up your TV with Wake-on-LAN before sending ADB commands
Tip: You can also monitor your TV status or combine commands in Jeedom scenarios for advanced automation.
For more information on Jeedom automation, see my other Jeedom articles or share your setup in the comments.
Step 5: Controlling Your TV via ADB Keyevents
You can send key events to the TV for automation or advanced control. Example commands:
Switch to HDMI 1: adb shell input keyevent KEYCODE_F6
Return to Home: adb shell input keyevent KEYCODE_HOME
Sometimes, your Philips POS9002 disconnects from the network while in deep sleep mode—especially after several hours or depending on firmware settings. This may prevent remote control (ADB, Jeedom, etc.) unless the TV is first re-awakened.
How to enable and use Wake-on-LAN:
On your TV, open Settings > Wireless & Networks > Wired/Wi-Fi.
Scroll down and enable Wake-up with Wi-Fi (WoWLan).
(If your TV is connected by Ethernet, know that the Wake-on-LAN option may work, but this is dependent on firmware—test and report your findings! I have it working on Ethernet, but it may be different for you.)
Once enabled, you need to send a special “magic packet” to your TV’s MAC address from a device on the same local (physical & IP) network, for example using Python.
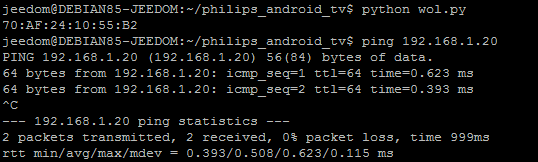
Example Python script (“wol.py”).
#!/usr/bin/env python3
import socket

MAC = '1c:5a:6b:b8:93:c0'        # <-- Replace with your TV's MAC address
BROADCAST_IP = '192.168.1.255'   # <-- Replace with your network's broadcast address (e.g. 10.0.0.255)

def wake_on_lan(mac, broadcast_ip):
    mac_bytes = bytes.fromhex(mac.replace(':', ''))
    magic_packet = b'\xff' * 6 + mac_bytes * 16
    sock = socket.socket(socket.AF_INET, socket.SOCK_DGRAM)
    sock.setsockopt(socket.SOL_SOCKET, socket.SO_BROADCAST, 1)
    sock.sendto(magic_packet, (broadcast_ip, 9))

if __name__ == '__main__':
    wake_on_lan(MAC, BROADCAST_IP)
Key steps:
Replace MAC with your TV’s actual MAC address (find it in the network parameters).
Make sure the broadcast address matches your home subnet (e.g. 192.168.1.255).
Run the script from any device (Windows, Linux, macOS) on the same network.
After running the script, test your TV’s availability with a ping or by retrying ADB connection.
Initial State: Put your TV in sleep/standby mode. Ensure ADB commands like adb devices or adb connect [TV_IP] do not detect the TV (offline).
An attempt to kill & restart ADB is no more successfull.
2. Send the WOL Packet: Run the provided wol.py script from a device on the same local network.
3. Check Network Wake-up:
Open a terminal/command prompt and ping [TV_IP].
The TV should respond to pings again a few seconds after the WOL packet is sent.
4. Reconnect ADB: Once the TV replies, try adb connect [TV_IP]. If successful, you can resume remote control, run scripts, or automate further.
Troubleshooting tips:
If no ping response : double-check that the MAC address and broadcast IP are correct, and that “Wake-up with Wi-Fi (WoWLan)” is enabled in TV settings.
Try both with Ethernet and Wi-Fi connections if supported.
Some routers may block broadcast packets ; test from a directly connected machine if possible.
Wait 5–10 seconds after sending the packet before trying to ping/connect.
Wrapping Up: Make the Most of Your Philips POS9002
With these step-by-step tips, you can troubleshoot most common issues—remote pairing, firmware updates, slowness, and advanced remote control—on your Philips POS9002.
Leveraging features like ADB or Wake-on-LAN enables true “power user” automation—especially when combined with smart home platforms like Jeedom.
If you have feedback, corrections, or new tricks to share, please leave a comment below. Cooperation helps everyone keep our TVs updated and running smoothly!