Once Gekko trading bot is installed, the real work begins—turning it into a powerful tool for live or simulated crypto trading, step by step. This guide shows you exactly how, with practical tips and real-world warnings.
⚠️ No trading bot guarantees profits. This article neither. Your results depend entirely on your strategy logic and your chosen market/currency pair.
Step 1: Feeding Gekko with Market Data
Method 1 : Using the Web UI
Before you can backtest or simulate live strategies, Gekko needs historical market data stored locally.
- Go to the “Local Data” menu.
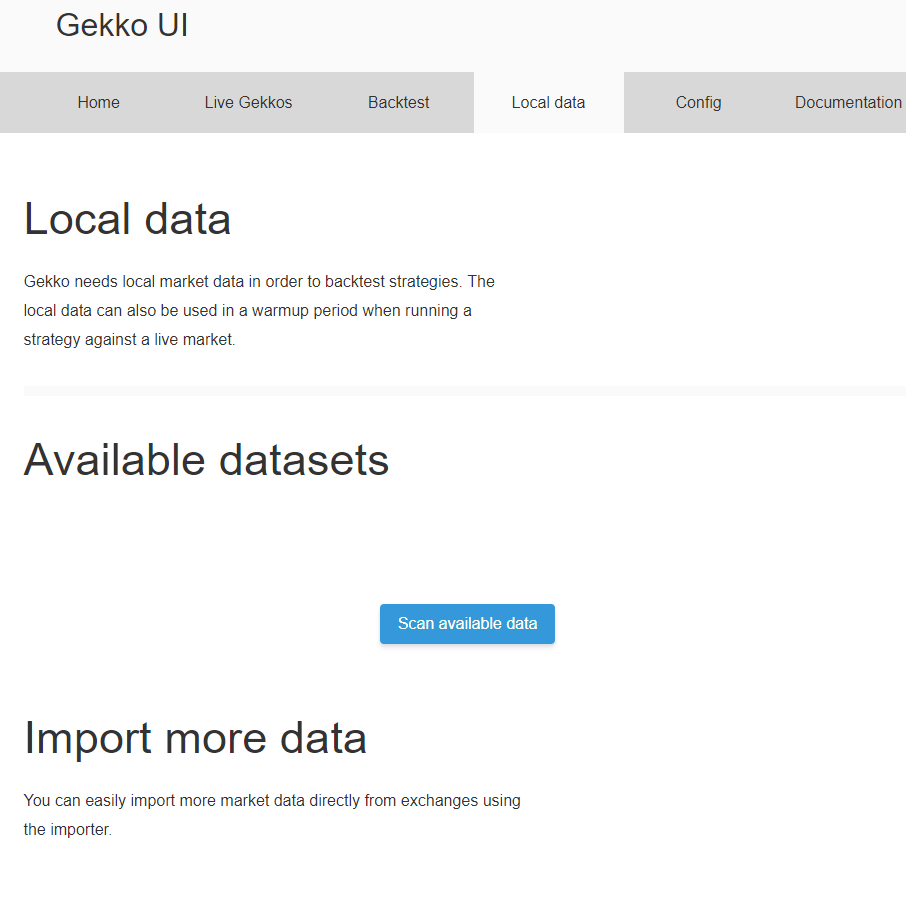
- Click “Scan available data” (ignore the initial message, normal since nothing is imported yet).
- Click “Go to the Importer” at the bottom.

- Select your exchange, currency, and asset (e.g., Kraken, EUR, ETH).
- Choose a date range and click Import.
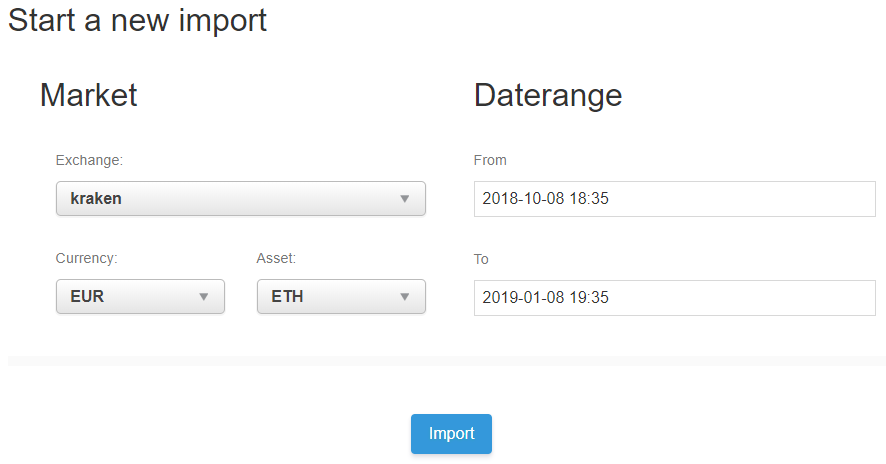
Note: Importing large datasets may be slow, especially with anonymous access—split long periods into chunks if needed, and be prepared to restart if you hit API limits.

Gekko automatically downloads the data from Kraken and records it in its local database.
Method 2 : Using the CLI
- Copy and edit Gekko’s config file:
cd <gekko_installdir>
cp sample-config.js config.js
- Edit config.js with your favorite editor and enable
candleWriterin the config so Gekko can store data:
config.candleWriter = {
   enabled: true
 }
- Set the date range you want to import (note: AAAA-MM-JJ HH:MM:SS format):
config.importer = {
   daterange: {
     // NOTE: these dates are in UTC
     from: "2017-11-01 00:00:00",
     to: "2017-11-20 00:00:00"
   }
 }
- Run the import:
node gekko --config config.js --import

- Confirm the import via the UI or by checking logs for errors:
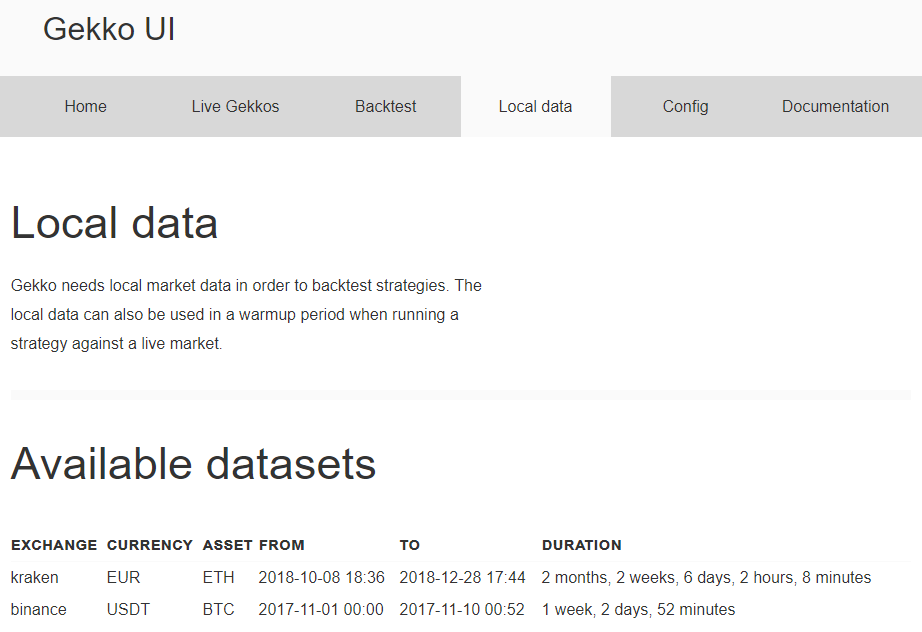
The first dataset above, is the one we imported using the UI and from Kraken. The second one is from binance (I stopped it before it reached 2017-11-20). This is because I didn’t modify the standard config.watch section in config.js and it includes a binance example which you may also want to remove :
config.watch = {

// see https://gekko.wizb.it/docs/introduction/supported_exchanges.html
   exchange: 'binance',
   currency: 'USDT',
   asset: 'BTC',

// You can set your own tickrate (refresh rate).
   // If you don't set it, the defaults are 2 sec for
   // okcoin and 20 sec for all other exchanges.
   // tickrate: 20
 }
This is in this section that you must specify from which market and for which asset you want to import data.
Tips:
- If you encounter errors, check your console logs for details.
- Always use a valid exchange/currency/asset combination. See Gekko’s supported exchanges.
Advanced data import tips
If you need to download massive datasets or from multiple markets, check out community scripts from the official Gekko GitHub “tools” section (or here) for potential batch importers and helpers.
Power users can also automate import jobs (with shell/Python scripts) or split huge date ranges into smaller chunks.
If you’re looking for more flexible importing or want to experiment, you might explore frameworks like Freqtrade or Zenbot, which have their own advanced bulk import tools.
Step 2: Backtesting Strategies with Local Data
Backtesting is the safest way to test if a strategy might work—before risking anything on a live market. This involves testing a strategy by applying it to historical data and analyzing how it performed. But beware: good performance based on historical data is no guarantee of good performance in the future.
Method 1 : Using the Web UI
- Go to the Backtest menu.
- Click Scan available data to see your imported datasets (e.g., Past imports from Kraken or Binance).
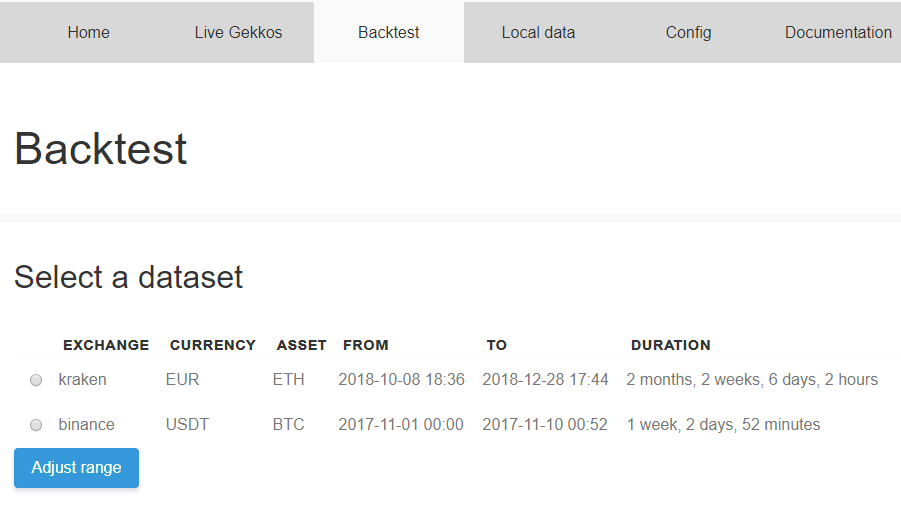
We can once again see the two series of data we imported previously, good.
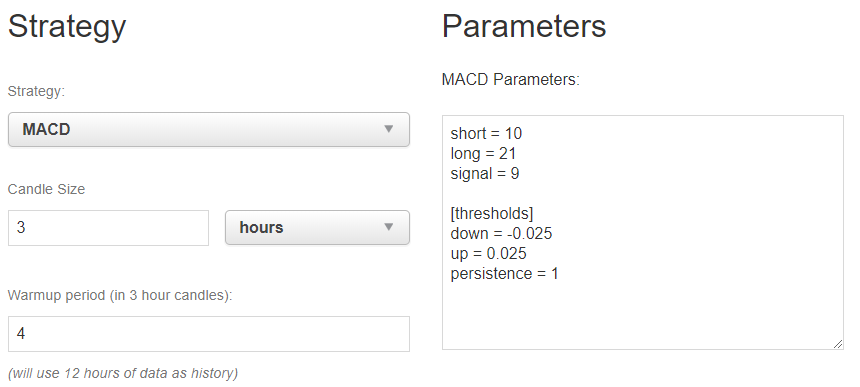
- Choose your dataset and select a strategy, here the
MACD. This is a quite standard indicator (as well as the other ones out-of-the-gekko-box) and the strategy implementing it is also quite simple as we will see in a next article.
Note that what is displayed on this screen can be changed:
- The strategy in the drop-down list are the ones in
<gekko_installdir>/strategies/*.js files (eg. MACD.js for the MACD strategy) - The parameters on the right are from the <strategy_name>.toml files in
<gekko_installdir>/config/strategies - The paperTrader settings we will review below are stored in the
<gekko_installdir>/config/plugins/paperTrader.toml file
- We change the candle size to 3 hours, and use 4 candles of history to “warmup” the strategy (as an engine) and provide the indicator some historical data.
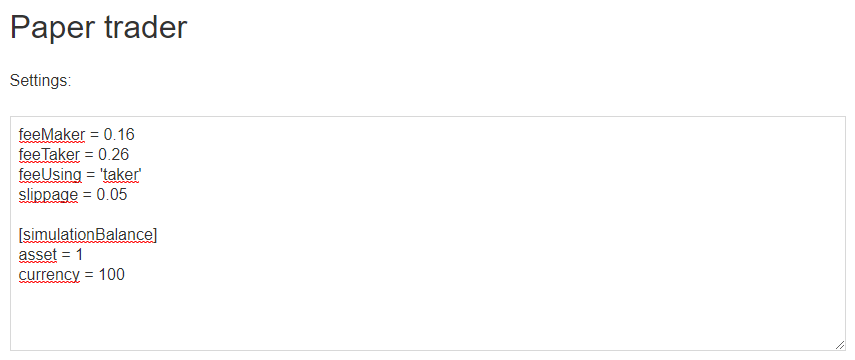
- Adjust paperTrader settings (fees, slippage…) to match your exchange. Note: Although I am not yet certain that slippage works correctly in Gekko, I still recommend significantly increasing this value (here 0.05 = 5% theoretical upward or downward variation when placing a buy or sell order, respectively, to reflect market volatility).
- Select the dataset at the top and click Backtest.

- Analyze results displayed below:
- Overall simulated profit/loss compared to the most basic “buy and hold” strategy
- List of trades, roundtrips (a buy order followed by a sell order), and a trades chart (green=buy, red=sell)
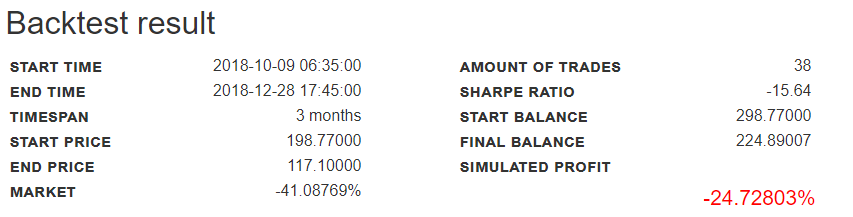
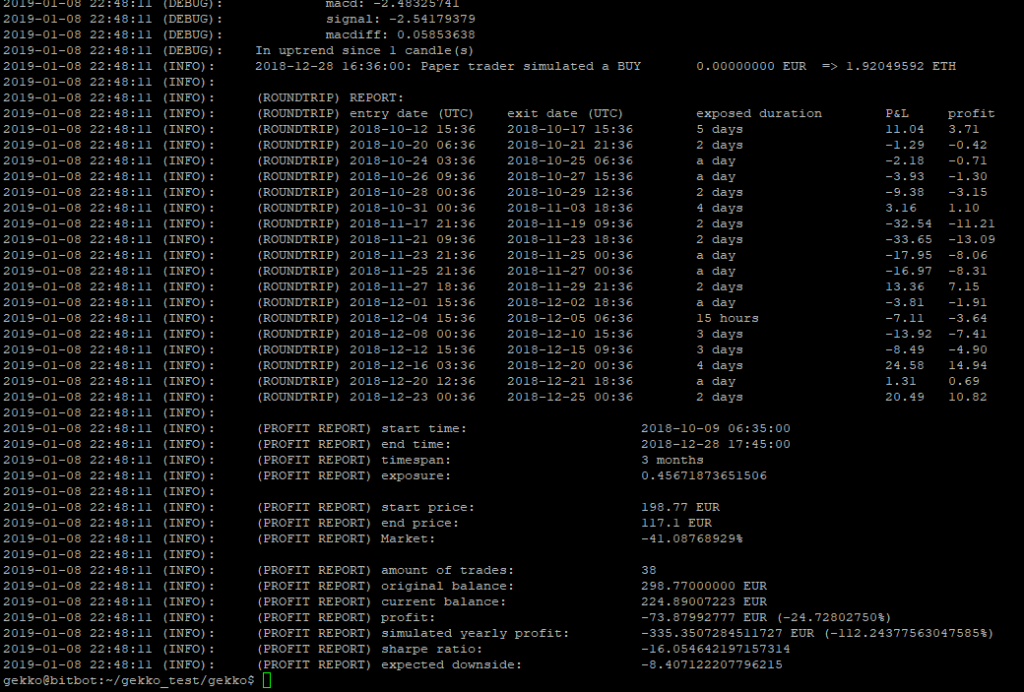
Those are the general statistics. Simulated profit here may sound bad (-24%), but actually it is better than the standard performance of the market (buy and hold) if you did no actions with your 1 asset and 100 currency configured in the paperTrader settings (-41%). We can see here that the strategy actually performed 38 trades.

Here we can see the whole timeframe with BUY/LONG orders (green dots) and SELL/SHORT orders (red dots). You can zoom in on Gekko’s UI. As you might expect, when a green dot appears just before a sharp market decline, it’s not a good sign, BUT this interpretation also depends on the long-term outlook and the size of the candles.
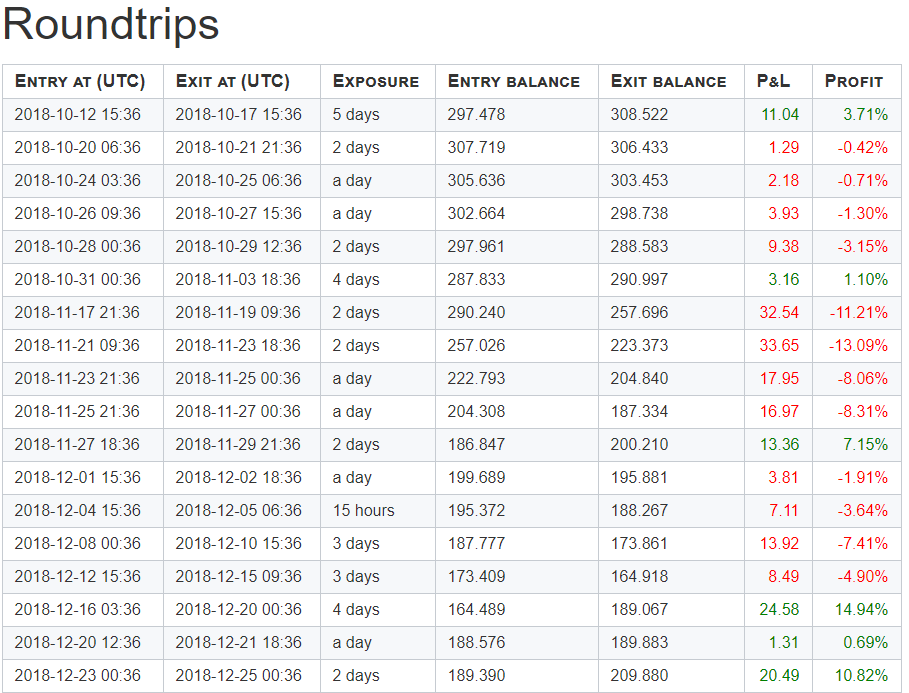
Finally you can see here a detailled view of each round trip (a buy+sell or sell+buy so that a PnL can be calculated).
Method 2 : Using the CLI
Edit your config file (config.js) to tweak it:
- Make sure the config.tradingAdvisor section is configured as expected. Basically, this is where you provide the chosen strategy with the same parameters we saw earlier in the interface. Here, we are still using MACD.
config.tradingAdvisor = {
   enabled: true,
   method: 'MACD',
   candleSize: 180, //unit is minutes
   historySize: 4, //this is the historySize in the UI
 }

// MACD settings:
 config.MACD = {
   // EMA weight (α)
   // the higher the weight, the more smooth (and delayed) the line
   short: 10,
   long: 21,
   signal: 9,
   // the difference between the EMAs (to act as triggers)
   thresholds: {
     down: -0.025,
     up: 0.025,
     // How many candle intervals should a trend persist
     // before we consider it real?
     persistence: 1
   }
 };
- Make sure the paperTrader is enabled, to actually simulate orders.
config.paperTrader = {
   enabled: true,
   // report the profit in the currency or the asset?
   reportInCurrency: true,
   // start balance, on what the current balance is compared with
   simulationBalance: {
     // these are in the unit types configured in the watcher.
     asset: 1,
     currency: 100,
   },
   // how much fee in % does each trade cost?
   feeMaker: 0.16,
   feeTaker: 0.26,
   feeUsing: 'taker',
   // how much slippage/spread should Gekko assume per trade?
   slippage: 0.05,
 }
- And the performanceAnalyser should also be enabled:
config.performanceAnalyzer = {
   enabled: true,
   riskFreeReturn: 5
 }
- Edit the config.watch section to use the dataset from Kraken:
config.watch = {

// see https://gekko.wizb.it/docs/introduction/supported_exchanges.html
   exchange: 'kraken',
   currency: 'EUR',
   asset: 'ETH',

// You can set your own tickrate (refresh rate).
   // If you don't set it, the defaults are 2 sec for
   // okcoin and 20 sec for all other exchanges.
   // tickrate: 20
 }
- Finally, edit the timerange to be used. The ‘scan’ option will make Gekko use the whole timeframe available in the dataset. If you want to reduce the timeframe, you just have to comment out the daterange: ‘scan’ line, and uncomment and modify the 4 next lines.
config.backtest = {
   daterange: 'scan',
   // daterange: {
   //   from: "2018-03-01",
   //   to: "2018-04-28"
   //},
   batchSize: 50
 }
Launch the backtest:
node gekko --config config.js --backtest
See the results in your terminal or logs.
Further reading:
- See my guide Gekko Strategy Customization for advice on developing and tweaking strategies.
- Gekko official strategy docs
Step 3: Simulating Your Strategy on a Live Market (“Paper Trading”)
Paper trading lets you test your strategy in real-time market conditions—without risking real money. This is the intermediate method before launching your bot “in real life”: you test a strategy on a copy of the real market, placing orders only on the copy of the market, to see what would have become of your initial investment. This is essential for validating your strategy before going into production.
Method 1 : Using the Web UI
- On the UI, click on the “Live Gekkos” top menu.
- The “Market watchers” are modules already launched & running to gather and record live data from the markets you will configure for each Live Gekko.
- The “strat runners” are the running paperTraders modules: they analyze the market and use the STRATegy you defined on those data, to provide you feedback about what orders were simulated, and their results.
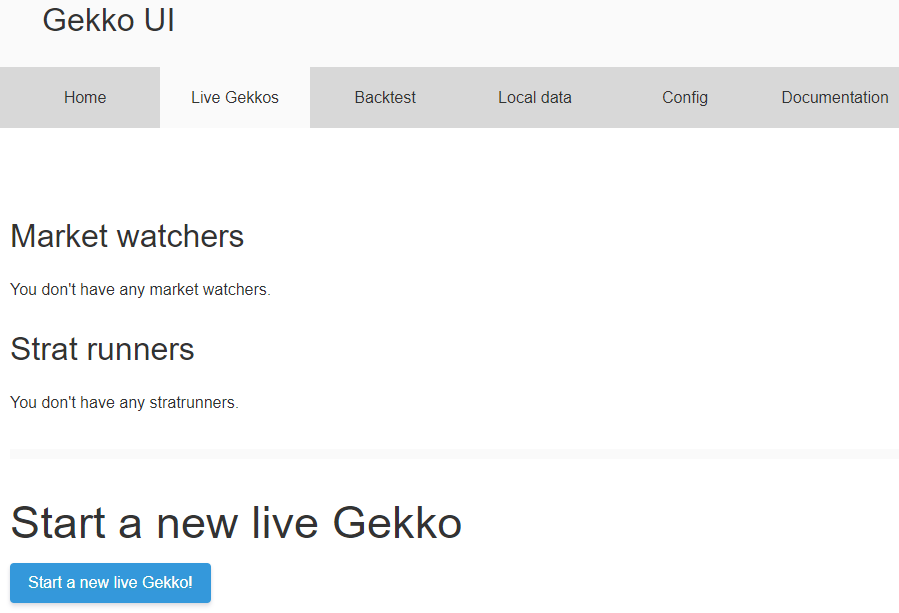
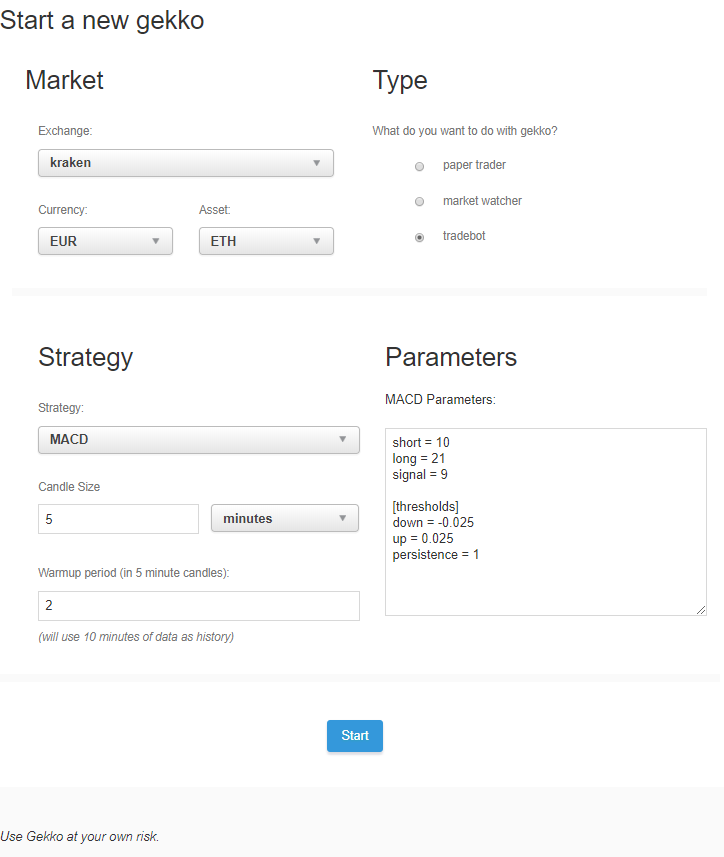
- Click “Start a new live Gekko!” blue button,
- Configure the market you want to use,
- Make sure to choose “Paper Trader” on the right (not TradeBot !) to simulate trades,
- Choosed the strategy you want, and configure the candles sizes, warmup period,
- For the strategy you choosed, edit its parameters.
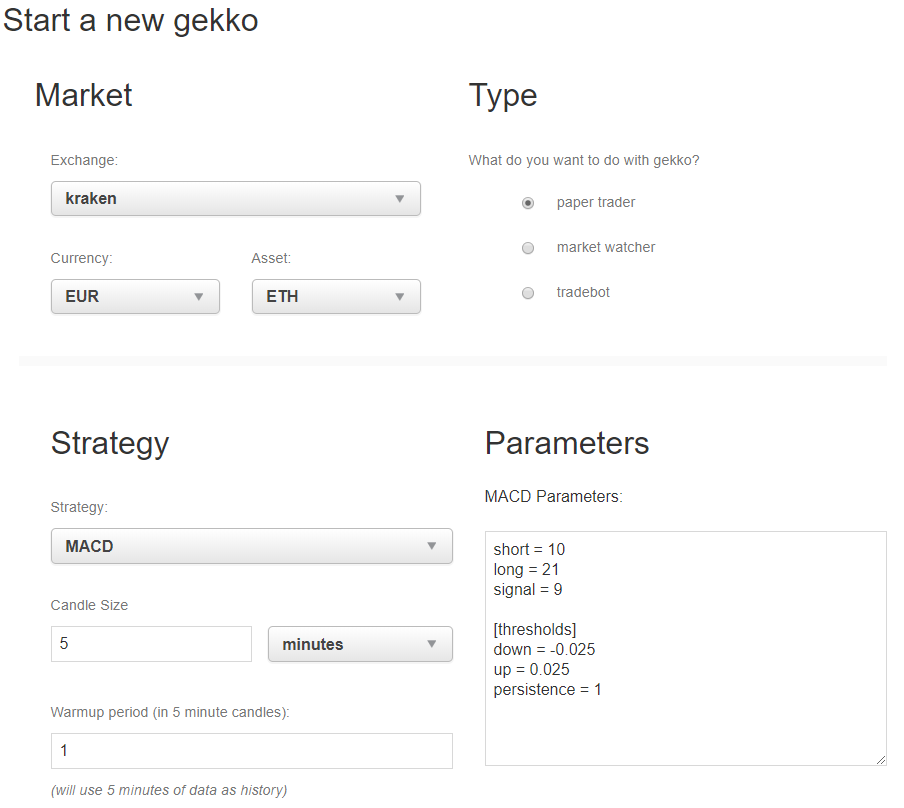
- Configure Kraken’s fees on the paper Trader options below, and slippage.
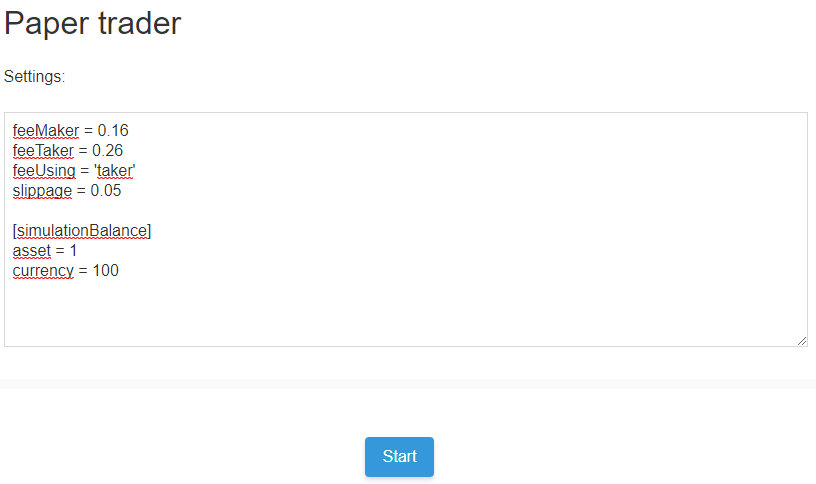
- Start the paper trading bot.
You’ll see data building up (give it time for warmup, depending how you configured it).
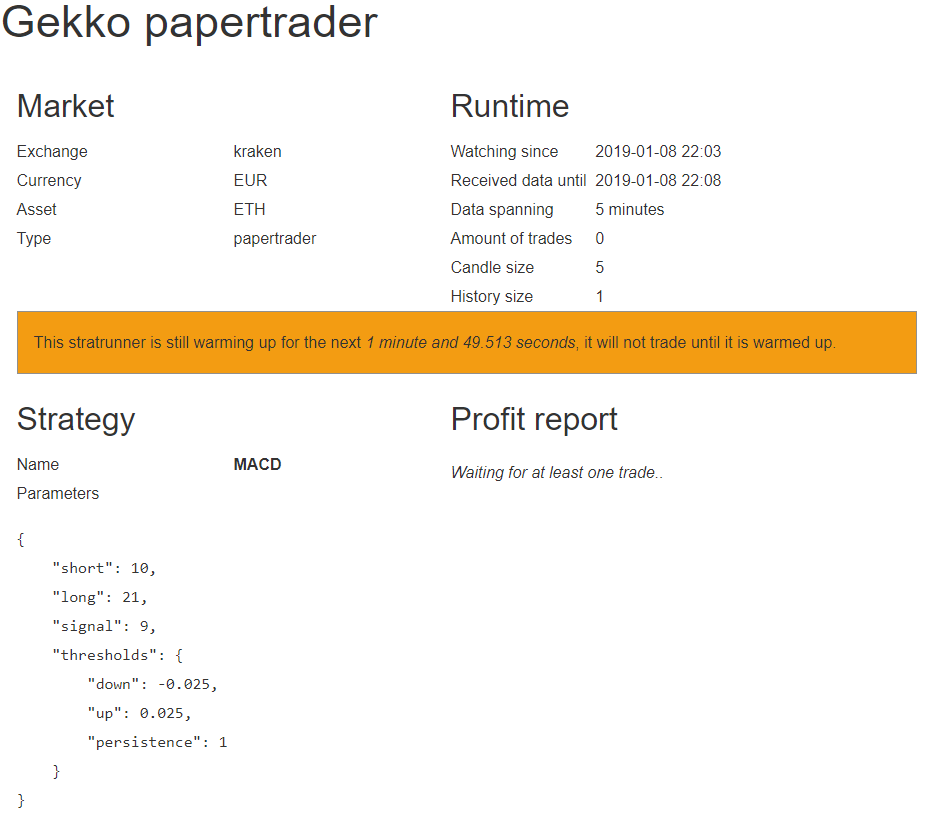
- Come back on the “Live Gekkos” page, while it’s warming up.
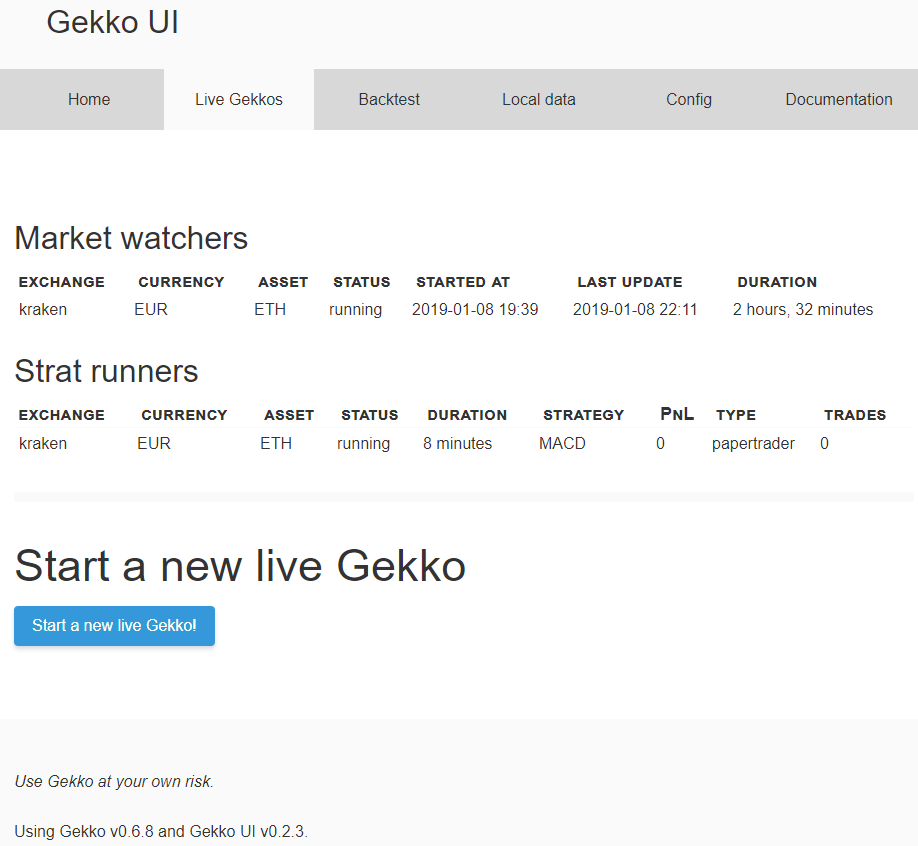
Here I think we can see a little bug in the UI, as it says the duration since we launched the Market Watcher (which was automatically launched by Gekko) is 2h32mn which is wrong. I think there is a mismatch between UTC times and local time to calculate the duration. Not a big issue.
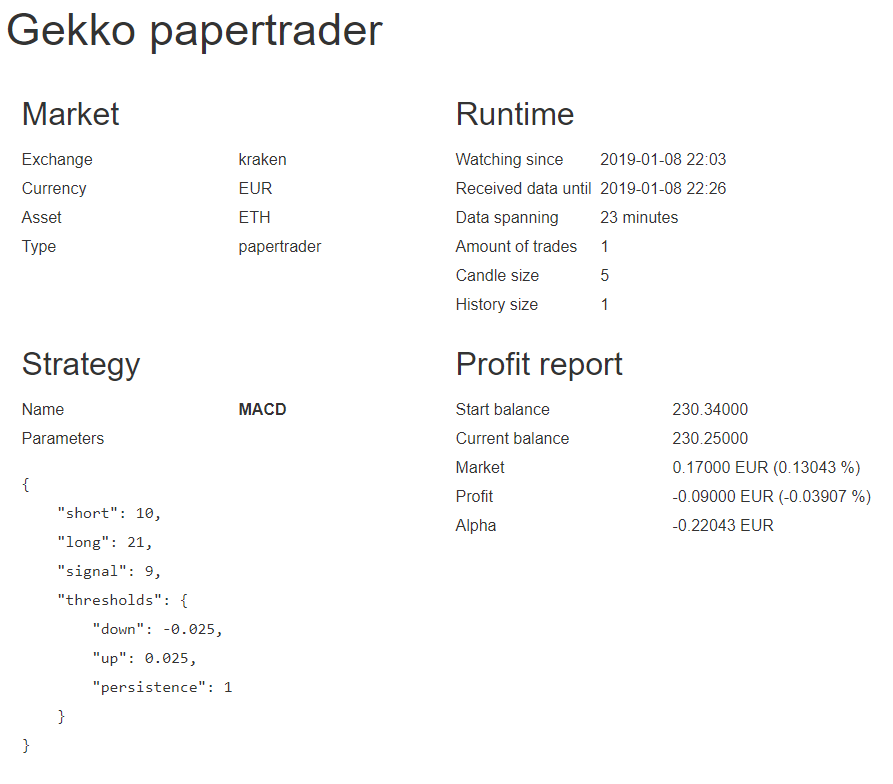
- Monitor in real time: ithe UI shows simulated buys/sells, PnL (profit and loss), trade count, runtime.
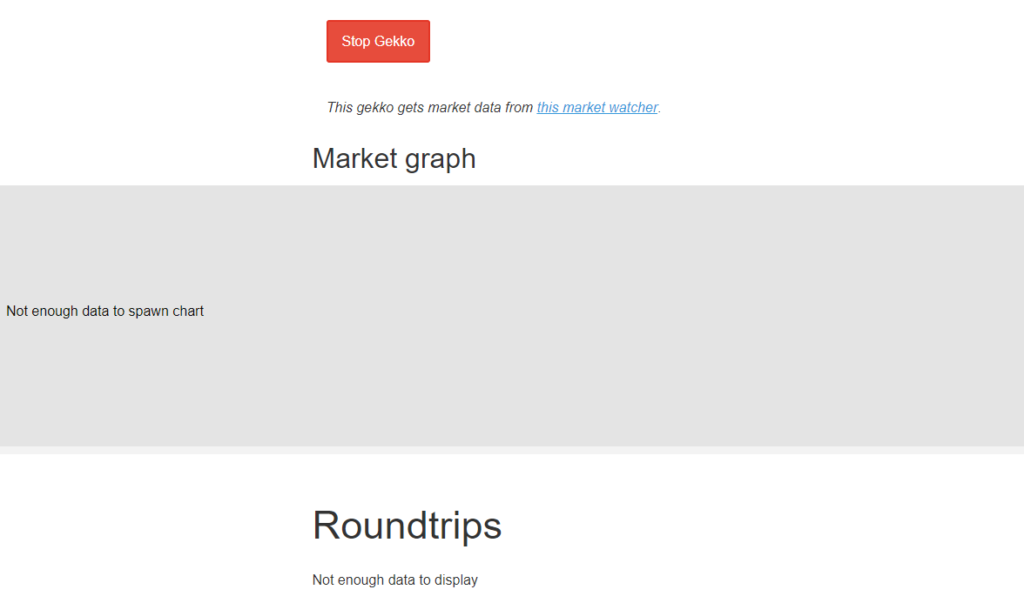
You can click on each running bot for details, logs, and visualizations. After a few minutes …
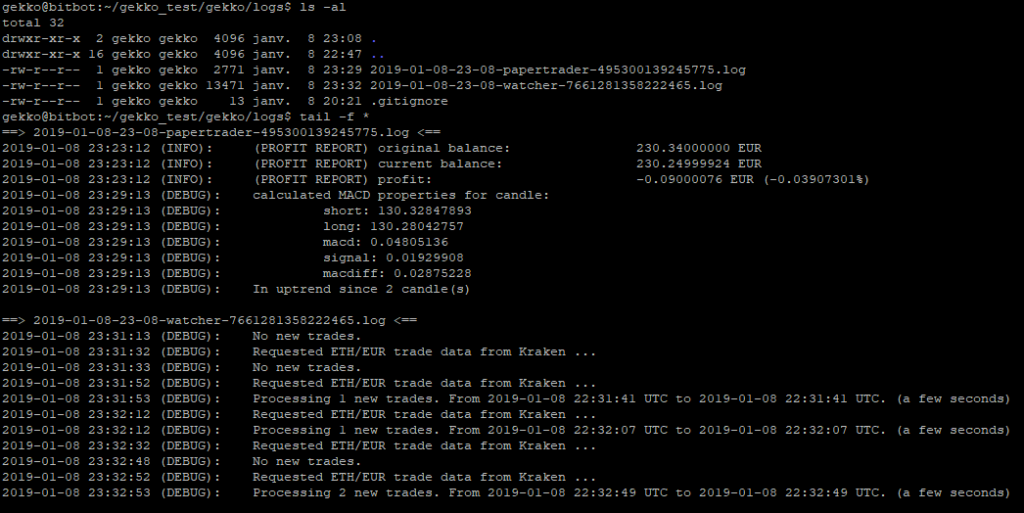
- You can also manually check Gekko’s logs on the filesystem:
cd <gecko_installdir>/logs
ls -al
tail -f *
Now, I will stop this test (just click on the big red button inside the Strat runner section), and switch to the CLI to launch it manually, as I prefer to not depend on a UI to perform operations.
Method 2 : Using the CLI
- With a proper
config.js(see previous step), launch in paper trading mode:- Keep
config.paperTrader.enabled = true
- Keep
node gekko --config config.js
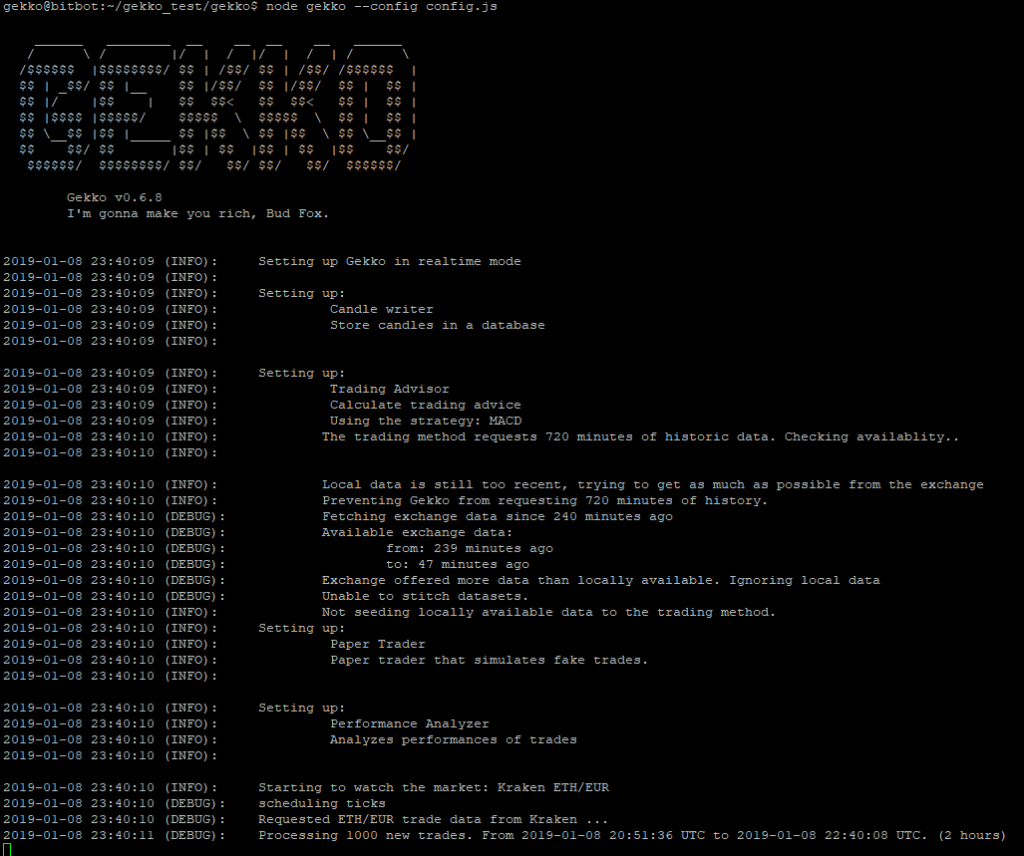
- Prefer to have this run in the background using pm2 for reliability:
As running a livebot is supposed to be a long activity, I don’t want to depend on my terminal (which could be unfortunately closed) and want it to run in the background and use pm2. I’ll still be able to check and analyze the logs to understand what is happening.
rm logs/*
pm2 start gekko.js --name TESTBOT_MACD -e logs/err.log -o logs/out.log -- --config config.js- Logs can be monitored. Two methods:
pm2 logs TESTBOT_MACD
tail -f logs/*
Step 4: Going Live – Real Trading with Gekko
After thorough backtesting and paper trading, you can enable real trades on your exchange. This step involves real money—remember the previous warnings and be prepared to potentially lose all or part of your initial investment.
Method 1 : Using the Web UI
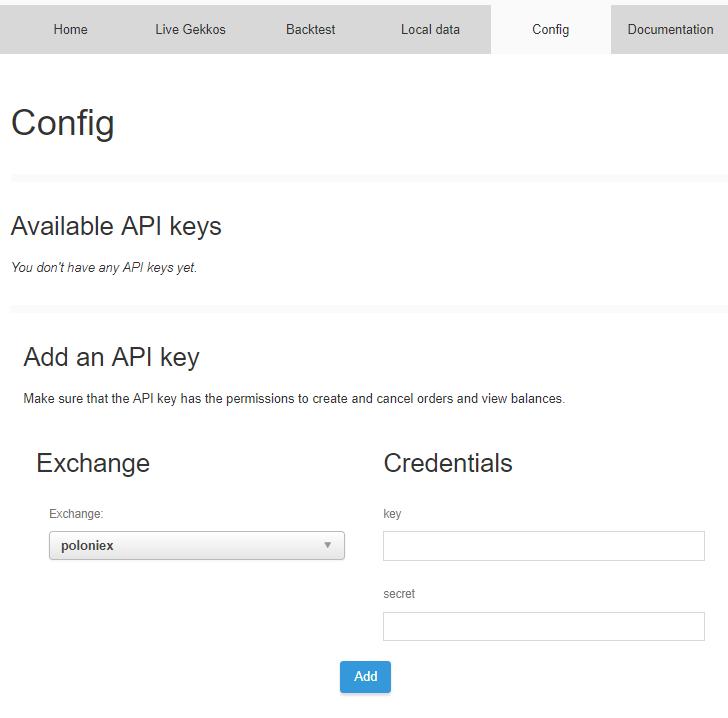
- Configure an API key to access a real Kraken account (or any other exchange you would use).
- Go to “Live Gekkos”, start a new bot, and this time choose Tradebot (instead of Paper Trader).
Please remember & understand that even with good backtesting results, those results will only be guaranteed good on PAST data, not NEW data from live markets. Therefore, even with a very good strategy on past data, you could have a very bad strategy with new data (this is called overfitting).
- Click on the “Start” blue button.
- Gekko will pull your real balances and positions for the chosen account.
- As soon as your bot is running, it may trigger actual buy/sell orders—be 100% sure your config is correct!
Important:
- Never use stock strategies directly for live trading. Even strong backtest results are no guarantee of future performance (market conditions change, overfitting risk, etc.).
- Start with minimal funds for your first live runs.
Method 2 : Using the CLI
- Disable paper trading and enable the live trader with your correct API key & associated secret:
config.paperTrader = { enabled: false };
config.trader = {
  enabled: true,
  key:      'YOUR_API_KEY',
  secret:   'YOUR_SECRET',
  username: '', // Only if your exchange uses it (e.g., GDAX)
  passphrase: '' // For exchanges like Coinbase Pro
};
- Run Gekko in standard mode:
node gekko --config config.js
Or use pm2 (strongly recommended for reliability).
- Monitor logs closely and be ready to intervene or stop at any sign of anomaly.
Conclusion & Final Reminders
You’ve now mastered the full Gekko workflow—from initial data import, through rigorous backtesting, to safe paper trading and finally live deployment. Each step helps you validate, trust, and tune your strategies before risking real funds.
Security and Risk Reminders
- Always protect your API keys and never share them—use IP whitelisting or exchange security tools wherever possible.
- Never use default/untested strategies for live trading; backtest and paper trade repeatedly under real market conditions.
- Remember, even robust results on past data don’t guarantee future profits (beware of overfitting).
- Monitor your live bot closely and be ready to pause or intervene at the first sign of trouble.
Best Practices Before Going Live
- Start with small amounts—treat your first live runs as test drives.
- Use your exchange’s sandbox/testnet environment if available.
- Backup your config files, logs, and historical datasets (just a
tarorrsyncof your gekko folders). - Think about monitoring solutions (e.g. dedicated dashboards, log alerts, server monitoring scripts)—see my other automation articles for inspiration.
Ready for More?
Want to go further? Explore these :
- Gekko Strategy Customization – write and finetune your own trading logic.
- Automate Gekko’s Strats Parameters Backtesting (with Gekkoga) – optimize for all market conditions.
Your experience matters to the community—share your config, results, bugs, or suggestions in the comments! The more we test and report, the better Gekko and open source tools get for everyone.
Discover more from SINECU.RE
Subscribe to get the latest posts sent to your email.