In this tutorial, I’ll show you how to set up an automated outdoor watering system using the Jeedom home automation platform. With just a few components, you’ll be able to remotely control a water valve for a drip irrigation system, making your garden care much more convenient.
The solution uses a soil moisture sensor (communicating with Jeedom over Bluetooth) and a water valve operated via a ZWave relay. By combining Jeedom scenarios that check soil moisture and weather forecast data, the system will automatically open the valve when watering is needed, then close it after a set time.
This article covers the basics with a simple single-pot setup, but the same principles apply if you want to scale up for larger installations.
This will serve as the base for a more complex system that I’ll detail in a future guide. In my home setup, I use actually one main Jeedom box in my apartment, 4 Jeedom “bluetooth antennas” (repeaters) on my East terrace, 4 other antennas on my West terrace, so that I’m able to pilot 8 separate dripping systems depending on the moisture levels detected by 8 moisture sensors.
First we’ll check what hardware we need. Then, for this tutorial, I’ll start by deploying a fresh Raspbian image on a spare Raspberry Pi3 (I first tried with a Pi Zero W but had troubles with the ZWave stick not being fully USB compatible with the Zero), install Jeedom, and install the excellent BLEA plugin we will need. Next, I’ll demonstrate the configuration and scenarios from my main Jeedom install, showing how I automate the watering system.
One last thing in this introduction: the Jeedom screenshots at the beginning of the article are in French … Sorry for that, I changed the UI language later in this tutorial. Anyway Jeedom is fully functional in English and other languages.
The hardware
First a quick overview of the “indoor” stuff needed. The Jeedom box gluing everything together will, for this first setup, use a USB bluetooth adaptor and if needed a high gain antenna. My regular Jeedom installation is running on an Intel NUC with vSphere, it has embedded bluetooth but I wanted to be able to extend the effective range, and plug an external antenna, so I bought an UD100 “long range” external adaptor made by Sena. The external antenna is a 12dBi one for 2,4Ghz frequency, omnidirectional.


Yes, on the picture above this is a Raspberry Pi Zero, not the Pi3 used for this article. We will also need an Aeotec Gen5 ZWave stick to pilot remote ZWave modules through the ZWave protocol. The whole “controller” setup is as follow (with the Pi3 now :)):

The tricky part is the outdoor drip irrigation setup itself—don’t worry, it’s actually quite simple. Start with this basic configuration before moving on to more advanced setups (such as multi-zone watering with multiple Bluetooth antennas).

So the main components, except the regular outdoor watering components (hose, adapters) & Gardena’s micro dripping stuff are:
- A Fibaro FGS-222 ZWave dual relay module, controlled by Jeedom, switches the 24V delivered by a 220-24V power supply to the valves (using “dry-contact” mode). Since it’s a dual relay, you can control two water valves independently; with a single relay module, the instructions remain the same except for the wiring.
- A water valve, I choosed the Hunter PGV-100mmB 24v (AC)
- A 220v to 24v (AC) power supply; of course depending on where you are from, maybe you will need a 110v to 24v power supply. Double check if the water valve you order is AC or DC and if your power supply is aligned on that !
- A Xiaomi MiFlora (or compatible) Bluetooth flower care sensor, used to detect soil moisture.
Setting up the Jeedom Controller
I’ll simply deploy a new Raspbian image on the Raspberry Pi3. I wrote a small tutorial about this, and i’ll start here from the end of the tutorial.
Once Raspbian is installed, i’ll check if the embedded bluetooth interface is detected. As seen here, we should also add the pi user to the bluetooth group so that he can access Bluetooth services over DBus.
root@raspberrypi:~# adduser pi bluetooth
Ajout de l'utilisateur « pi » au groupe « bluetooth »...
Adding user pi to group bluetooth
Fait.
root@raspberrypi:~# hciconfig
hci0: Type: Primary Bus: UART
BD Address: B8:27:EB:D3:D3:B8 ACL MTU: 1021:8 SCO MTU: 64:1
UP RUNNING
RX bytes:731 acl:0 sco:0 events:44 errors:0
TX bytes:1755 acl:0 sco:0 commands:44 errors:0And check if the bluetooth service is launched.
root@raspberrypi:~# systemctl status bluetooth
● bluetooth.target - Bluetooth
   Loaded: loaded (/lib/systemd/system/bluetooth.target; static; vendor preset: enabled)
   Active: active since Mon 2020-04-27 20:17:22 CEST; 4 days ago
     Docs: man:systemd.special(7)
Warning: Journal has been rotated since unit was started. Log output is incomplete or unavailable.
● bluetooth.service - Bluetooth service
   Loaded: loaded (/lib/systemd/system/bluetooth.service; enabled; vendor preset: enabled)
   Active: active (running) since Mon 2020-04-27 20:17:22 CEST; 4 days ago
     Docs: man:bluetoothd(8)
 Main PID: 334 (bluetoothd)
   Status: Running
   Memory: 852.0K
   CGroup: /system.slice/bluetooth.service
           └─334 /usr/lib/bluetooth/bluetoothd
Warning: Journal has been rotated since unit was started. Log output is incomplete or unavailable.
Perfect. We will try later to use the external adaptor I bought, but it should not be a problem. For information and to be used as a memo for me, you will find here and here some documentation if you want to play with bluetooth on your raspberry, by using the bluetoothctl utility.
root@raspberrypi:~# bluetoothctl
Agent registered

[bluetooth]# list
Controller B8:27:EB:A3:43:77 raspberrypi [default]

[bluetooth]# show
Controller B8:27:EB:A3:43:77 (public)
        Name: raspberrypi
        Alias: raspberrypi
        Class: 0x00000000
        Powered: yes
        Discoverable: no
        Pairable: yes
        UUID: Generic Attribute Profile (00001801-0000-1000-8000-00805f9b34fb)
        UUID: A/V Remote Control        (0000110e-0000-1000-8000-00805f9b34fb)
        UUID: PnP Information           (00001200-0000-1000-8000-00805f9b34fb)
        UUID: A/V Remote Control Target (0000110c-0000-1000-8000-00805f9b34fb)
        UUID: Generic Access Profile    (00001800-0000-1000-8000-00805f9b34fb)
        Modalias: usb:v1D6Bp0246d0532
        Discovering: no
[bluetooth]# agent on
Agent is already registered
[bluetooth]# scan on
Discovery started
[CHG] Controller B8:27:EB:A3:43:77 Discovering: yes
[NEW] Device 75:A1:60:B0:33:BC 75-A1-60-B0-33-BC
[NEW] Device 40:CB:C0:E0:72:88 40-CB-C0-E0-72-88
[NEW] Device C4:7C:8D:62:8D:7C C4-7C-8D-62-8D-7C
[NEW] Device C4:7C:8D:62:88:2A C4-7C-8D-62-88-2A
[NEW] Device C4:7C:8D:62:8D:65 C4-7C-8D-62-8D-65
[NEW] Device C4:7C:8D:62:8D:DC C4-7C-8D-62-8D-DC
[NEW] Device C4:7C:8D:62:87:E6 C4-7C-8D-62-87-E6
[NEW] Device C8:0F:10:A4:B6:45 MI_SCALE
[CHG] Device C4:7C:8D:62:8D:DC Name: Flower care
[CHG] Device C4:7C:8D:62:8D:DC Alias: Flower care
[NEW] Device C4:7C:8D:64:44:E8 C4-7C-8D-64-44-E8
[NEW] Device 7C:71:8C:D4:D5:61 7C-71-8C-D4-D5-61
[NEW] Device 3F:D8:34:CE:3F:B1 3F-D8-34-CE-3F-B1
[CHG] Device C4:7C:8D:62:87:E6 Name: Flower care
[CHG] Device C4:7C:8D:62:87:E6 Alias: Flower care
[CHG] Device C4:7C:8D:62:8D:65 Name: Flower care
[CHG] Device C4:7C:8D:62:8D:65 Alias: Flower care
[NEW] Device C4:7C:8D:62:84:E2 C4-7C-8D-62-84-E2
[CHG] Device C4:7C:8D:64:44:E8 RSSI: -99
[CHG] Device C4:7C:8D:64:44:E8 Name: Flower care
[CHG] Device C4:7C:8D:64:44:E8 Alias: Flower care
[bluetooth]# scan offnDiscovery stopped
[bluetooth]# exit
root@raspberrypi:~#
Now i’ll plug the Aeotec ZWave dongle on the raspberry, and check if it is detected by Raspbian. First we need to make sure the cdc-adm kernel module is well loaded (Aeotec says this is required) and this part depends on the Debian version you installed … To make sure it is loaded we will ask Raspbian to load it at boot by adding it in /etc/modules.
root@raspberrypi:~# joe /etc/modules#
# This file contains the names of kernel modules that should be loaded
# at boot time, one per line. Lines beginning with # are ignored.
cdc-acmI reboot. Then, I’ll just monitor a few system log files and check on which device it will be mounted by the OS as we will need it later in Jeedom.
pi@raspberrypi:~ $ sudo su -

root@raspberrypi:~# tail -f /var/log/messages
May  2 09:37:02 Pi3-test kernel: [   11.835249] Bluetooth: HCI socket layer initialized
May  2 09:37:02 Pi3-test kernel: [   11.835263] Bluetooth: L2CAP socket layer initialized
May  2 09:37:02 Pi3-test kernel: [   11.835304] Bluetooth: SCO socket layer initialized
May  2 09:37:02 Pi3-test kernel: [   11.852229] Bluetooth: HCI UART driver ver 2.3
May  2 09:37:02 Pi3-test kernel: [   11.852245] Bluetooth: HCI UART protocol H4 registered
May  2 09:37:02 Pi3-test kernel: [   11.852332] Bluetooth: HCI UART protocol Three-wire (H5) registered
May  2 09:37:02 Pi3-test kernel: [   11.852552] Bluetooth: HCI UART protocol Broadcom registered
May  2 09:37:02 Pi3-test kernel: [   12.100250] Bluetooth: BNEP (Ethernet Emulation) ver 1.3
May  2 09:37:02 Pi3-test kernel: [   12.100259] Bluetooth: BNEP filters: protocol multicast
May  2 09:37:02 Pi3-test kernel: [   12.100274] Bluetooth: BNEP socket layer initialized
May  2 09:40:22 Pi3-test kernel: [  110.185265] usb 1-1.5: new full-speed USB device number 4 using dwc_otg
May  2 09:40:22 Pi3-test kernel: [  110.318535] usb 1-1.5: New USB device found, idVendor=0658, idProduct=0200, bcdDevice= 0.00
May  2 09:40:22 Pi3-test kernel: [  110.318550] usb 1-1.5: New USB device strings: Mfr=0, Product=0, SerialNumber=0
May  2 09:40:22 Pi3-test kernel: [  110.328039] cdc_acm 1-1.5:1.0: ttyACM0: USB ACM device
May  2 09:40:22 Pi3-test mtp-probe: checking bus 1, device 4: /sys/devices/platform/soc/3f980000.usb/usb1/1-1/1-1.5
May  2 09:40:22 Pi3-test mtp-probe: bus: 1, device: 4 was not an MTP device
May  2 09:40:22 Pi3-test mtp-probe: checking bus 1, device 4: /sys/devices/platform/soc/3f980000.usb/usb1/1-1/1-1.5
May  2 09:40:22 Pi3-test mtp-probe: bus: 1, device: 4 was not an MTP device
Lines 14 to 21 above are logged when I plug the ZWave dongle, it seems good as the system detects it and seems to mount it.
Next i’ll plug my external bluetooth dongle.
May  2 09:42:25 Pi3-test kernel: [  233.426617] usb 1-1.2: new full-speed USB device number 5 using dwc_otg
May  2 09:42:25 Pi3-test kernel: [  233.566301] usb 1-1.2: New USB device found, idVendor=0a12, idProduct=0001, bcdDevice=82.41
May  2 09:42:25 Pi3-test kernel: [  233.566315] usb 1-1.2: New USB device strings: Mfr=0, Product=0, SerialNumber=0
May  2 09:42:26 Pi3-test kernel: [  233.620575] usbcore: registered new interface driver btusb
May  2 09:42:32 Pi3-test kernel: [  239.836725] Voltage normalised (0x00000000)
Same result, it seems to be detected and mounted. Let’s check it:
root@Pi3-test:~# lsusb
Bus 001 Device 004: ID 0658:0200 Sigma Designs, Inc. Aeotec Z-Stick Gen5 (ZW090) - UZB
Bus 001 Device 005: ID 0a12:0001 Cambridge Silicon Radio, Ltd Bluetooth Dongle (HCI mode)
Bus 001 Device 003: ID 0424:ec00 Standard Microsystems Corp. SMSC9512/9514 Fast Ethernet Adapter
Bus 001 Device 002: ID 0424:9514 Standard Microsystems Corp. SMC9514 Hub
Bus 001 Device 001: ID 1d6b:0002 Linux Foundation 2.0 root hub
Everything seems good, the Sigma Designs is the Aeotec ZWave dongle, and the Cambridge Silicon Radio is the Bluetooth dongle. This is now our functional hardware setup:

Now I install Jeedom. Here I’ll reuse some parts of the tutorial I wrote about restoring Jeedom from an old Debian 8.5 Virtual Machine to a new Debian 10.3 VM.
root@raspberrypi:~# wget https://raw.githubusercontent.com/jeedom/core/master/install/install.sh
root@raspberrypi:~# chmod +x install.sh
root@raspberrypi:~# ./install.sh
It will take a long time on a Raspberry. It should finish with those lines. Of course, backup somewhere the mysql root password it displays, it may be useful.
==================================================
|         TOUTES LES VERIFICATIONS SONT FAITES    |
==================================================
étape 11 vérification de jeedom réussie
/! IMPORTANT /! Le mot de passe root MySQL est XXXXXXXXXXXXXX
Installation finie. Un redémarrage devrait être effectué

root@raspberrypi:~# /sbin/reboot
Jeedom configuration
First connection
We connect to Jeedom’s UI (either you know its IP by your router/dhcp server, or by using /sbin/ifconfig after installing the nettools package). The default login/pass with a fresh Jeedom installation is admin/admin.

We are asked to change the admin password.

We need to configure our market login/pass so that we will be able to download plugins. Beware if you are already using the free Jeedom version, you are allowed to only run 2 Jeedom instances at the same time, on the same market account. If Jeedom tells you you have too much instances connected, then you will need to disable one through Jeedom’s web site / market link. It’s very easy to re-declare it after.

First object creation
Jeedom is operational, but is all empty as I did not create yet any “container” (or Object) in which to assign some components to be displayed. Let’s just create a “home” one. On my production Jeedom system, I defined one container per room and terrace. You can organize them in a hierarchical structure.


Plugins installation
Now we need to install some plugins through Jeedom’s marketplace:
- Red below:
- ZWave plugin: to handle the ZWave communication protocol (to interact with the modules which will open/close the water valve),
- Bluetooth Advertisement (also called BLEA) plugin: to handle the bluetooth communication (with moisture sensor),
- Weather plugin: to check if it’s raining before we check the moisture level,
- Orange below:
- Agenda plugin: you can also use this to deploy a much simpler watering system based solely on a schedule (or even simpler with a recurring scenario programmed in Jeedom). Neither of these options takes soil moisture into account.


Bluetooth Advertisement (BLEA) Plugin configuration
From the Market page, we install the BLEA plugin, this is very simple.

When the plugin will be installed, Jeedom will ask if you want to switch on the configuration page, say yes.

Now we need to activate it, and I’ll also check the checkbox to display its mobile view on the panel. Click Save, then refresh the page. You should see the same view but augmented with a few fields, about the plugin configuration. If not, refresh again the page (F5) or use the “Plugins” menu on the top, then “Manage Plugins”, and then your BLEA plugin.
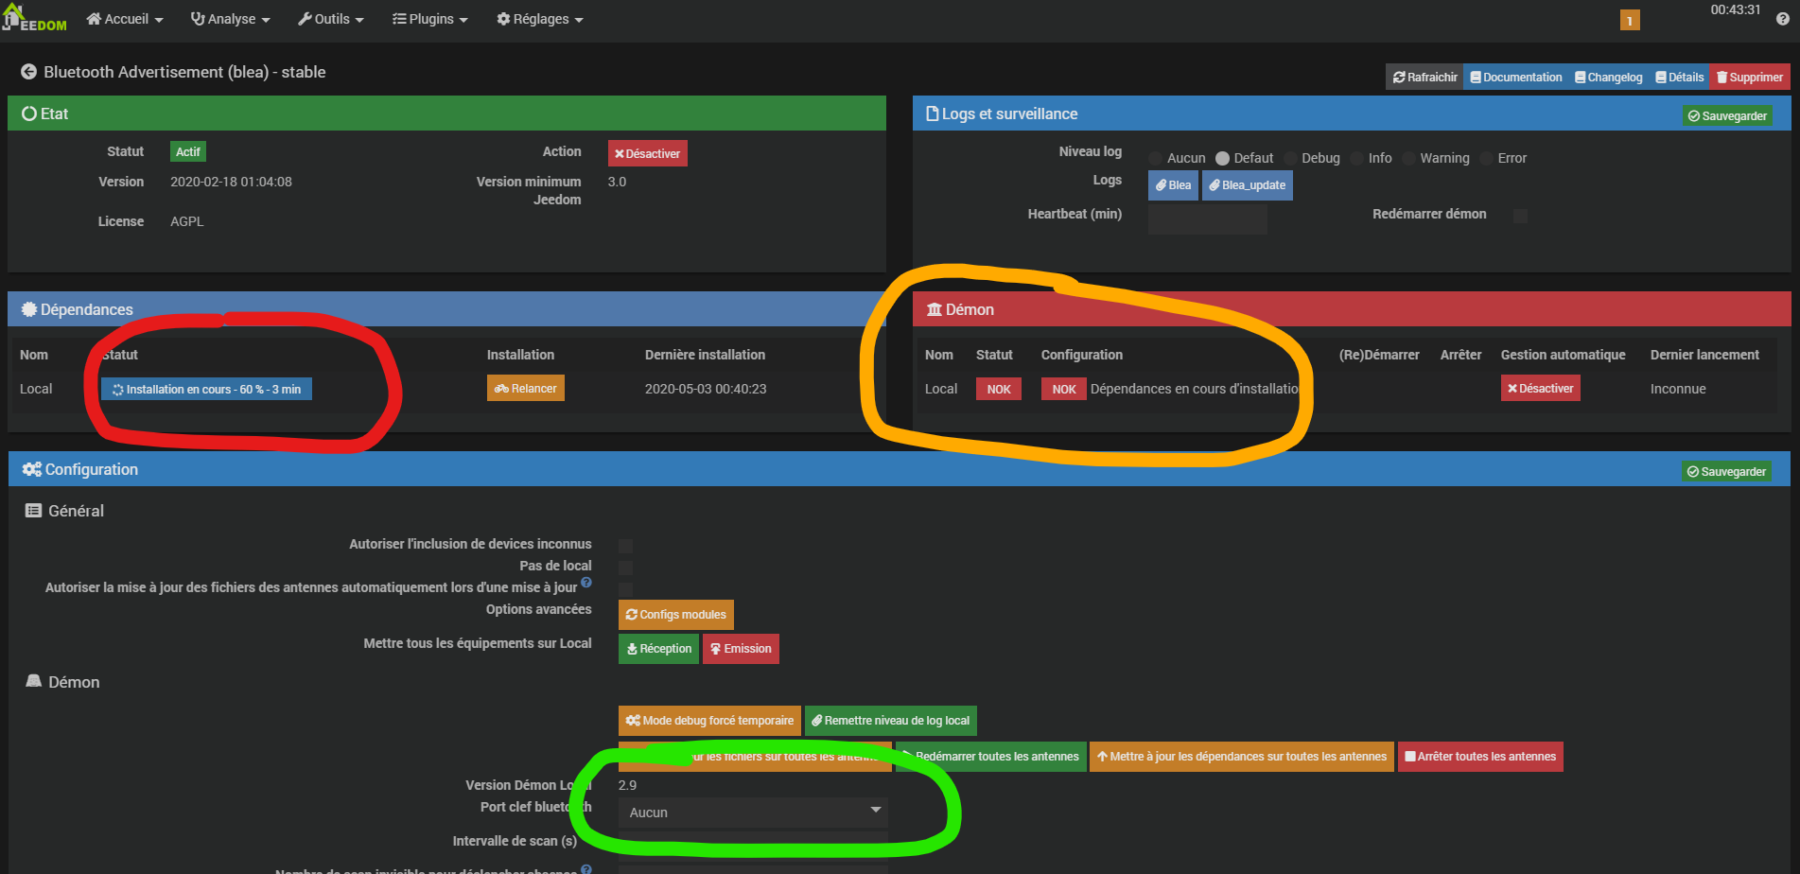
First, notice it is already installing all the required system dependancies in the background (red circle above). With the Debian installation I’m using, this step was succesfull, no need to check the logs and debug some stuff (most of the time if you have any problem at this step this is related to Python packages or permissions). Once the permissions are installed and OK, the daemon should start automatically and show a double green “OK” instead of the double “NOK” red buttons inside the orange circle.
We will need to tell Jeedom what Bluetooth controller should be used, in the dropdown list (green circle on the picture above). Both the controller embedded in the Raspberry Pi3 & our external dongle are listed; and as the external one is the latest one we added on the system it is the “hci1”. you should end up with this:
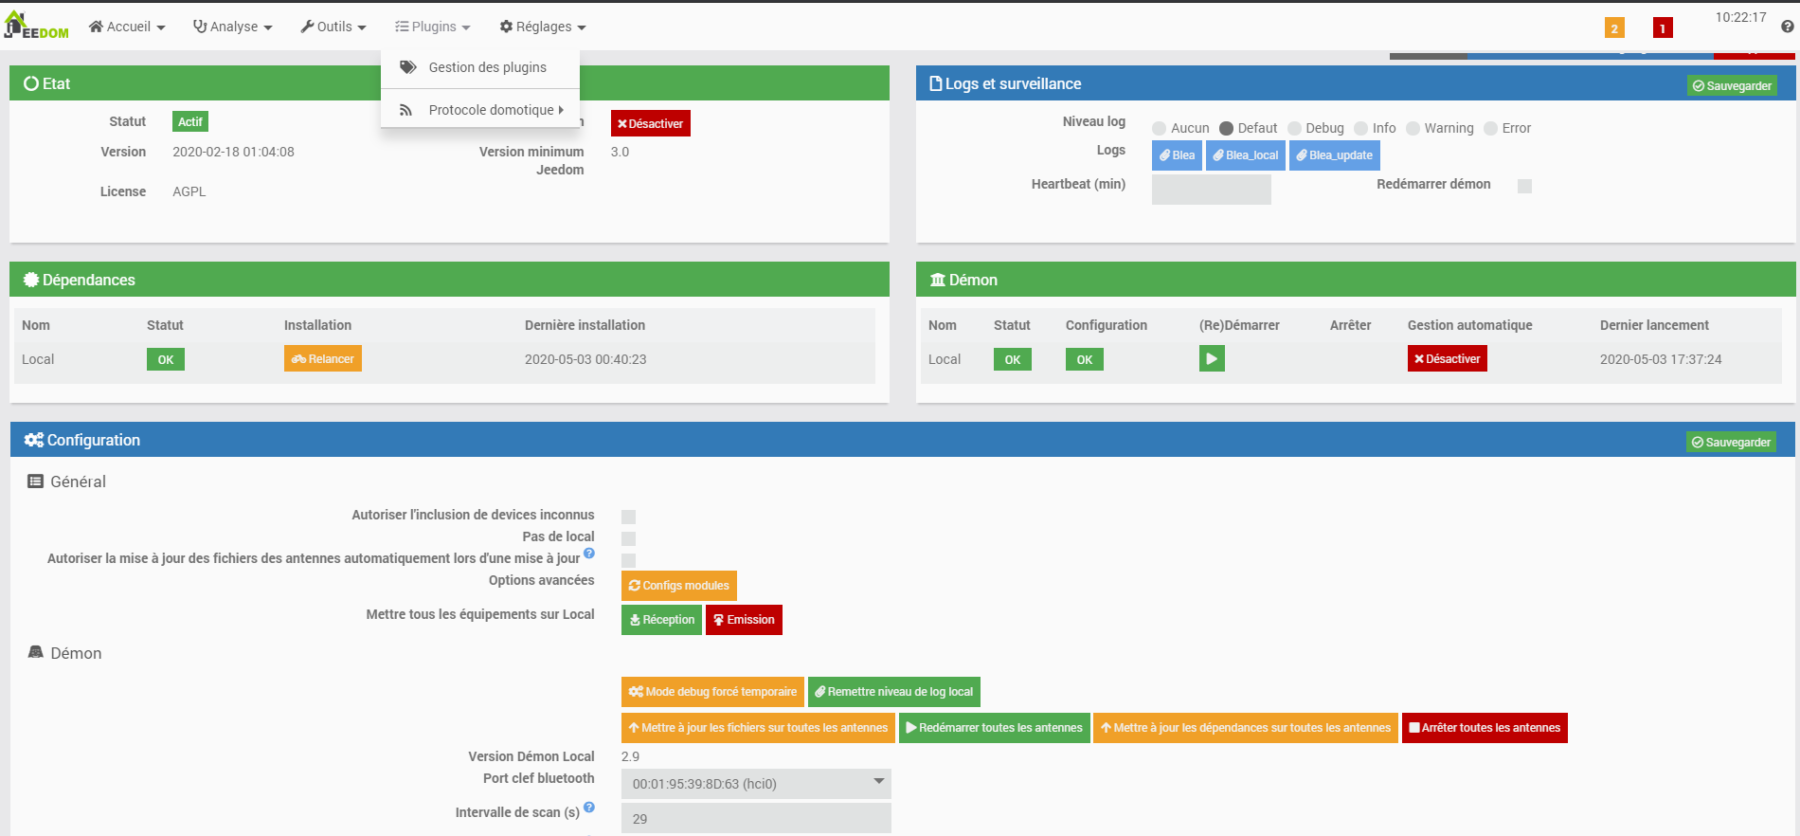
Now we will associate our Miflora and for this you need to switch on the other configuration screen for the BLEA plugin by going in the Menu “Plugins -> Home Automation Protocols -> Bluetooth Advertisement”.


Of course the equipment list is still empty. We need to:
- Unpack our Miflora detector and remove the small plastic part under the battery, it will automatically power on the detector,
- Place the Miflora near the Bluetooth antenna to ensure a good signal strength,
- Launch a blutooth scan in Jeedom BLEA by using the top left button below.

When the scan is launched it will automatically create a new equipment for each device detected through the bluetooth controller. Note that you can restrict the type of device you are looking for in the scan launch window. In my case, a lot of devices will be found, as I actually already have 8 “production” Miflora, used to irrigate my terraces, and associated with my Jeedom V3 production system on a Debian Virtual Machine.

I just let the Scan automatically run, it will stop after 2 minutes on this screen:

Don’t forget to rename, assign to a parent object, and save any new equipment.
When you click on the little left arrow just before the 3 tabs, you will go back to the list of equipment detected by Jeedom. Each of them can be clicked to enter its configuration.

As I need for my article to isolate the Miflora i unboxed for this tutorial, and because Xiaomi does not show the Mac address of the equipment on the box or on the device, i’ll have to play with the new sensor to make it detect an abnormal value and that we can notice it among others. I choosed to put my test sensor in a glass filled with salted water so that moisture should increase to something close to 100%, way above the other sensor which are really in my flowers.
I could also check all the MAC adress on my Production Jeedom and deduce which is the new one (as it is not declared on my production jeedom), but I think it will be longer than just measuring the moisture.
First we need to assign each equipment to our Jeedom “Home” object we created a few steps above, in order to get them displayed on the Jeedom front page:

In the parameters tab, I will also modify the default refresh time set to 18.000 seconds (300 minutes), I don’t want to wait so long, i’ll put it to 300s (5mn).

Do not forget to save the configuration with the top right green button ! And do that for each equipment you have. Now when I go back on Jeedom’s frontpage this is what you should see:

Notice each Miflora equipment is gathering data and Jeedom will display it permanently: temperature, moisture, luminosity, fertility.
Now I fill a glass with salted water, and put my new sensor inside the glass, and I wait a few minutes to compare the moisture values.

Either you wait 5mn, or you can use the little “refresh” icon to force a refresh of the data. Jeedom will then query the device for an update. Here’s the change:

Woohoo we got the candidate ! Let’s remove it from its glass as I think too much conductivity is not good for the battery …. And I’ll rename this Miflora and remove the other equipments so that for this tutorial i wont be confused with other Mifloras I use.


This part is finished: we have a working Jeedom with Bluetooth capacities and a remote Miflora detected and gathering data for us. This device can now be used inside Jeedom to code some scenarios (we will do this later to start the water valve) or even PHP scripts. Let’s switch on the ZWave part.
ZWave plugin configuration
We go back to the Market inside Jeedom’s UI (note that I decided to switch Jeedom’s UI in English :p) and install the ZWave plugin; same process as before for the BLEA plugin, I won’t show it again. Once installed, the plugin will display its configuration page.

Then we activate the plugin. And we refresh to display the extended UI.

The dependencies should install automatically after a few seconds. But First I recommend to change right now the dongle port in the dropdown list in the Setup section of the page, as it is not clear in the documentation or forum if this parameters can help to build the dependencies (I don’t think so – it should only be software building). It should NOT change the packages required and the way they are compiled, but some users report some failures when the port is not set; and it’s not a big deal to change it.
Reminder: it was displayed when we checked the logs when we first connected the dongle, line 17:
May 2 09:40:22 Pi3-test kernel: [ 110.328039] cdc_acm 1-1.5:1.0: ttyACM0: USB ACM device
Don’t forget to save the configuration with the green “Save” button on the right of the Setup block. Now we can launch dependencies building.

Dependencies installation will take a few minutes. If you think the webpage is stalled and have a doubt about the installation, you can connect on your JEedom box (with SSH) and check the “tail -f /var/www/html/log/openzwave_update” log file manually. This is the result on my box.

We can see the dependencies are now OK (green circle), BUT the daemon did not start successfully (red circle). First we’ll have a look at the daemon’s log, by refreshing the page (top yellow circle) and open the log (other yellow circle).

Obviously the dependencies forgot to install a python module … It’s strange, maybe that’s because I initially had Python3 as the default python version system-wide, and I changed it later to python2; I’m not sure. You may not have this problem. However, let’s try to manually fix this by opening a shell on the box, and install the tornado package.
pi@Pi3-test:~# sudo su -

root@Pi3-test:~# python -m pip install tornado
DEPRECATION: Python 2.7 reached the end of its life on January 1st, 2020. Please upgrade your Python as Python 2.7 is no longer maintained. pip 21.0 will drop support for Python 2.7 in January 2021. More details about Python 2 support in pip, can be found at https://pip.pypa.io/en/latest/development/release-process/#python-2-support
Looking in indexes: https://pypi.org/simple, https://www.piwheels.org/simple
Collecting tornado
  Downloading tornado-5.1.1.tar.gz (516 kB)
     |████████████████████████████████| 516 kB 1.5 MB/s
Collecting backports_abc
  Downloading backports_abc-0.5-py2.py3-none-any.whl (5.2 kB)
Collecting futures
  Downloading futures-3.3.0-py2-none-any.whl (16 kB)
WARNING: Retrying (Retry(total=4, connect=None, read=None, redirect=None, status=None)) after connection broken by 'ReadTimeoutError(HTTPSConnectionPool(host='www.piwheels.org', port=443): Read timed out. (read timeout=15),)': /simple/singledispatch/
Collecting singledispatch
  Downloading singledispatch-3.4.0.3-py2.py3-none-any.whl (12 kB)
Requirement already satisfied: six in /usr/lib/python2.7/dist-packages (from singledispatch-etornado) (1.12.0)
Building wheels for collected packages: tornado
  Building wheel for tornado (setup.py) ... done
  Created wheel for tornado: filename=tornado-5.1.1-cp27-cp27mu-linux_armv7l.whl size=461234 sha256=9bccf18e976de51e63e9ef3288d6902fad6cbc3c52286109cab357a0f8c07486
  Stored in directory: /root/.cache/pip/wheels/d8/83/af/e0dc6afbf3a2c51af8d6e3f9fbe790d0c581c2de05bc5d50f5
Successfully built tornado
Installing collected packages: backports-abc, futures, singledispatch, tornado
Successfully installed backports-abc-0.5 futures-3.3.0 singledispatch-3.4.0.3 tornado-5.1.1

root@Pi3-test:~# python3 -m pip install tornado
Looking in indexes: https://pypi.org/simple, https://www.piwheels.org/simple
Requirement already satisfied: tornado in /usr/local/lib/python3.7/dist-packages (6.0.4)
root@Pi3-test:~#
Now we restart the daemon on Jeedom’s plugin configuration page (yellow circle below).

That’s now ok, perfect. We have a functional ZWave plugin. Let’s just do a sanity check: reboot Jeedom through its UI, and once it’s back online, check its “Health” page. Both plugins should be displayed in green.


So far so good ! Now it’s time to plug & detect our first ZWave module.
Watering configuration
Fibaro FGS-222 “Dual Relay” ZWave module configuration
First we will study the wiring we want on the module. Next we will power the module in order to make it join our ZWave network and be detected by Jeedom. Then we will plug the 24v power supply to test the water valve.
Target Wiring Diagram
Fibaro’s documentation for this module is here, you MUST read it to understand how it works. From this documentation, the standard wiring diagram is as follow:

As you can see, there is no explanation in this diagram, or in the documentation, about the dry contact mode the module actually supports and which will be very useful in our case, as the water valves require a 24v AC power supply to switch from a CLOSED position, to OPENED. Our target diagram is indeed this one.

The module is powered by the main 220V AC line. The water valve will be powered by the 24V AC line when we will trigger the Q1 output of the module by using Jeedom and the ZWave communication protocol between Jeedom and the module.
Note 1: you may want to add a switch on the S1 input of the module, to be able to manually trigger the water valve, in case your Jeedom controller is down, or your ZWave network broken.
Note 2: this module is a double relay, we can add a second water valve on the Q2 output (and eventually a second switch on the S2 input). In Jeedom you will be able to trigger the Q2 output for the second water valve, independently of the Q1 output.
Wiring the module & inclusion in Jeedom
Here’s the wired module, ready to be included in Jeedom. I won’t plug the water valve for now as I just want to check if the inclusion of the module in Jeedom is OK.

Now we power it.

In Jeedom we then need to go in the Home automation Protocol Menu, then ZWave, and we will launch the Inclusion mode, to discover ZWave devices.


Jeedom will ask if you want to add a secured device (ZWave+ protocol), or not secured (classical ZWave protocol). ZWave protocol security is out of scope of this tutorial. Anyway, the Fibaro FGS 222 is NOT a ZWave+ device, therefore we select the first option.


Once it’s done, we need to quickly press 3 times on the little “B” switch on the module to also launch its inclusion mode.

Jeedom should detect the module and quickly inform you.

And finally Jeedom will display the configuration page for the device.

I’ll change the parent object to assign it to the only object I created for this tutorial (and Save the configuration), and then I go back to the home page.


Woohoo ! Now if you click on one of the lights on the UI, you should hear a very soft “clac” in the module, it’s the internal relay switching on or off. Also, the light will change on the UI.

Tweaking module configuration
As we are handling with water system, I strongly recommend to review two important parameters defining:
- An “auto off” for the relays after an amount of seconds, so that if our watering scenario (or Jeedom or the ZWave network) has a problem, then the water valve will automatically close after this delay;
- Its state after a power shutdown.: we probably want to ensure the module will switch all of its outputs to OFF (water valve not opened) when the power will be back.
For this, just click on the module name on the frontpage, it will bring you back to its ZWave page. Then click on the blue “Setup” button.

The two parameters we want to check/change are the { 3, 4, 5 } and { 16 } for my two points above.

First, set the Parameter 3 to “Manual override enabled” in case you plug manual switches on the module. Then set parameters 4 & 5 to the delay you want. Take care, the documentation is not clear, it says the value is in milliseconds but it’s not: for a 3mn delay, I have to set the value to 1800 (60 seconds * 3 (mn) * 10 (factor which I don’t explain)). Test it with a watch: when you switch on the relay through Jeedom’s UI, you should hear the relay and Jeedom’s light on the UI switching off after the delay you put here.
Then, set the parameter 16 to “State NOT saved at power failure, all outputs are set to OFF upon power restore” if it was not by default.
We’re all set for the ZWave module. Now let’s plug the water valve and test it.
Wiring the water valve
Let me remind here the electrical diagram we shall use for this setup.

In real life, and still on the test bed, the wiring is very simple, as one wire of the valve goes on Q1 Fibaro’s module output, the other one is plugged on one of the wire of the 24V AC converter, and the other wire of the 24V AC converter goes on the IN plug of the Fibaro’s module.
When we will trigger the Q1 output through a ZWave command (by using Jeedom as we did above), the Fibaro’s module will “wire” its IN input to its Q1 output. As we wired the IN input with a 24v power supply, the valve will be powered with 24V as long as the Q1 is not asked to shut off through a “OFF” ZWave order.
It becomes this:

Testing it manually in Jeedom
I made a little video to review the setup, and test it live so that we can verify the valve can be remotely controlled by Jeedom. Once it works, we will be able to automate the setup.
Now that the hardware is all functional, we want to switch on the water valve to irrigate some flowers when the moisture is below a threshold and the weather not rainy.
Gluing everything together
Weather plugin configuration
As we want our system to also take care about the weather, to not irrigate if some rain is forecasted in the next hour or couple of hours, we will need to gather the weather forecast. In jeedom Market, look for the Weather plugin and install it. Once installed, activate it.

The plugin will now be reachable through the “Weather” section in the “Plugins” menu.

Note that on its configuration page, we need to provide an OpenWeatherMap API Key. You can get one by registering here to their free service, and create one in the API menu on their web site once you are logged in with your fresh new account. Just copy/paste the API key in Jeedom’s Weather plugin’s configuration page, and do not forget to save it.

Now we will jump on the Plugin main page, and add an equipment.

First we have to give it a name, then on the main configuration page we have to assign it to our first & only Jeedom object, activate equipment, activate the widget to be displayed, and fill in the place for which we want to gather the weather forecast (city, country code).

Again, don’t forget to save it. Note the various Commands we will be able to use through Jeedom. You can check them on the “Commands” tab of your new equipment. The one we will want to check in our scenario is the “Rain+1”, which will return a value indicating the risk of raining.

As explained on the equipment page, if you just created your API key, you may have to wait a bit before it can really be used. If it’s not yet useable, you will get this warning.

After ~10 minutes in my case, the error message was gone, I could save the configuration, and refresh Jeedom’s homepage to obtain this.

We can now use the various informations from our two sensors (Miflora, and weather) in order to automatically activate the water valve, in a scenario.
The scenario, the “intelligent” part
I think the simplest way to handle the watering system is to run a scenario every X hours. We coud also make a provoked scenario, with the moisture sensor as a trigger. Anyway in this guide, the scenario will:
- every X hours, check whether the weather (current or forecast) exceeds a given rainfall threshold
- If yes, then we do nothing, no need to witch on the water valve, the next iteration will do the job unless it’s still raining
- If no, then:
- We check if the moisture is below another threshold
- If no we do nothing
- If yes we switch on the water valve, add a small timer and switch off the valve after X minutes.
As a security, we saw earlier that the water valve will be switched off automatically with parameters 3 & 4/5 on the Fibaro module. So we could actually avoid to make our scenario explicitely switch off the valves, and only rely on the devices auto-switch-off parameter; but I only see it as a backup: we shall be able to switch off manually the valves in our watering system global scenario. If for any reason the shut-down order fails from Jeedom, then the device auto-switch-off parameter will close the water valve.
First, let’s create a new periodic scenario through the well named “Scenarios” menu.

Then we add a new one and give him a name before we arrive on its main configuration page.


Notice the second tab called “Scenario” on top of the scenario main page. This is where we will implement the main logic. But first let’s make this scenario periodic, every two hours. No need to modify other parameters and their explanation is out of scope of this tutorial.

Now we add a line for the scheduling.

You can either manually enter a crontab formated string in the line which will appear after clicking on the “Programming” button, or you can use the little “?” button on its right, to be proposed standard but less customizable options.

In my case i’ll use a formated crontab line, to tell the scenario to execute every two hours.

You can save it, and switch on the “Scenario” tab. On top right of the page, click on “Add block” button and select the “If Then Or” block.

A new block was added in our scenario and now we need to find the Rain+1 command which is provided by the Weather plugin.


Now we add the condition on this command. We could just validate and enter it manually in the block definition.


Now we define what we should do if the condition is met. Click the “Add” button just bottom the “SO” line in the left of the block, and add another If/Then/Or block to test the Miflora humidity sensor, inside the first one which already checks the weather forecast.

Again, on the right of this new block, we have to find the right command.

And we define the condition. For this test i’ll use a random value of 50, as i’ll test it with a glass of water. This value shall later be adapted to what is the best for your trees/plants, and it may also be defined as a variable so that you can easily modify it without having to edit the whole scenario. It’s out of scope of this tutorial.

Now we add a new “Action Block” inside this second block, to activate the valve.

And we add a first action, to trigger the Relay switch’s Output, which will activate and open the water valve.


Next, still inside this third block, we add a new action, which will the the pause to perform before we order the relay switch to shut-down the valve. This is indeed the delay your water valve will allow your tress to be watered !

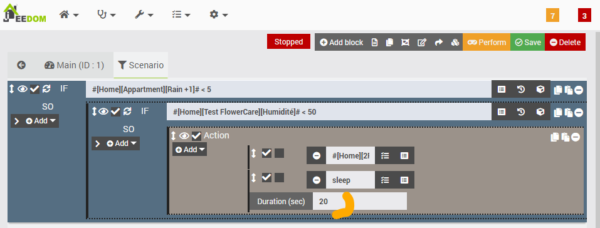
Finally, we add an action to close the valve.

Our basic scenario is now almost complete.

For a “production” scenario, we shall add some notifications to be sent by email or pushover or other external services, to inform you by various ways, that the system decided to NOT water because of the weather forecast, or decided to water because the humidity check was triggered. For now, without additional plugins, we can tell our scenario to display short messages inside your browser if you are connected to Jeedom’s UI when the event is triggered, and add a line in the scenario’s specific log. You need to add two actions in the 3rd block we created as shown below, and add 2 “ELSE” blocks to add actions if we did not floor because of the humidity being high enough, or the weather becoming rainy.

Now we save our complete scenario, and we test it.
Testing the system
To test the scenario, i’ll first plug my Miflora in salted water so that it improves conductivity. I’ll also set up the Miflora to refresh its data every 10s (that is way too low for a production system, it will ruin its battery very fast), and make sure my Double relay default setting for automatic shutdown of outputs are set to 3mn so that we are sure the valve will closed following our scenario last order, after the pause. We shall of course hear the valve sound when it’s triggered on and off, ant we should also see an information window appear in Jeedom, and a specific line in our scenario log file.
I’ll also show how to modify the scenario to not be triggered periodicaly, but to be triggered when the humidity sensor itself will feed back a humidity rate below 50. The scenario in that case should be modified to let time to the soil to propagate humidity and to let the sensor detect moisture propagation.
Better than written words, here is again another video of the test session.
Conclusion: our test bed is OK, we can now check what it becomes “In Real Life”.
Extanded Production system
We described in this article how to automatically open and stop a water valve depending on the humidity sensor in the ground. We saw how to add the pre-requisite plugins, configure them, and code a scenario to check values and launch actions on the valve dependings on the values we detect. Those are all the basics to deploy it in your own garden.
Now it’s all up to you to wire it electrically outside (and protect it against environmental conditions which may alter the system !), plug the garden hoses, test if there are no leaks, etc. I can not describe here how to do it in your own garden or terraces. But, on the computing side, you could also want to improve a little bit the hardware system, and the logics behind.
For example, we learned how to add a security level on the Relay switch, to automatically shut down the water valve after a few minutes, even if Jeedom is failing to send the CLOSE order to the relay. In my case, I choosed to redundate this “software” security feature with another one, hardware based: I added a master water valve on each of my terraces.
My setup
My setup is as follow. First the two terraces overview. The diagram may seem complex (you can enlarge it) but it’s actually simple, it’s just full of wires … so many arrows to link the components on the diagram.

Here is what one of the electrical box looks like. You can see:
- The 220V AC to 24v AC power supply, with its outputs splitted to the 5 valves and the Fibaro relay switches,
- 3 Fibaro relay switches. 2 are double relay switches so that I can control 4 water valves as they both have two outputs, and the third one is a single relay switch, to control the master valve. Their outputs are wired to the water valves.
- You can also see a litttle USB adapter, it’s used to power a raspberry I use on the terrace as an external antenna for Jeedom, it will be explained in another tutorial.

Here is the overview of one of the two patios, under the slabs. Everything is wired under the terrace floor so nothing is visible externally except the little dripping lines going to the flowers. All the system must be carefully sealed, as of course you don’t want it to be flooded when it rains. It will have to support winter, etc. For example I choosed to seal electrical wires on the water valves, with silicon.
On my Production Jeedom box, I have:
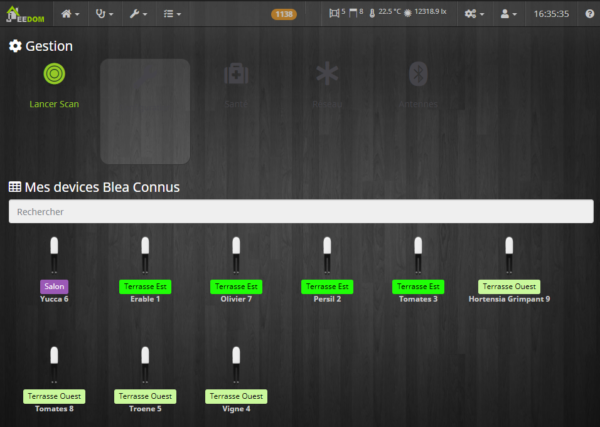
- 9 Miflora configured: 8 for the 8 outdfoor watering lines, and one for the interior (not used for automatic watering),
- 6 ZWave Relay switches, 4 are double relays.
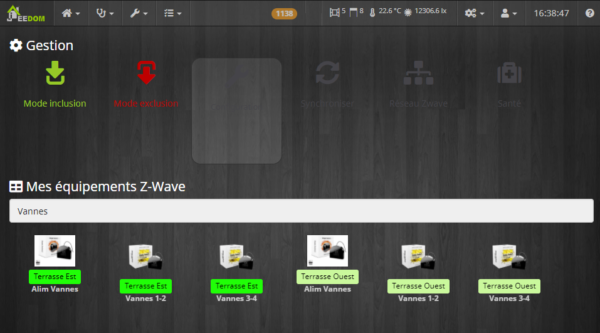
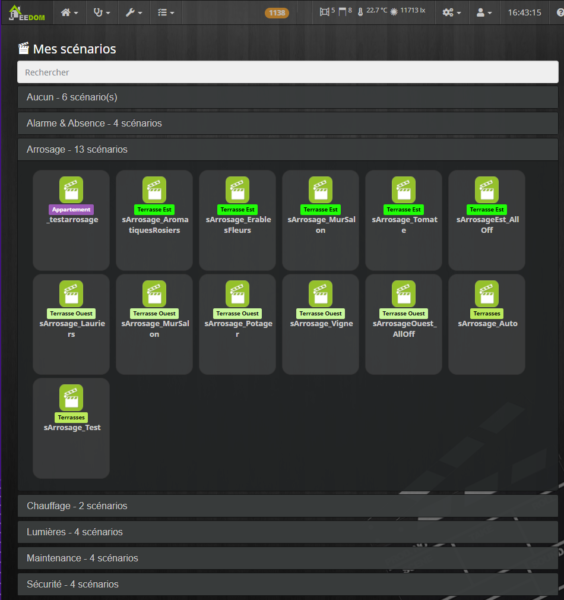
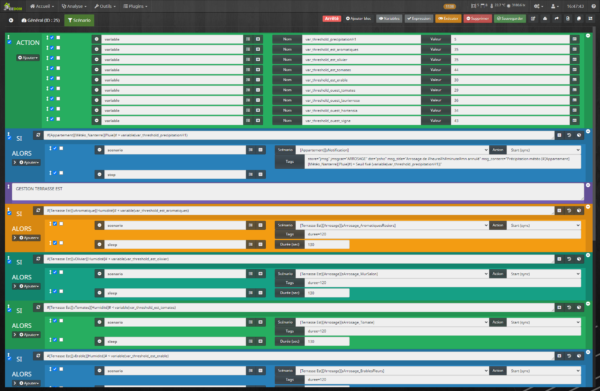
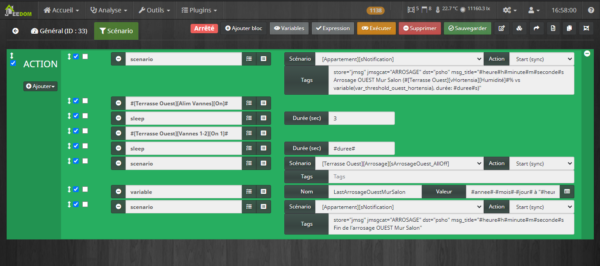
I choosed to split the watering scenario in different modules: 1 scenario to handle each watering line specificaly, 1 master scenario to check the conditions and to call the specific scenarios to activate a watering line with the duration as a parameter, 1 scenario to shut down all the valves by security. Also, I defined all the triggers to be used in variables, so that it’s easier to modify them at the same place, and not in the scenario code.
Improvements
Among the improvements I suggest you to implement, there’s the notifications to inform about what’s happening: pushover, mails, etc. Nice plugins exist on Jeedom’s market to allow you to do that. They will expose new commands that you will be able to use inside your scenarios. On my system I created a notification system which can be called with a few parameters: text to notify, method of notification to use (jeedom notification center, log, mail, speach to voice, pushover). Now my watering system is sending me notifications on my phone when it’s activating a watering line or when it won’t because of the weather forecast.
Also, I strongly suggest to use the “Virtual” plugin, to add virtual components on Jeedom’s UI. Inside this virtual equipment, you will gather data from the sensors (to display humidity, fertility, temperature, etc.), but you can also compute new values, for example to display when was the last data from a sensor, and when was the last watering. It’s very useful to check if all the Mifloras are working properly. You can also plug notifications in case you detect something is going wrong.
Wrap-up & Going Further
With this basic setup, you’ve got a fully automated and remotely managed watering system using Jeedom, Bluetooth, and ZWave. The solution is modular—expand it by adding multiple moisture sensors, extra valves, or even advanced weather integration.
A next article will describe how to deploy bluetooth antenas to your system, so that you don’t only rely on the single antenna plugged on the main raspberry. It’s important to do so as bluetooth range is low, and a bad connection could easily ruin your Miflora’s batterys life by resending data. Even worse, depending on environmental conditions around the network, some may not be seen anymore by Jeedom every time.
Related articles you may find useful:
- Intelligent watering system, part II: Use Raspberry Pi Zero as Bluetooth antenna for Jeedom
- Quick tutorial: installing Debian raspbian on a Raspberry Pi (Zero)
- Restoring Jeedom from a Debian 8.5 to a Debian 10.3 Virtual Machine
Further reading & useful resources:
- Official Jeedom BLEA plugin documentation
- Domotique (smart home DIY) articles on this blog
- Gardena micro drip systems (manufacturer)
Questions, tips, or feedback? Share them in the comments or check out the other tutorials on this blog!


Great post, very detailed
On my watering system, i also added in my scenario the ability to split the total duration off the watering in several slot of maximum of 10 min and 5 min of pause after (with figaro 4 & 5 configured with max 12 min) because most of water valve do not support to be activated during a long time (valve could heat too much)
Intéressant Brag00n, comment t’y es tu pris ?
Thank you ! Actually I didnt think about that, as I prefered to run the scenario every 2 hours, and right now all the watering delays are set to 2mn on my production system.
When i enable the whole system again for spring, it requires a few days to be tweaked as 2mn every 2 hours is not so long, but it avoids flooding …