In this quick guide, I’ll show you the essential steps to prepare a Raspberry Pi Zero for use with the Jeedom automation system. You’ll learn how to flash Raspbian Lite on an SD card using a Windows PC, configure Wi-Fi and SSH before first boot, and make a few tweaks for a headless, robust setup.
Installing Jeedom itself is not covered here, but you’ll find a complete walkthrough of a Jeedom restore and migration in this related article.
What is needed
You will need:
- A Raspberry Pi Zero W
- An SD Card (16 GB recommended, smaller is also fine)
- A 1.5 A (at least) USB power supply
- A Windows computer to download and burn the Raspbian image onto the SD Card
Get the raspbian image
Download and install Win32 Disk Imager, then download Raspbian Lite (no graphical interface for a lighter, headless setup).
Unzip the Raspbian image file somewhere easy to find.
Open Win32 Disk Imager, select your unpacked Raspbian image with the “Image file” button, and choose your SD card under “Device”. Double-check that you selected the correct drive, as all data on it will be erased. Finally, click “Write” and enjoy a coffee while it completes.
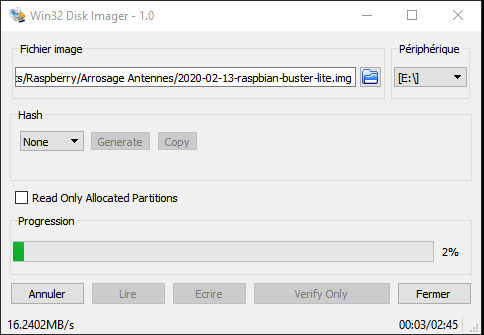
When the operation will be done, a Windows popup asking you to format a drive will appear, this is normal, one of the two filesystems wrote on the SDCard is not recognized by Windows, as it is a Linux EXT partition. You should also see a new drive in your Explorer, called “boot”, this is also normal.
Configuring Wi-Fi before booting from the SD Card
You could set up Wi-Fi after booting the Raspberry, but that would require hooking up a keyboard and display. There’s a much easier way: create a special wpa_supplicant.conf text file on the “boot” partition of your SD Card, containing with the code below. Raspbian will automatically use it to connect to Wi-Fi during startup.
You may want to adjust your country code on the first line.
country=FR
ctrl_interface=DIR=/var/run/wpa_supplicant GROUP=netdev
update_config=1

network={
        ssid="My SSID"
        psk="My un-encrypted passphrase"
        scan_ssid=1
}
With the latest Buster Raspbian release, you must ensure that the file contains the three first lines at the top. Also, if you are using a hidden network, the extra option scan_ssid, may help connection.
About the passphrase: the password can be configured either as the ASCII representation, by using quotes as per the example above, or as a pre-shared 32 byte hexadecimal key (PSK). You can use the wpa_passphrase utility (with another Linux box) to generate the PSK. It takes the SSID and the passphrase as as inputs, and generates the encrypted (hashed actually) PSK. With the example from above, you can generate the PSK with the following command:
wpa_passphrase your_SSID your_un-encrypted_SSID_passphrase

network={
        ssid="your_SSID"
        #psk="your_un-encrypted_SSID_passphrase"
        psk=28d0ec1234566c3f5333112345678968eb732030f5a48b8b499ab26000123456
}
Configuring the SSH server before booting from the SD Card
Use the same technique here: simply create an empty file called ‘ssh’ at the root of yout “boot” drive, on the SD Card. No extension needed (take care with Windows).
You can now remove the SD Card from your Windows computer and insert it in your Raspberry.
Booting the Raspberry and connecting to it
Insert the SD card into your Raspberry Pi Zero and power it on. Watch for the green status LED, which will blink and then turn solid once booted. If your Wi-Fi settings are correct, the device will connect automatically. To find its IP address, check your Wi-Fi router or DHCP server’s client list and look for a new Raspberry Pi device.
On your Wi-fi router, or whatever the component on your network acting as a DHCP server, I strongly recommend to assign a static IP to your raspberry so that it will be much easier to manage it later, and configure it in Jeedom.
Then use your favorite SSH client to connect to the raspberry’s IP. The default login and password after a fresh Raspbian installation is ‘pi’ / ‘raspberry’.
First step is to change the default passwd:
passwd –> enter ‘raspberry’ (default passwd after a fresh installation –> enter your new password)
Tweaking the configuration
Change to the root user by using:
sudo su -First, and this is personal preference, I install the joe text editor.
apt-get install joeI like to make sure it will be the default editor:
update-alternatives --config editorThen I install the locate package, to easily find files on the filesystem (by using first ‘updatedb’ to index the FS).
apt-get install locate
updatedb
Then I suggest changing the Timezone and extend the root partition to the available size on the SD Card:
raspi-config- Choose “4 Localisation Options”
- Choose “I2 Change Timezone”
- And select your country/town.
- Then choose “7 Advanced Options”
- Choose “A1 Expand FileSystem”
- Choose YES when it will ask to reboot.
Then we will tweak a little bit the wi-fi interface. Reconnect by SSH, and edit the file /etc/network/interfaces and make sure it contains those lines (if you want to use DHCP; otherwise change the 8th line from ‘dhcp’ to ‘static’ if you want to fix the IP and make sure your DNS servers are properly configured in /etc/resolv.conf):
sudo su -
joe /etc/network/interfaces
source-directory /etc/network/interfaces.d/*
auto lo
iface lo inet loopback
auto wlan0
allow-hotplug wlan0
iface wlan0 inet dhcp
wpa-conf /etc/wpa_supplicant/wpa_supplicant.conf
wireless-power offNow let’s make sure Python 2.7 is used by default (while Python 3 is also installed and available system-wide):
update-alternatives install /usr/bin/python python /usr/bin/python3.7 1
update-alternatives install /usr/bin/python python /usr/bin/python2.7 2
The highest number at the end sets the priority: the one with the largest number becomes the default.
Now we deploy a few things. These commands install Python tools and dependencies for using bluepy, a module that enables Bluetooth Low Energy (BLE) communication on Linux, and then configure the necessary permissions to access network hardware from Python.
apt-get install python-pip python3-pip libglib2.0-dev
python2 -m pip install upgrade force pip
python3 -m pip install upgrade force pip
pip install bluepy
pip3 install bluepy
setcap cap_net_raw+e /usr/local/lib/python3.7/dist-packages/bluepy/bluepy-helper
setcap cap_net_admin+eip /usr/local/lib/python3.7/dist-packages/bluepy/bluepy-helper
More specifically, the last two commands assign special Linux rights to the bluepy-helper executable so that it can access the network interface (cap_net_raw) and manage the Bluetooth network configuration (cap_net_admin) without having to run the program as root.
These steps are required for most Python scripts that seek to scan or interact with BLE objects (connected sensors, beacons, etc.) on Linux distributions such as Debian or Ubuntu.
Note that the line 5 above should return that it is already deployed:
Requirement already satisfied: bluepy in /usr/local/lib/python3.7/dist-packages (1.3.0)I suggest you reboot with /sbin/reboot to check it’s reconnecting well – In my case it is !
Updating Raspbian & Raspberry’s firmware
sudo su -
apt-get update
apt-get full-upgrade
rpi-update
Then let’s free up space on the SD card …
apt-get autoclean
apt-get autoremove
apt-get clean
Now you get a fully functional raspberry pi zero runing a Debian/Raspbian, connected to your wi-fi network, and able to be used through SSH. This will be a technical pre-requisite for subsequent articles.
Wrap-up: Ready for Domotic Projects!
Your Raspberry Pi Zero is now set up with headless Raspbian, Wi-Fi and SSH enabled, up-to-date, and ready for all sorts of automation projects—especially as a Jeedom satellite or bluetooth antenna as we will see !
Next steps you might try:
- Use this Raspberry as a Bluetooth antenna for Jeedom
- Explore more home automation ideas in the Domotique category
External resources to go deeper:
Let me know in the comments if you run into any issues or if you want a follow-up article on optimizing Pi performance for connected sensors!