A topic rarely covered on this blog, yet crucial given the current economic and ecological challenges — and with 13 red “Tempo” tariff days still remaining for EDF Tempo subscribers: properly managing your heaters (and water heaters) is essential to understanding and controlling your electricity consumption. In fact, beyond the collective strain on power producers, heating is often the main cost centre at household level. Not to mention the 2023-444 decree, which makes the installation of smart thermostats mandatory in homes by 2027 2030.
Jeedom offers an excellent Thermostat plugin for this purpose, well documented, and efficient. As already mentioned, a home automation hub makes it possible to better integrate different types of equipment connected across your entire smart home, rather than being limited to the separate apps of incompatible brands.
Here we test the Jeedom integration of a Heatzy Wi-Fi “Pilote” module as a replacement for a Qubino Fil Pilote module with which one of my radiators does not work correctly. We then integrate everything into the Jeedom Thermostat plugin, so as to control this radiator in the same way as others already present — regardless of brand or module type. Finally, we will pair the Jeedom thermostat with a physical wall-mounted thermostat, allowing a guest to easily adjust the heating in the room.
We will first explain the principle of the “pilot wire” system, which sometimes causes issues on certain radiators (not all). We will also cover, at the end of this article, a way to reproduce a pilot wire module yourself fairly easily.
Let’s get started.
The French “pilot wire” system
History
Fun fact: France (once again?) created a “cultural exception” in the world of electricity, following the 1973 oil shock. To reduce its dependence on foreign oil, France launched the Plan Messmer: massive construction of nuclear power plants, encouragement for citizens to switch to electric heating, and an anticipation that if everyone heats at the same time, the grid would risk collapsing.
In the late 1970s, engineers from EDF collaborated with GIFAM (the French association of home appliance brands) to create a simple and robust system using the mains 50Hz sine wave directly to send simple commands. The first radiator prototypes equipped with this technology appeared in 1980; the “Pilot Wire” standard was then defined by the NF C 15-100 standard, which required a dedicated wire in electrical conduits for heating circuits. The real expansion came from 1990 onwards with the widespread rollout of EDF’s “Off-peak / Peak hours” tariff.
Instant Cororico: other countries created and deployed similar systems (Switzerland, Germany, Australia, and New Zealand) to address different challenges with different solutions. We will revisit this in an article on demand-response (effacement diffus). But with the deployment of the Pulsadis signal at national level (the direct ancestor of powerline communication and the Linky smart meter) between 1950 and 1960, and the “Pilot Wire” rollout, France was a pioneer in enabling large-scale, centralised and standardised domestic electric heating management — without resorting to the electrically brutal “on/off” approach for end-point devices. With these two protocols, France and EDF effectively pioneered the ancestor of today’s Smart Grid (from high-voltage transmission right down to the individual radiator).
How it works
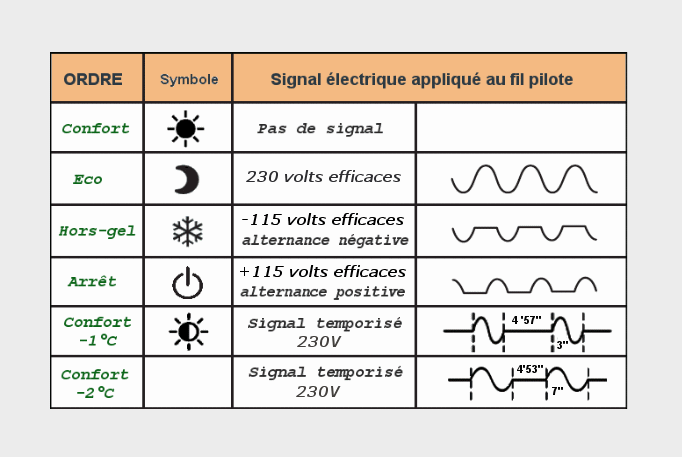
Unlike a simple “on/off” switch, the pilot wire can send complex commands to a radiator (4 or 6 commands depending on generation: Comfort, Eco, Frost-protection, Off, and optionally Comfort -1°C, Comfort -2°C) via a modulated 230V electrical signal. The radiator’s own thermostat remains responsible for managing the heating, but it does so based on a mode received via the pilot wire, issued by an “ambient thermostat” or a home automation hub controlling zones with multiple radiators. On most modern radiators, each of the first three modes can be associated with a specific target temperature.
Physically, the pilot wire is simply a 3rd wire, black in colour, which complements the standard phase and neutral wires of an electric radiator.
What about other countries?
In almost all other countries, electric radiator control works differently:
- “On/Off” (All-or-Nothing): The thermostat acts as a simple relay. Potentially remote-controlled, it cuts the power supply to the radiator once the target temperature is reached and turns it back on when it gets cold.
- Independent built-in thermostats: Radiators are managed individually with no link for centralisation (becoming less common).
- Proprietary systems: Some foreign manufacturers have their own wireless or wired protocols, but there is no national standard equivalent to the pilot wire.
We will examine this in more detail in a future article on distributed demand response.
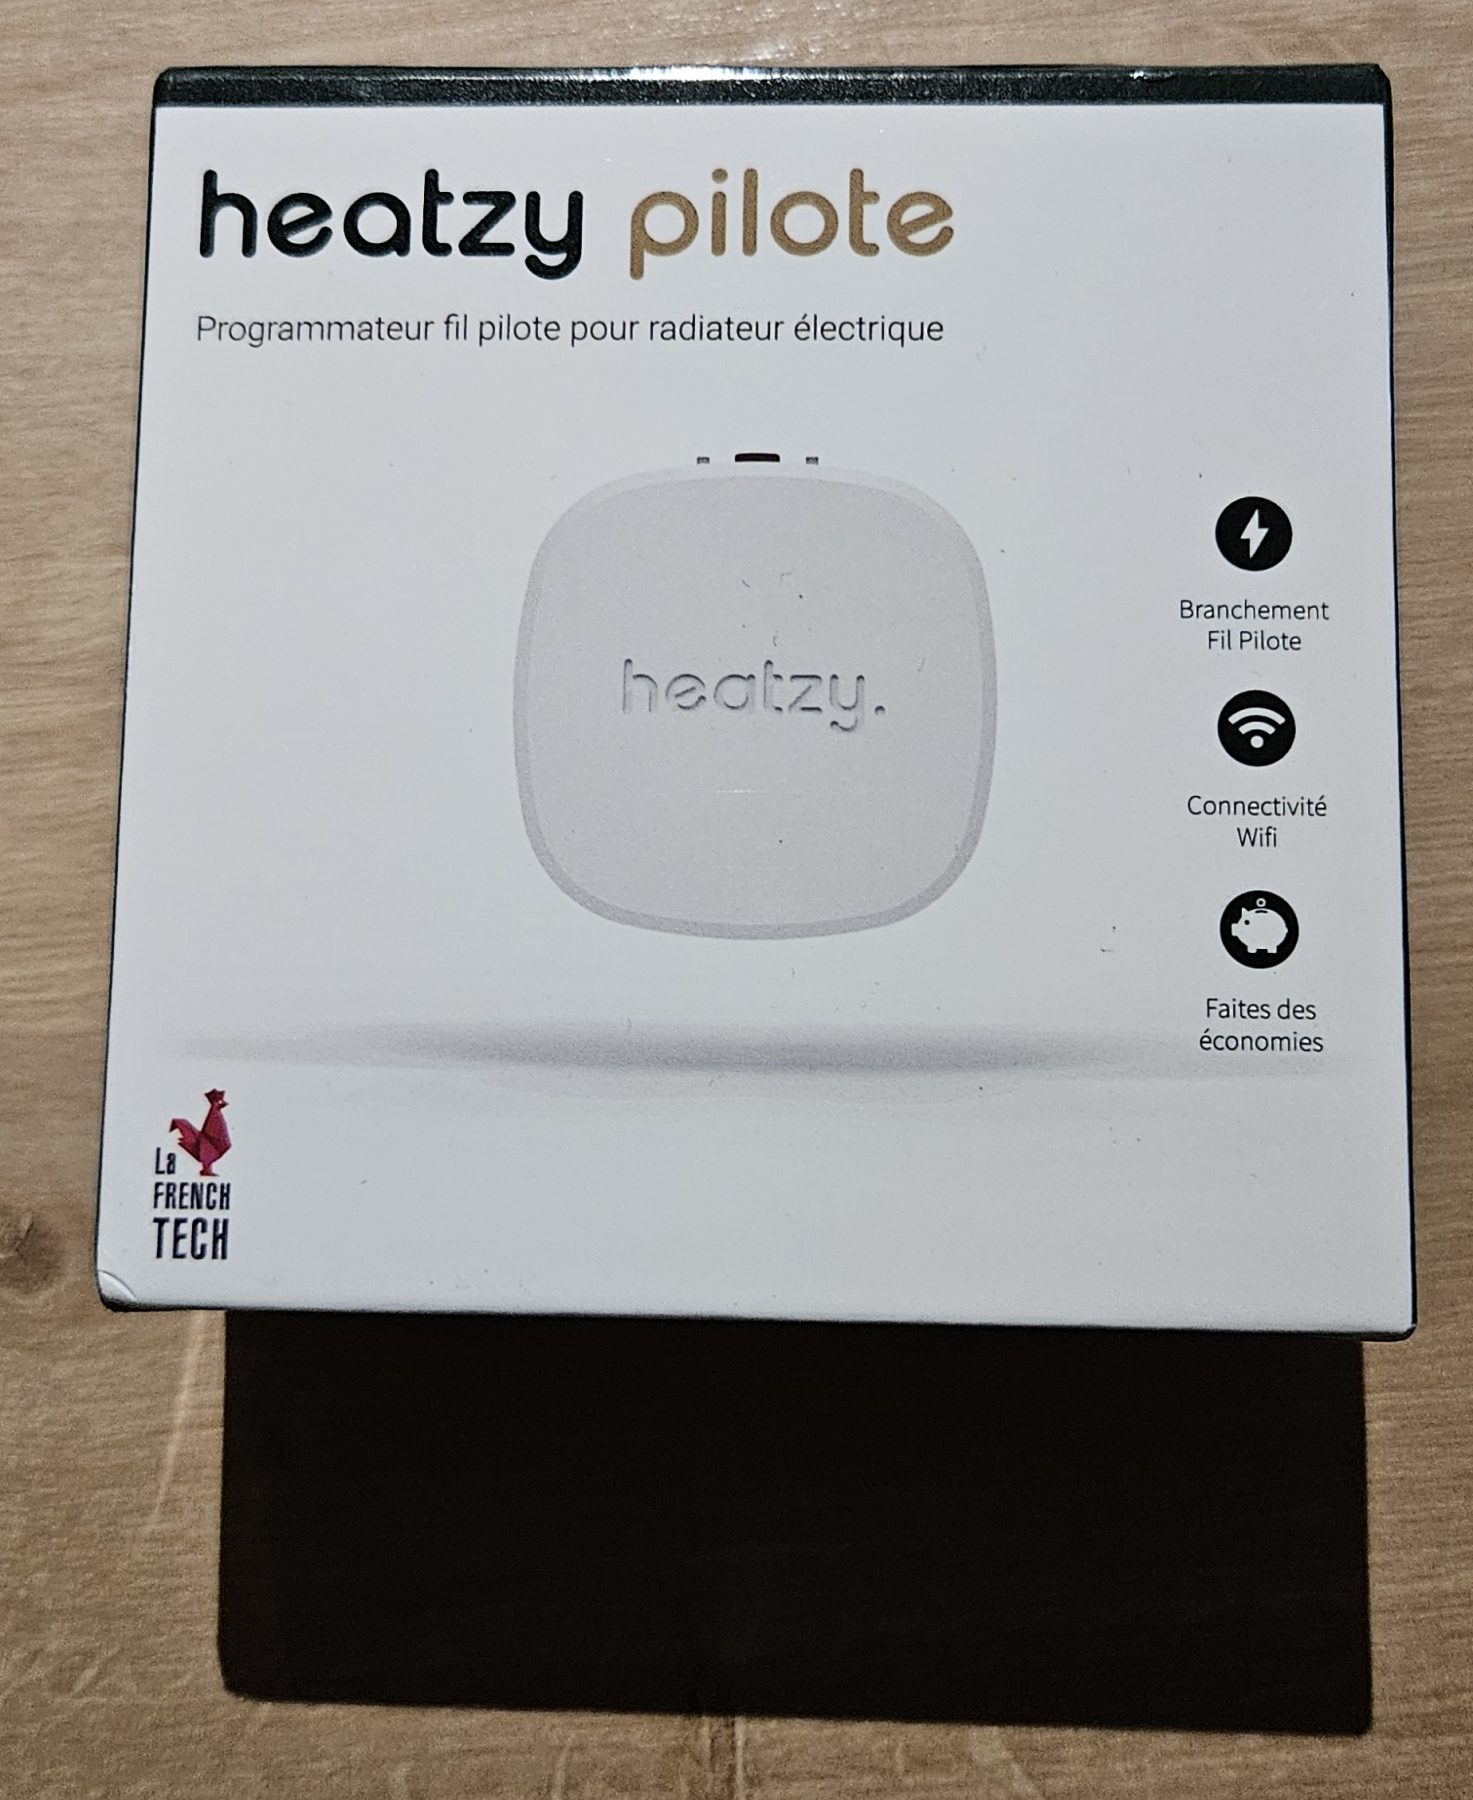
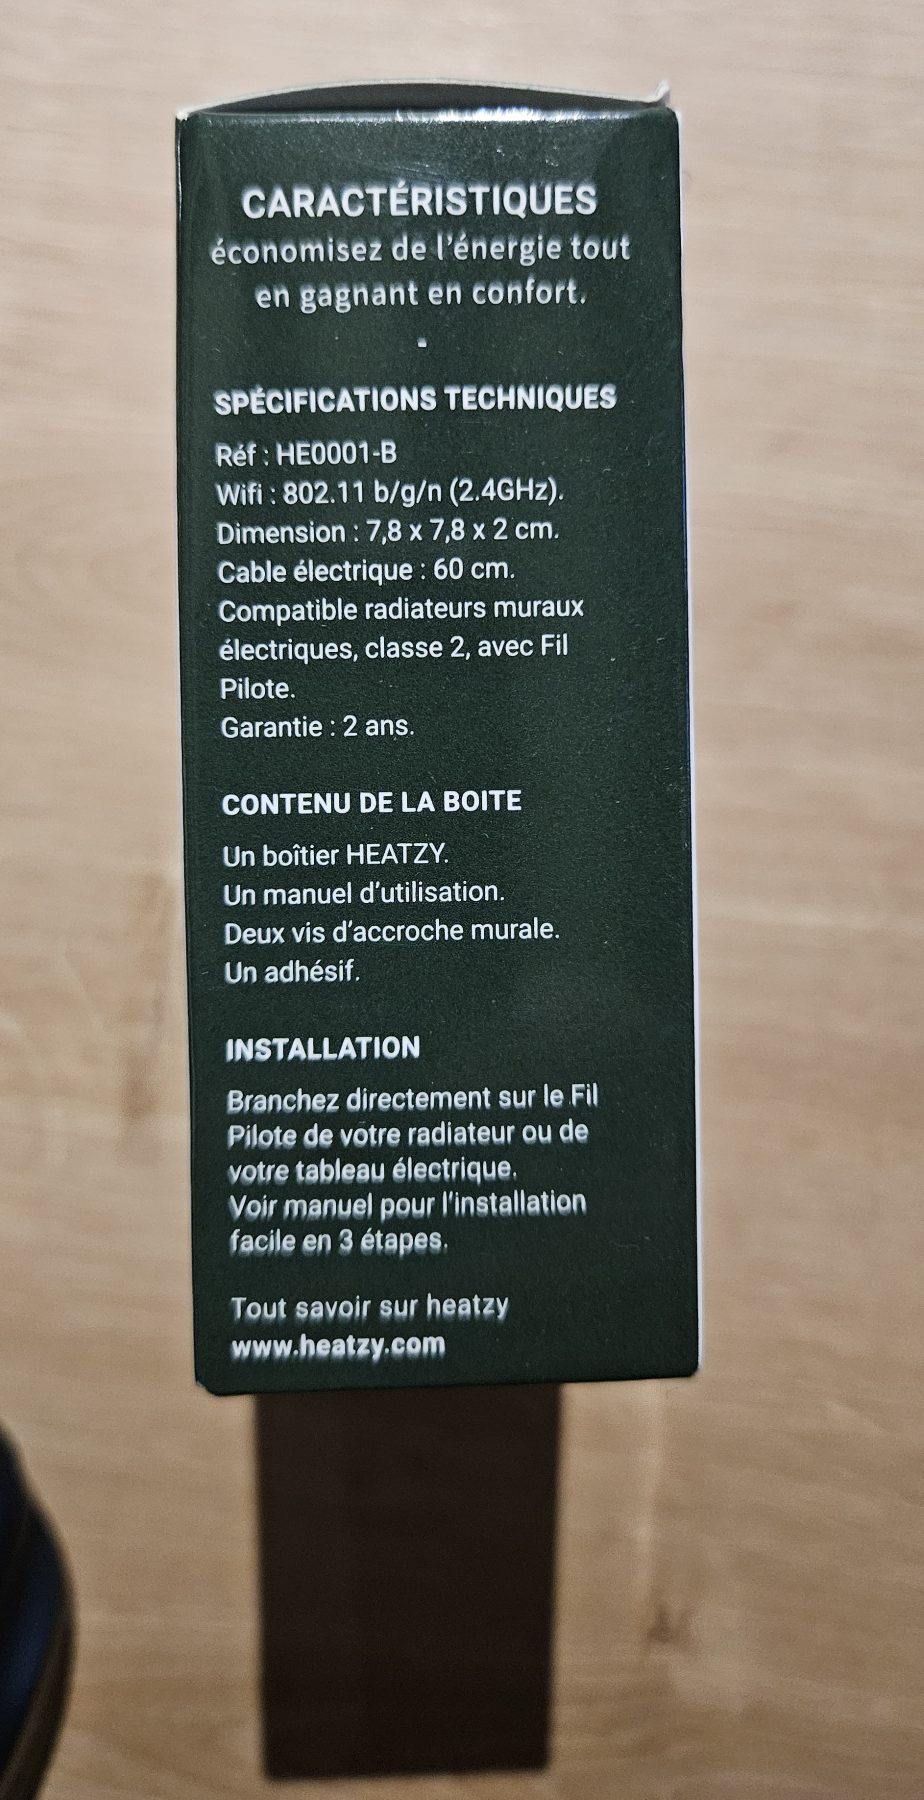
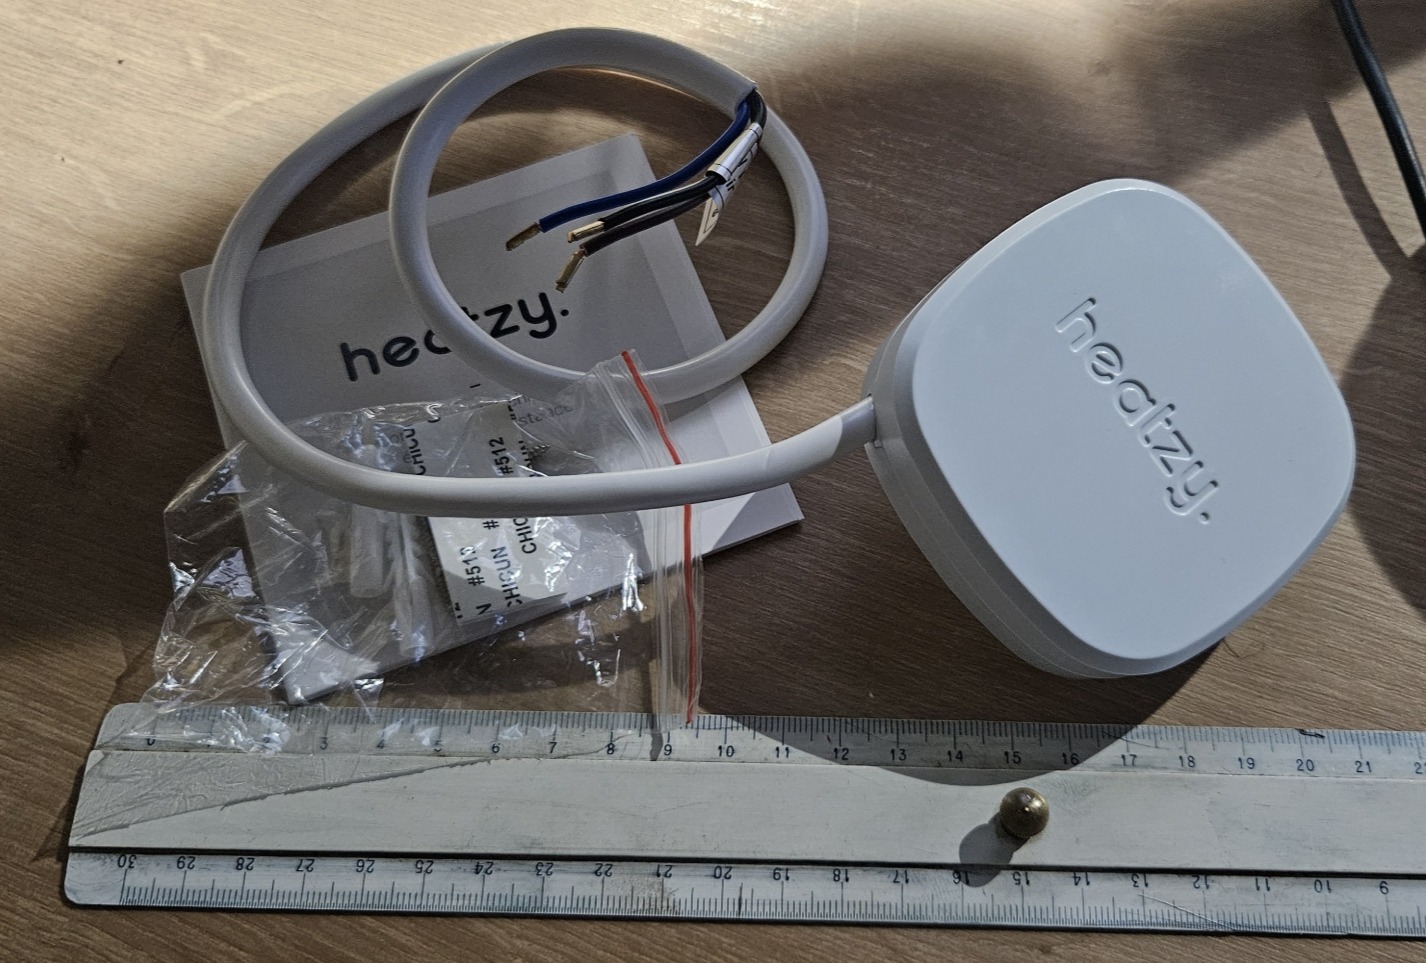
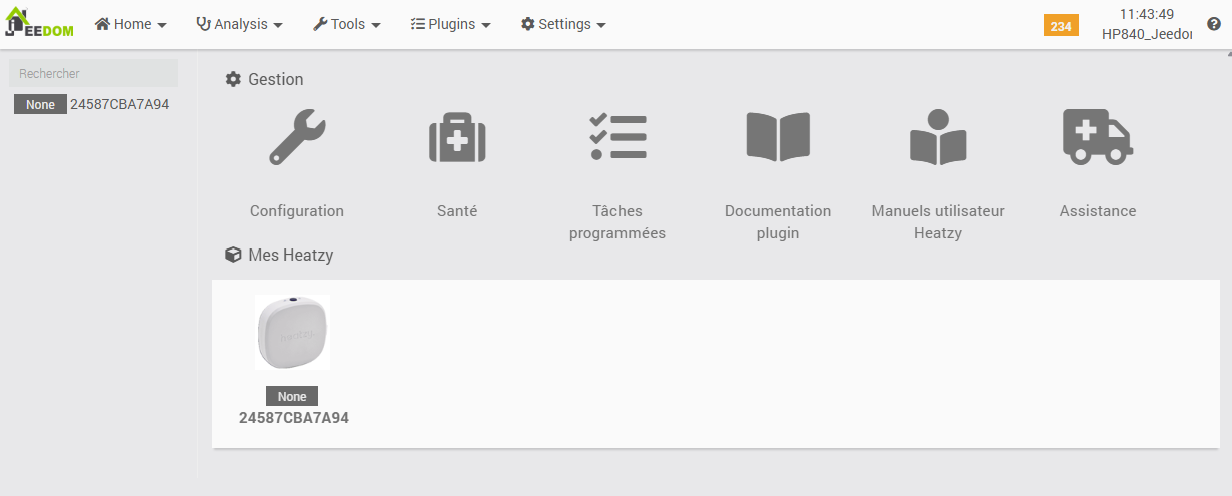
Unboxing & module documentation
Unboxing
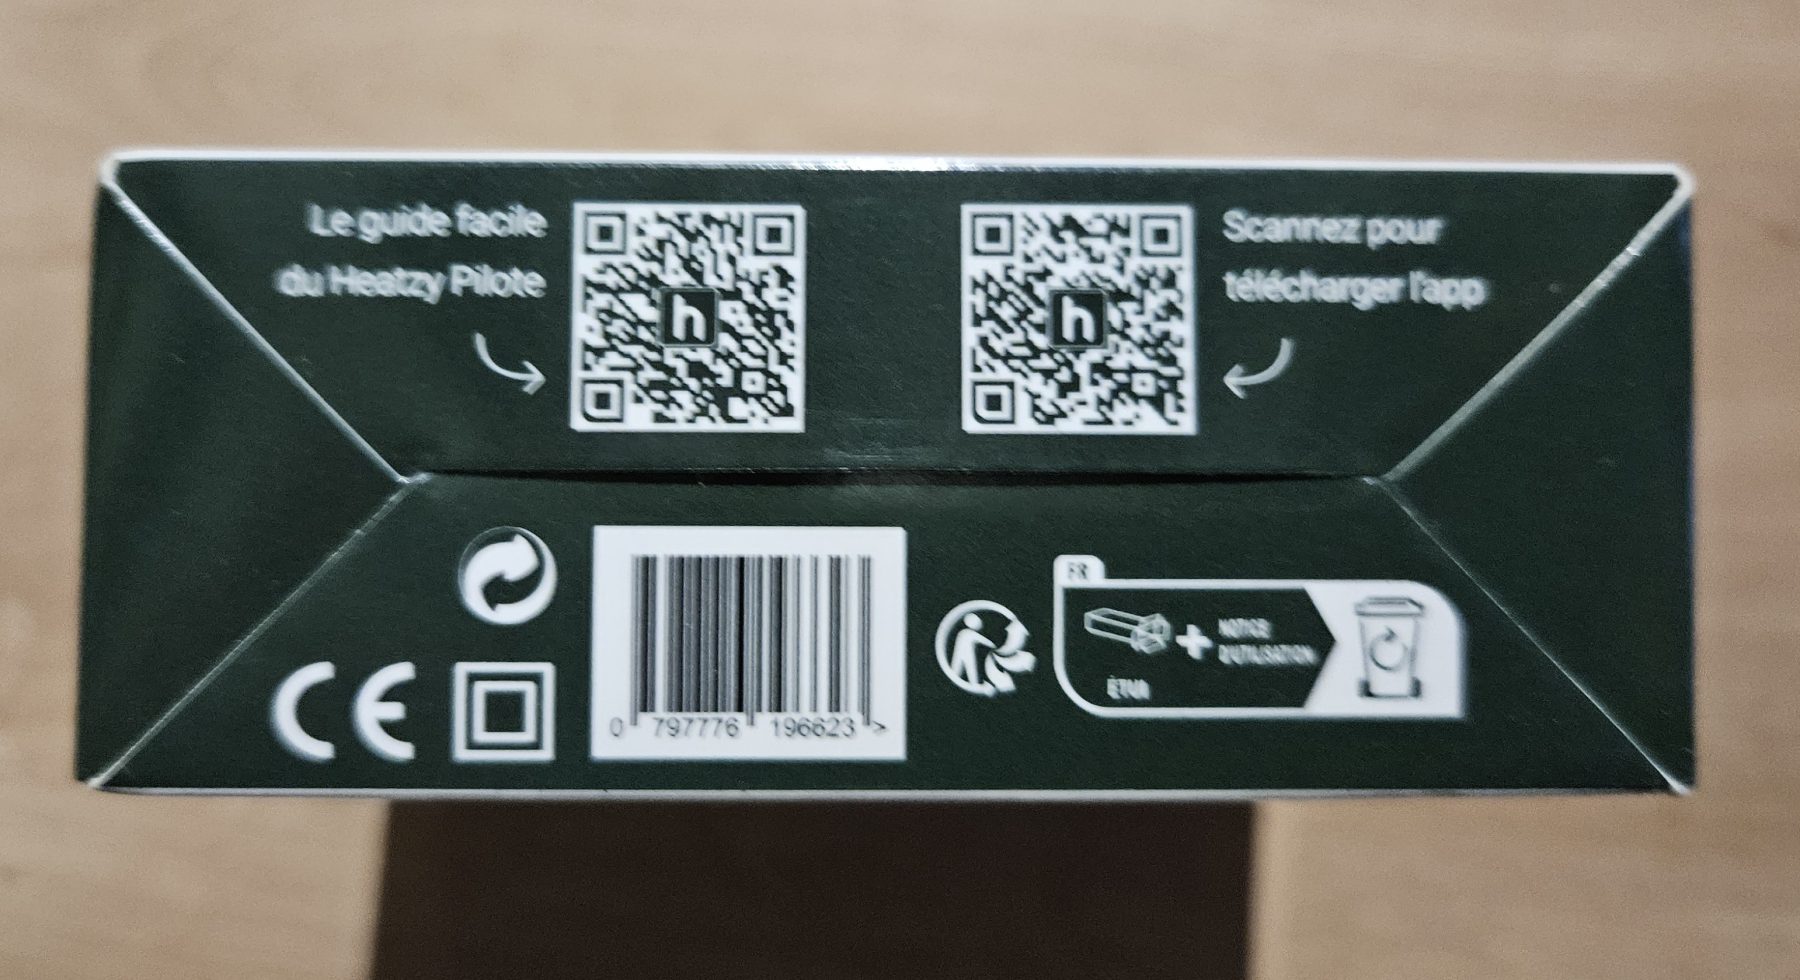
Nothing special regarding the module box. You can’t miss the QR codes linking to the documentation and the app to download, which is required to create a Heatzy account and configure the module (detection and association with home Wi-Fi for data transmission).
Documentation
Documentation is available here and especially this Installer’s Bible. Just in case, and I will remove them if it bothers the manufacturer, here is a local copy for precaution:
- Physical Installation
- The case, its 2 LEDs and button
- App download and account creation
- Pairing
- App interface
- Programming via the app
- Holiday mode via the app
- Locking module buttons via the app
- Boost mode (one-off programming override)
- Installer’s Bible (error codes, etc.)
I noted two points:
- Firstly, it seems very thorough and easy to understand (which it is).
- I’m not a fan of having “split” the necessary steps into several documents/files. Especially since on the Heatzy site, these files are not visually presented in the logical order of operations: reading from left to right and top to bottom, one would expect to find installation first, then the casing, then account creation (triggering app download), then pairing (using the app), then the interface.
Once this little mental puzzle is solved, we read: Prerequisites for pairing (The 7 Commandments and Phone Settings):
- Home Wi-Fi must operate on the 2.4 GHz frequency… And further on, it asks to separate the networks!
- The phone must have Wi-Fi, Bluetooth, and GPS enabled.
- The radiator must have the pilot wire enabled and be set to comfort mode at 21°C for verification.
Again, two observations:
- In an era where most routers are dual-band (2.4 GHz and 5 GHz), often on the same SSID because modern devices can choose their own frequency, this is questionable. At this stage, I have a moment of doubt because I’m clearly not going to split my Wi-Fi networks just for a radiator module. I suspect, however, that this is only an initial pairing issue: we’ll see that later.
- Bluetooth is likely needed to pass the Wi-Fi network credentials to the module during initial pairing, but why GPS? It doesn’t seem to be explained in the documentation.
Test wiring of the module (on a light bulb)
I test most of my new modules, even those I’m familiar with, on a basic setup with a light bulb to verify the outputs activate correctly from Jeedom before moving them to their final location.
Physical wiring
Installing a pilot wire module is generally very simple on a radiator (the module is powered by 230V just like the radiator, and the module’s pilot wire output connects to the radiator’s “incoming” pilot wire). With a light bulb, it’s slightly different but not complicated:
- The “wall” 230V phase powers the Heatzy module phase.
- The “wall” 230V neutral powers both the Heatzy module neutral and one of the bulb terminals.
- The Heatzy module “Pilote” output powers the other terminal of the bulb.
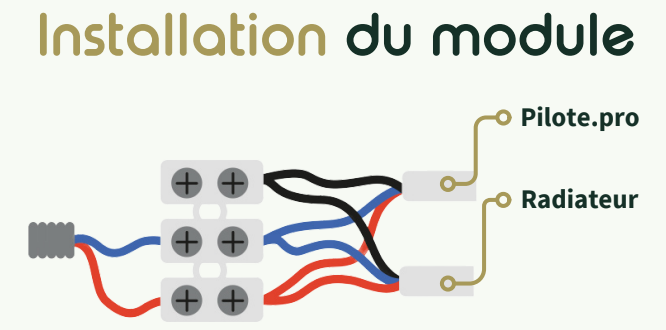
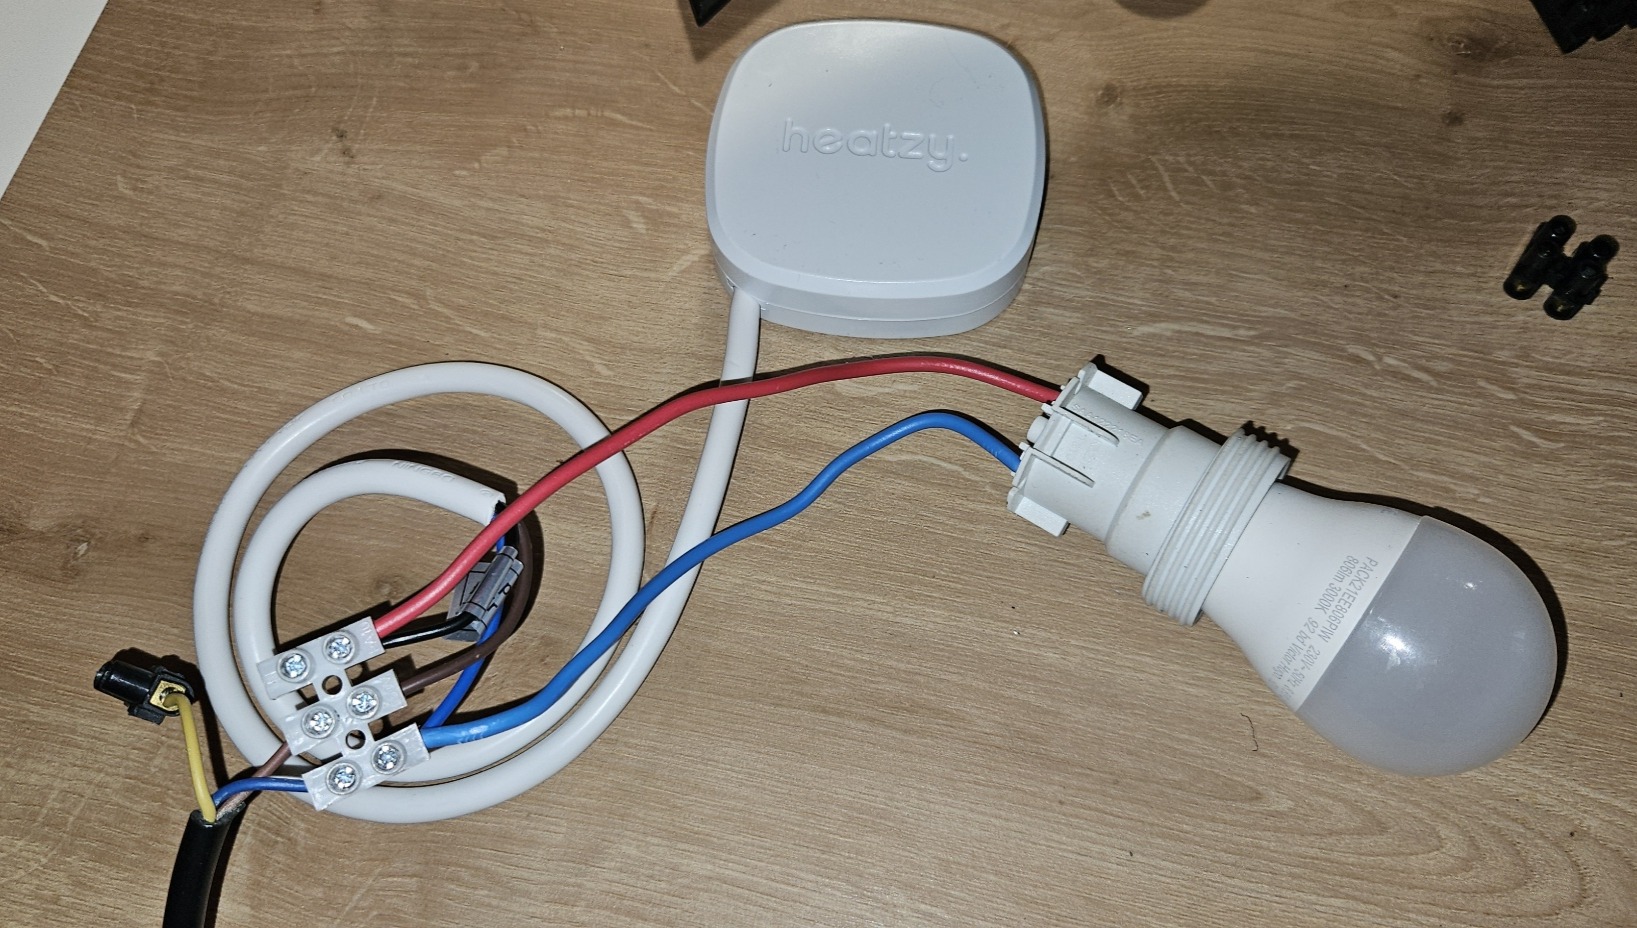
Warning: always turn off the power before modifying wiring, use a standard 230V bulb or a small neon indicator, and work in a box or on an insulated setup, as the “outgoing” pilot wire also carries 220-240V.
Coding of the 6 commands of the pilot wire & expected result
To test a pilot wire module with a light bulb, we exploit the fact that commands are coded on the pilot wire by the presence of 240V on specific half-cycles, causing the bulb to light up differently depending on the mode (continuously on, off, or “half the time” — i.e., a flicker due to the half-cycle).
Here is the theoretical GIFAM correspondence table; in practice, with a simple bulb, one can only clearly distinguish 0V / 230V and “half” cases, but cannot tell the difference between the “different” half-cycles:
| Radiator Mode | Signal between Pilot Wire and Neutral | Typical 230V Bulb Response |
|---|---|---|
| Comfort | 0 V | Permanently OFF |
| Comfort -1 °C | Periodic + and – half-cycles (frames) | Slight flicker / unstable, hard to read without an oscilloscope |
| Comfort -2 °C | + and – half-cycles at a different rate | Different flicker, also hard to distinguish visually |
| Eco (reduced / night) | Permanent 230 V | Permanently ON |
| Frost-protection | 230 V on a single half-cycle (e.g., negative) | Reduced brightness (approx. half) or slight shimmering |
| Off | 230 V on the other half-cycle (e.g., positive) | Reduced brightness (other “half”), visually close to frost-protection |
At this stage, after powering the module, the only possible test is using the module’s physical button (which should already show it’s working), so we move to the next step: pairing the module with the Heatzy infrastructure, starting with the mobile app, followed by inclusion in Jeedom for centralised control.
Pairing the module with the Heatzy infrastructure
The goal here is to get the module working with its “standard” mobile app, which is also used for the initial configuration and linking to Heatzy servers.
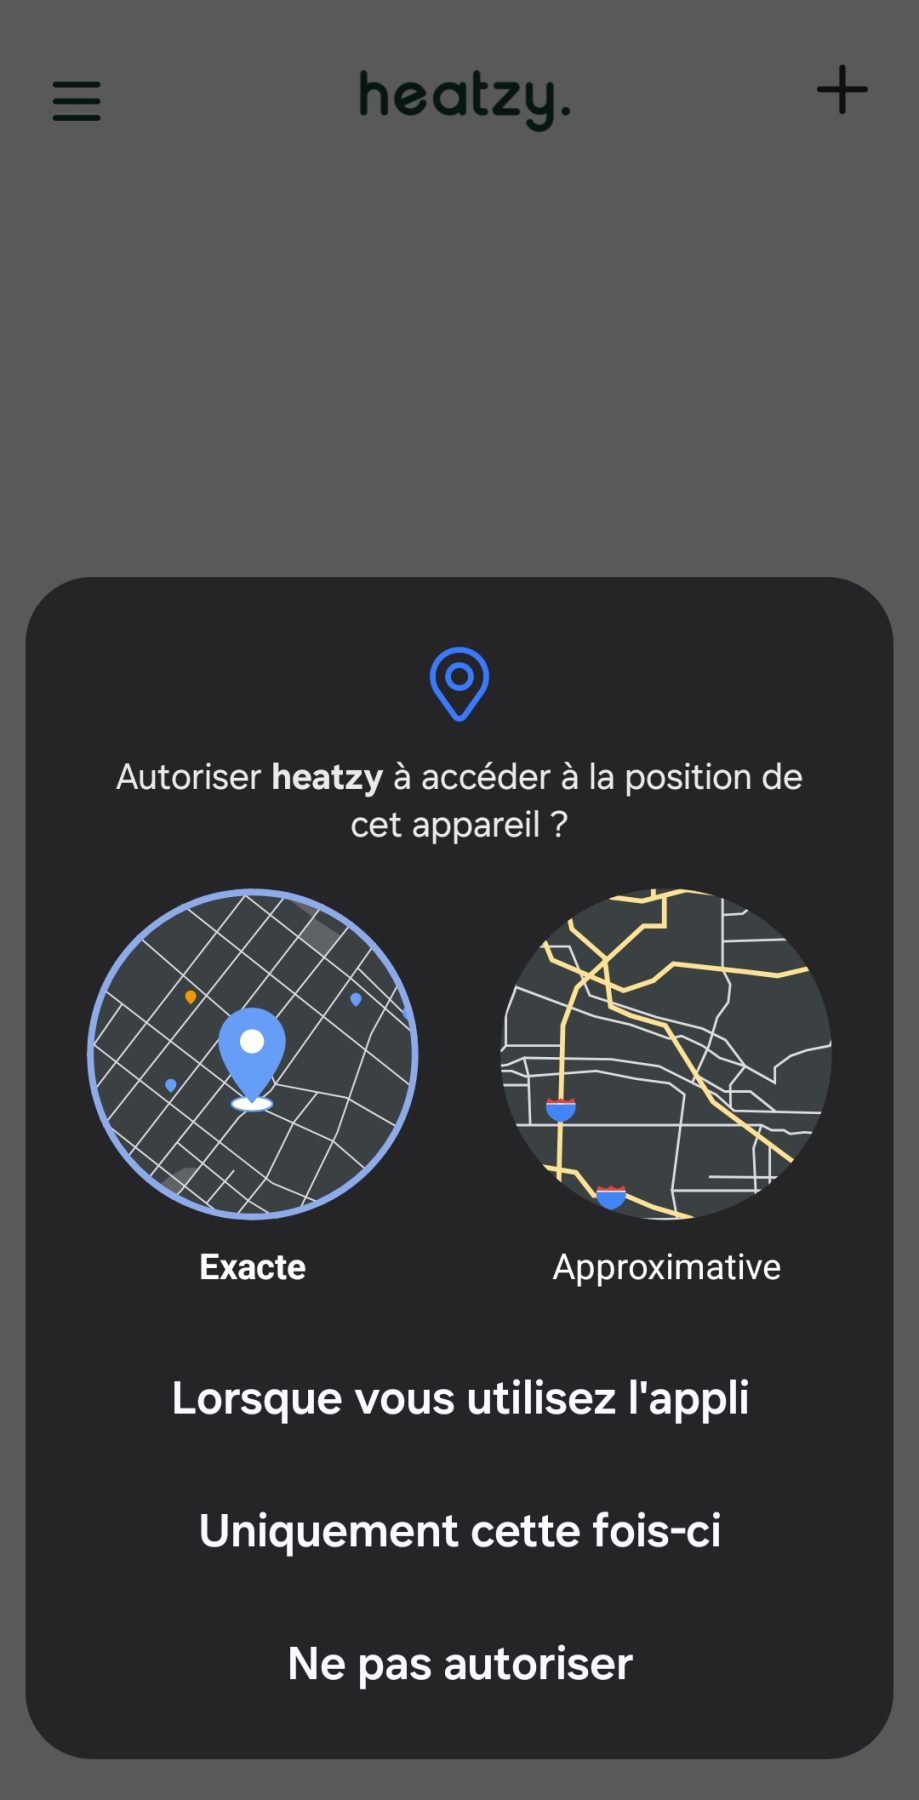
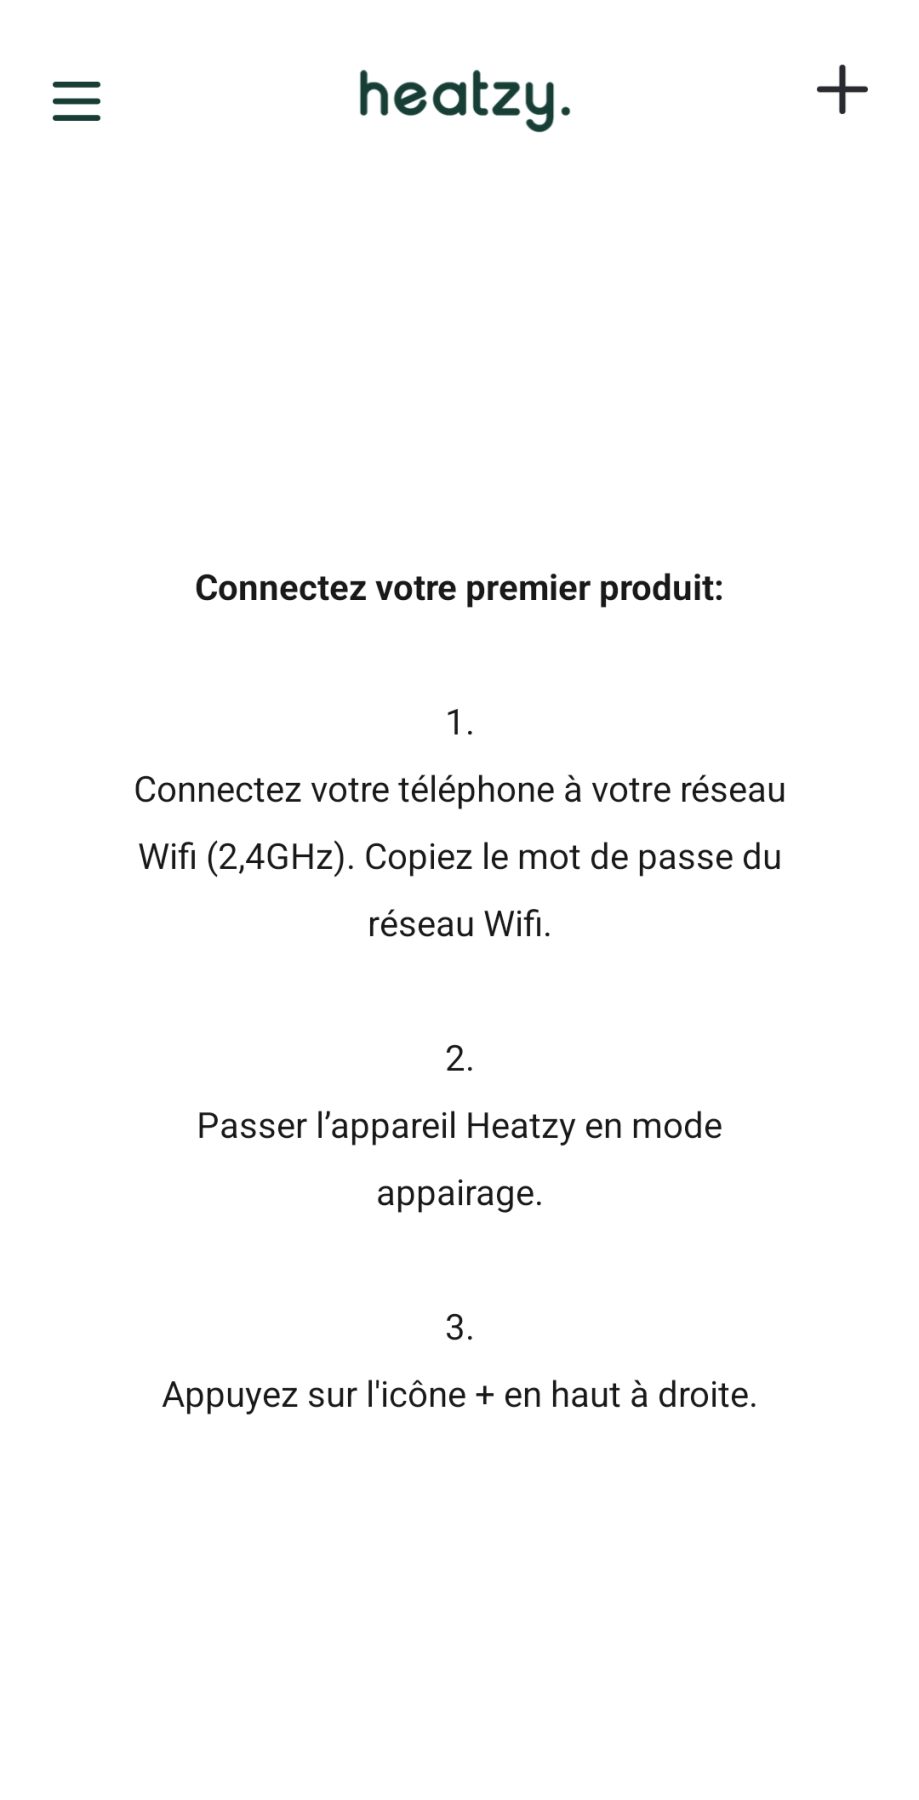
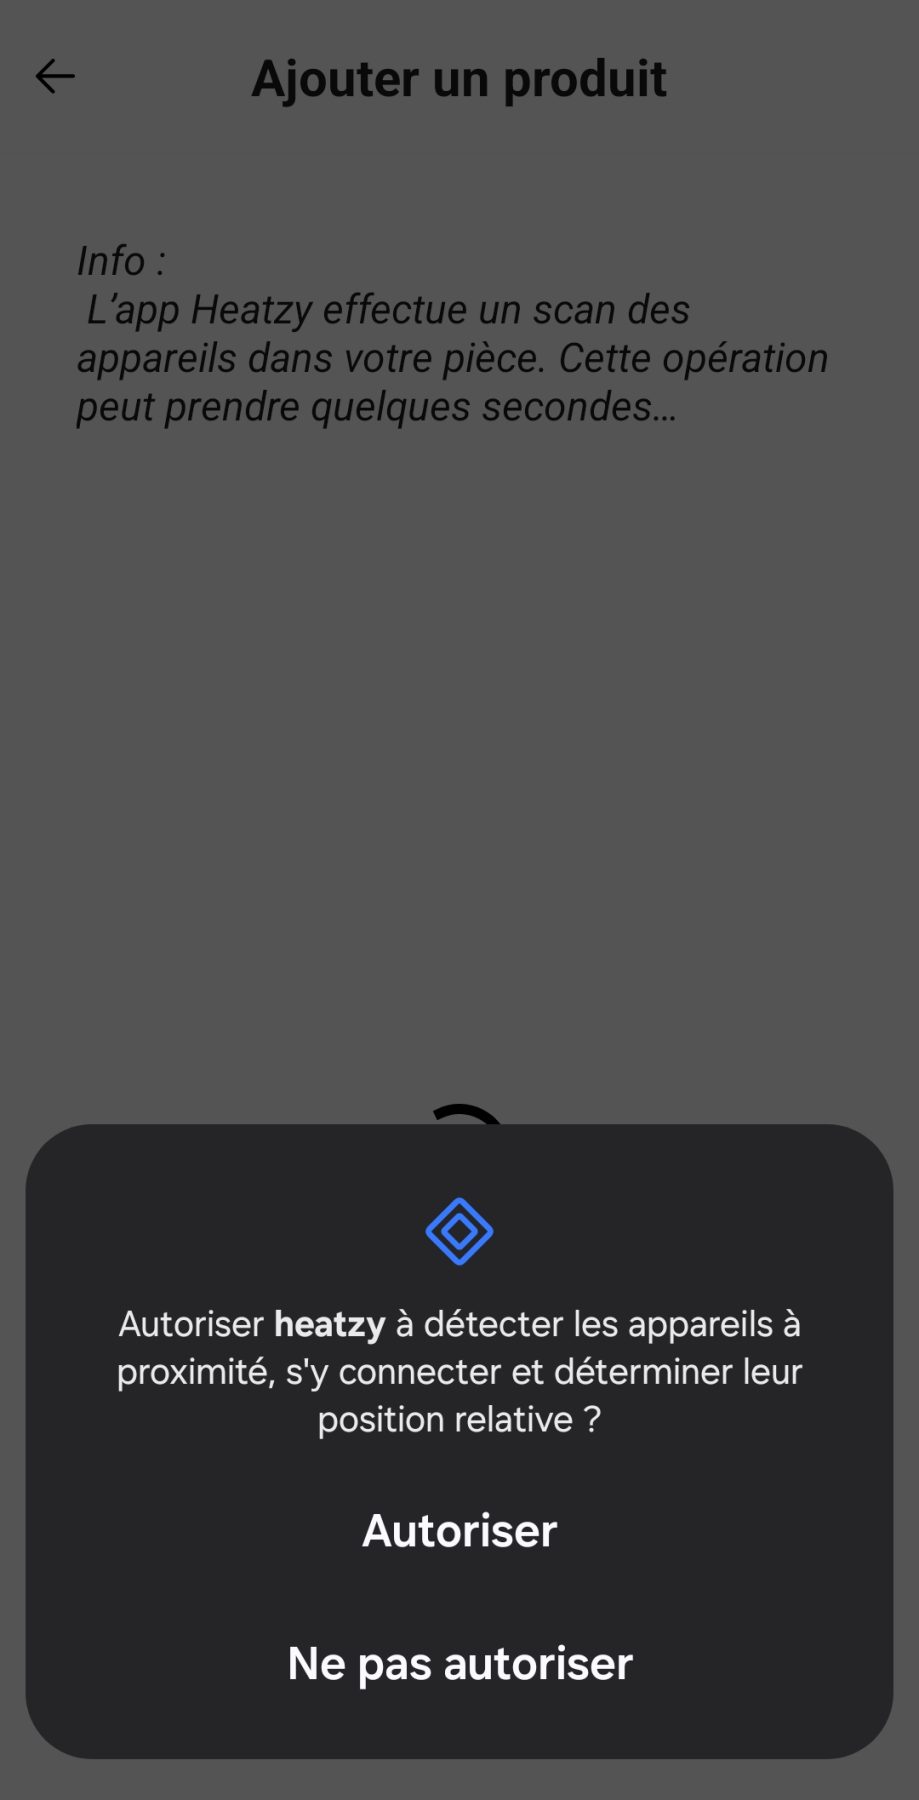
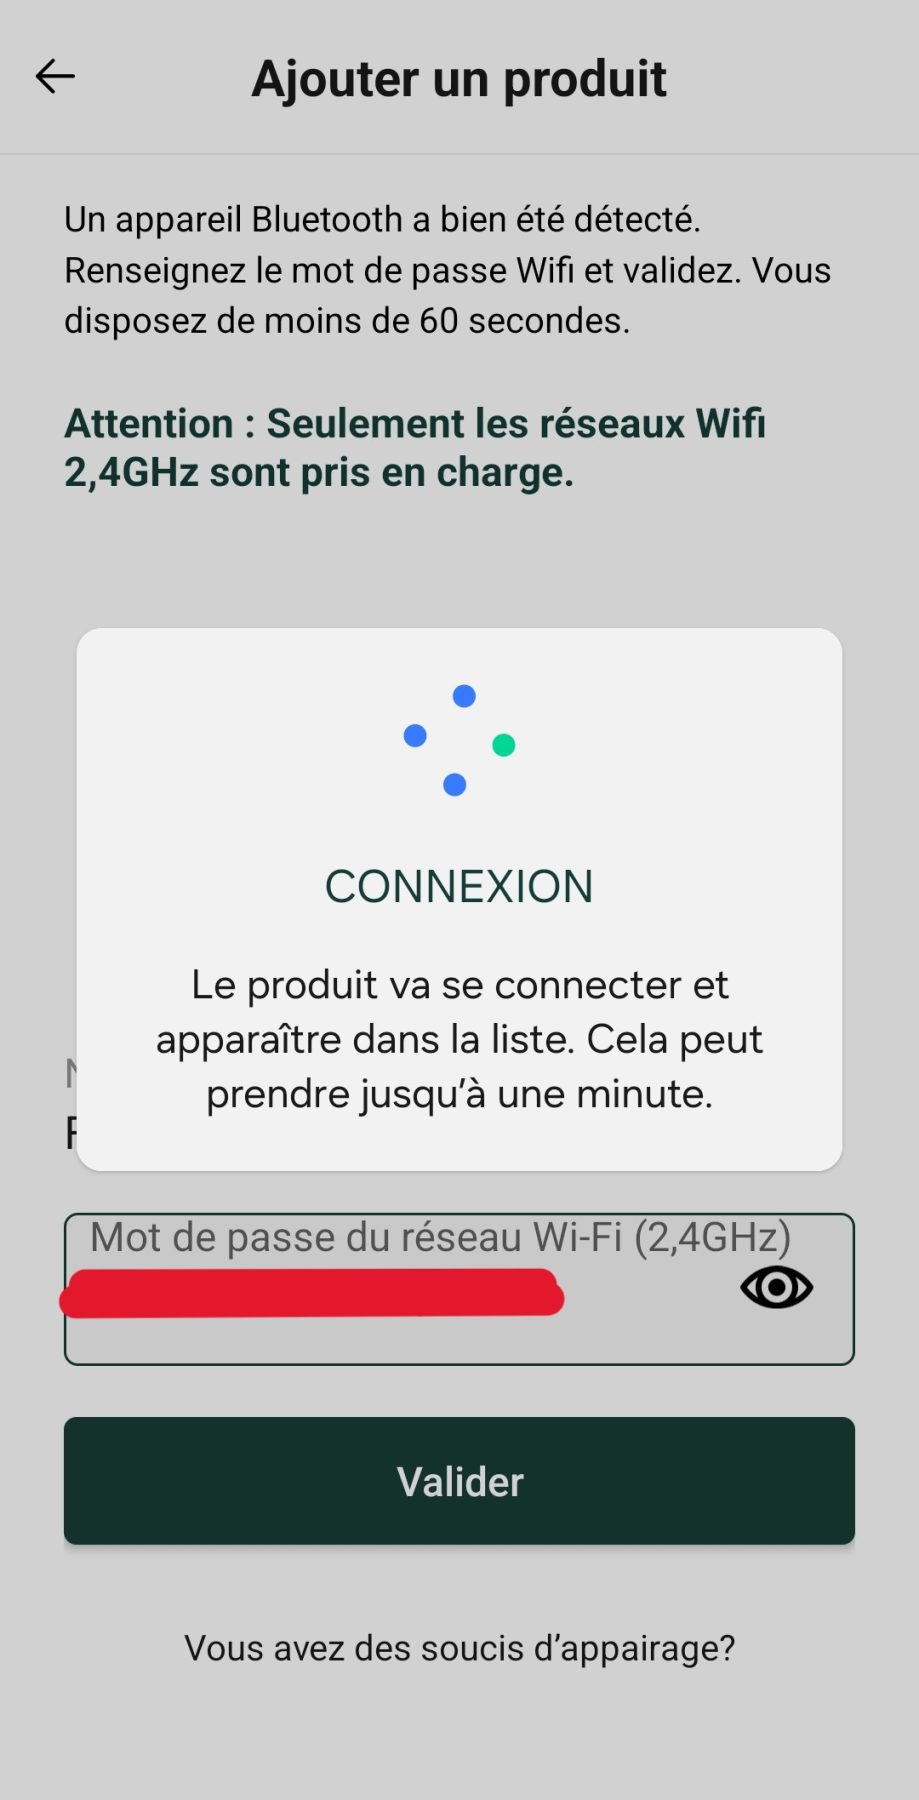
The following screenshots show the entire process on an Android mobile (likely identical on iOS): upon launch, it requests GPS location (off to a great start! :)), then account creation, followed by Bluetooth pairing with the module (holding the physical button for 10 seconds), requesting Bluetooth connection authorisation, entering the Wi-Fi password, and the connection attempt.


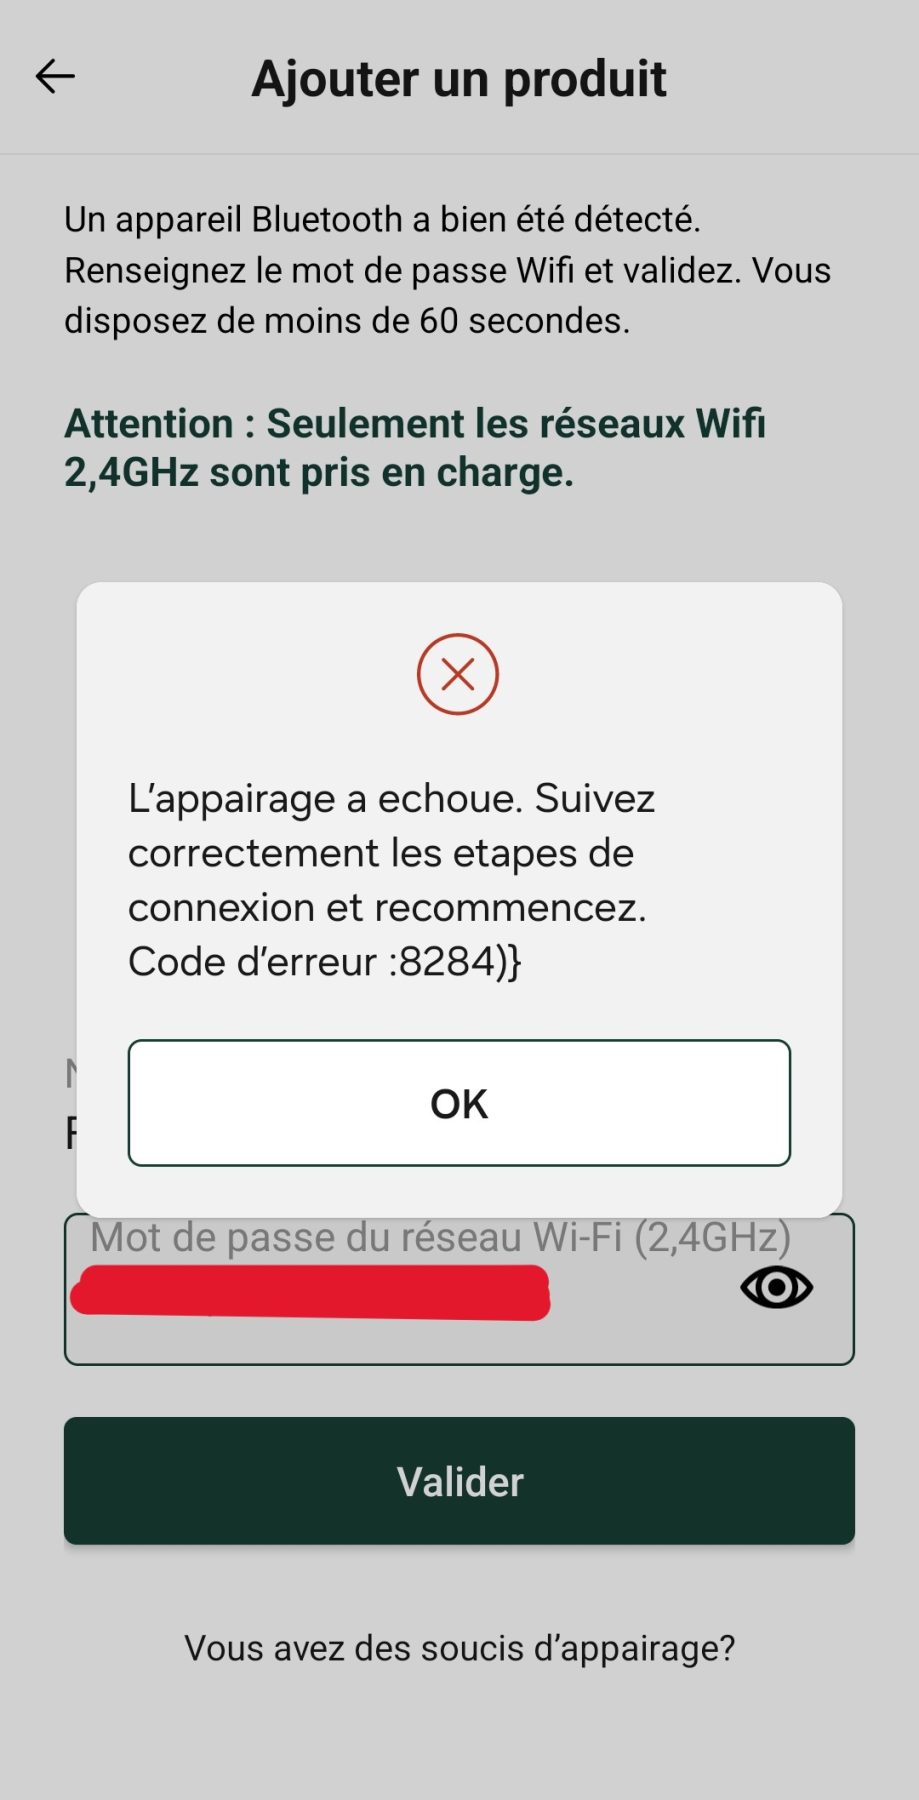
And then, disaster strikes: pairing failed.
So, what does the documentation say about this error? Nothing, as this code doesn’t appear in the Installer’s Bible — a real shame. But, given the warnings in the documentation and on the app screens, one might wonder if it’s related to the dual-band 2.4 & 5 GHz Wi-Fi, as my two networks share the same name.
So, we’re going to try a little workaround at the router level…
Bypassing the 2.4 GHz Wi-Fi restriction
The steps are simple and take about 10 minutes: temporarily disable the 5 GHz band to force my phone to pair on 2.4 GHz, retry the module pairing via the phone, verify it works, re-enable 5 GHz, and check if the module still functions.
1. Disabling 5 GHz Wi-Fi on the router
On a Freebox, this is done via the admin interface: just uncheck a box and don’t forget to apply at the bottom. For other ISPs, I’m not sure, but I recall it’s also possible to temporarily disable 5 GHz on an Orange box.
2. Re-pairing the phone & module on 2.4 GHz
Once 5 GHz is off, the second step is to reconnect the phone used for pairing to the 2.4 GHz network. Normally, it should happen automatically, but a quick toggle of flight mode speeds things up. Then, we restart the module pairing process.

Indeed, without the 5 GHz network, the phone sends a configuration that the module successfully uses to hook onto the Wi-Fi, allowing it to communicate with the Heatzy infrastructure and finally show up in the mobile app.
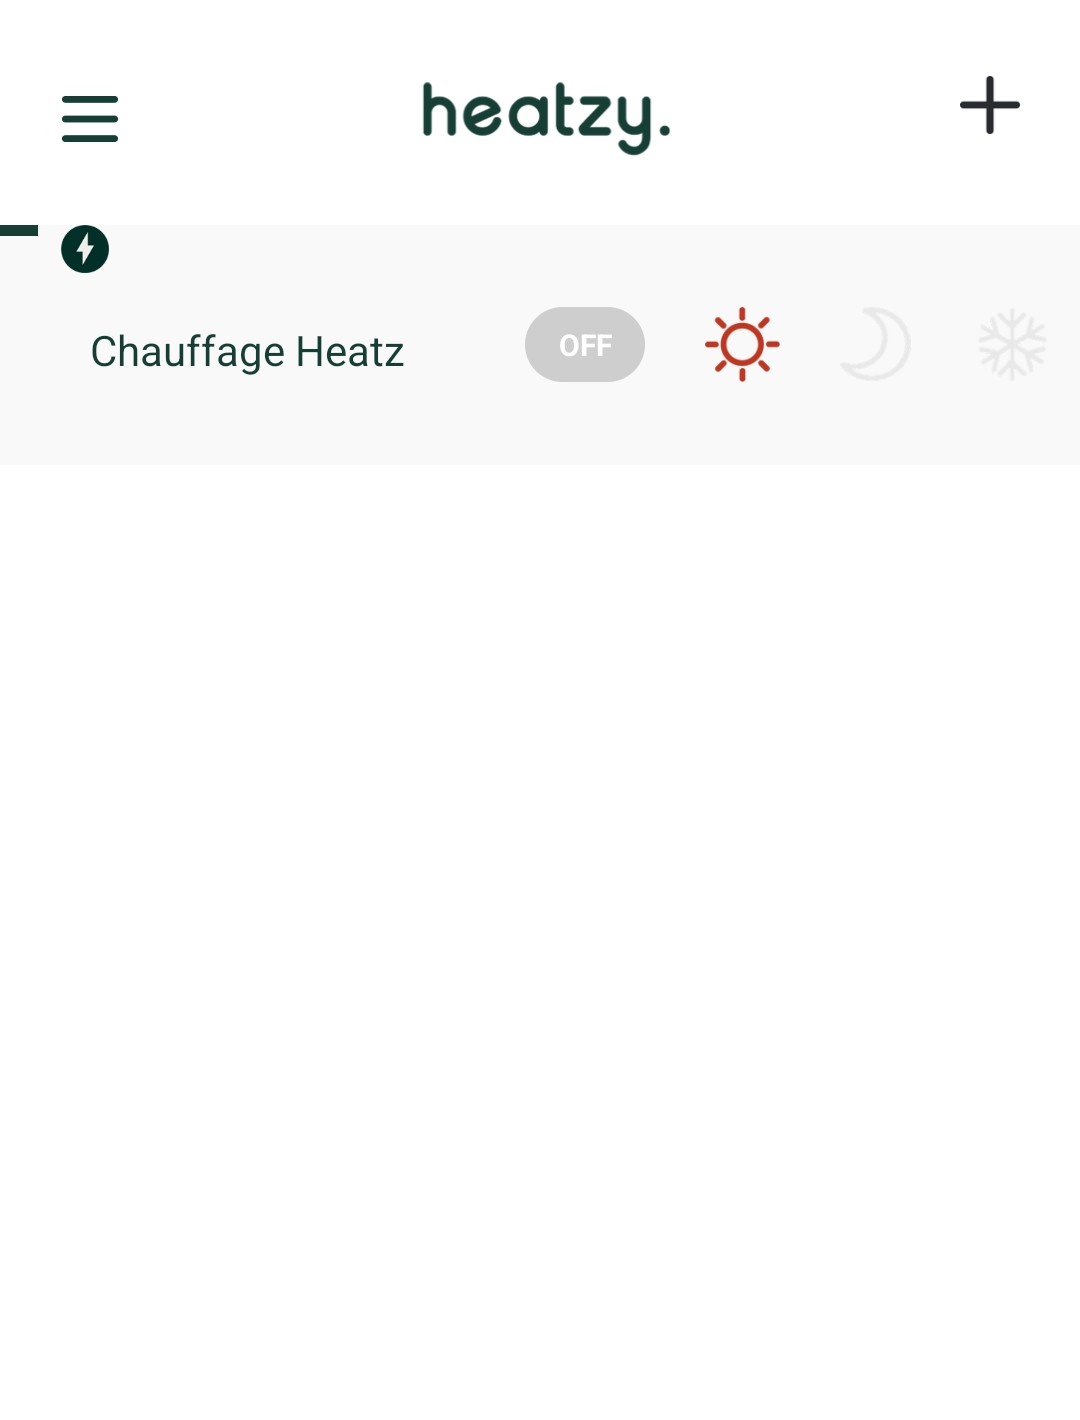
At this stage, the mobile app is functional. The 4 modes displayed in the app correctly trigger the expected bulb behaviours:
- Sun (Comfort) → bulb OFF
- Moon (Eco) → bulb ON (no flicker)
- Snowflake (Frost-protection) → bulb flickers
- OFF → bulb flickers (similar to frost-protection)
We’re reassured, but disabling the 5 GHz network isn’t ideal, and I don’t want to change its SSID name to avoid reconfiguring all home devices.
3. Re-enabling 5 GHz & validating operation
Simply re-enable 5 GHz on the router and verify devices reconnect. I confirmed that even without restarting the Heatzy, the app continues to control the module and bulb.
After restarting the module with both bands active on the same SSID, control remained possible. This is great, as official docs advise against identical SSID names. It’s positive again, because this is the expected/target behaviour, even though the official documentation clearly states that you should not give the 2.4 GHz and 5 GHz networks the same name/SSID.
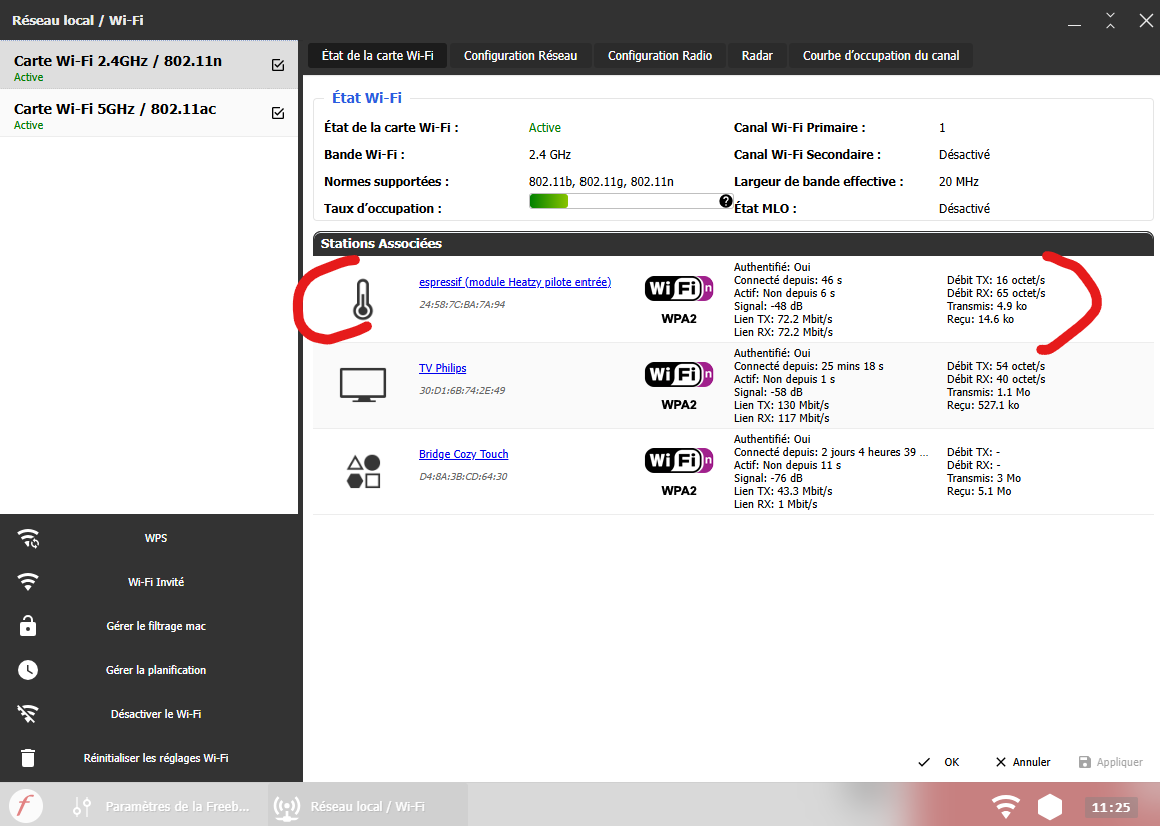
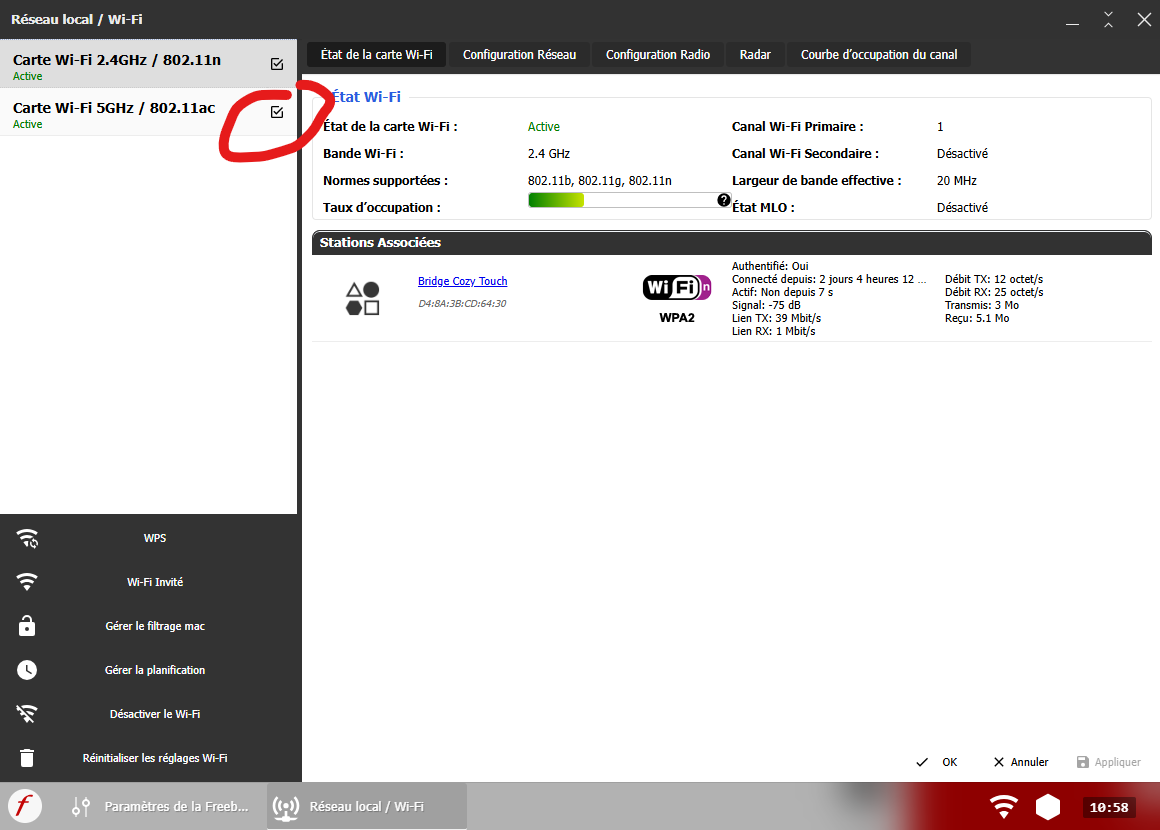
Note: the name ‘espressif’ appearing on the DHCP server corresponds to an ESP32 manufacturer. The MAC address is not listed on the device or its packaging; however, it corresponds to the reference reported within the mobile application.
Jeedom integration
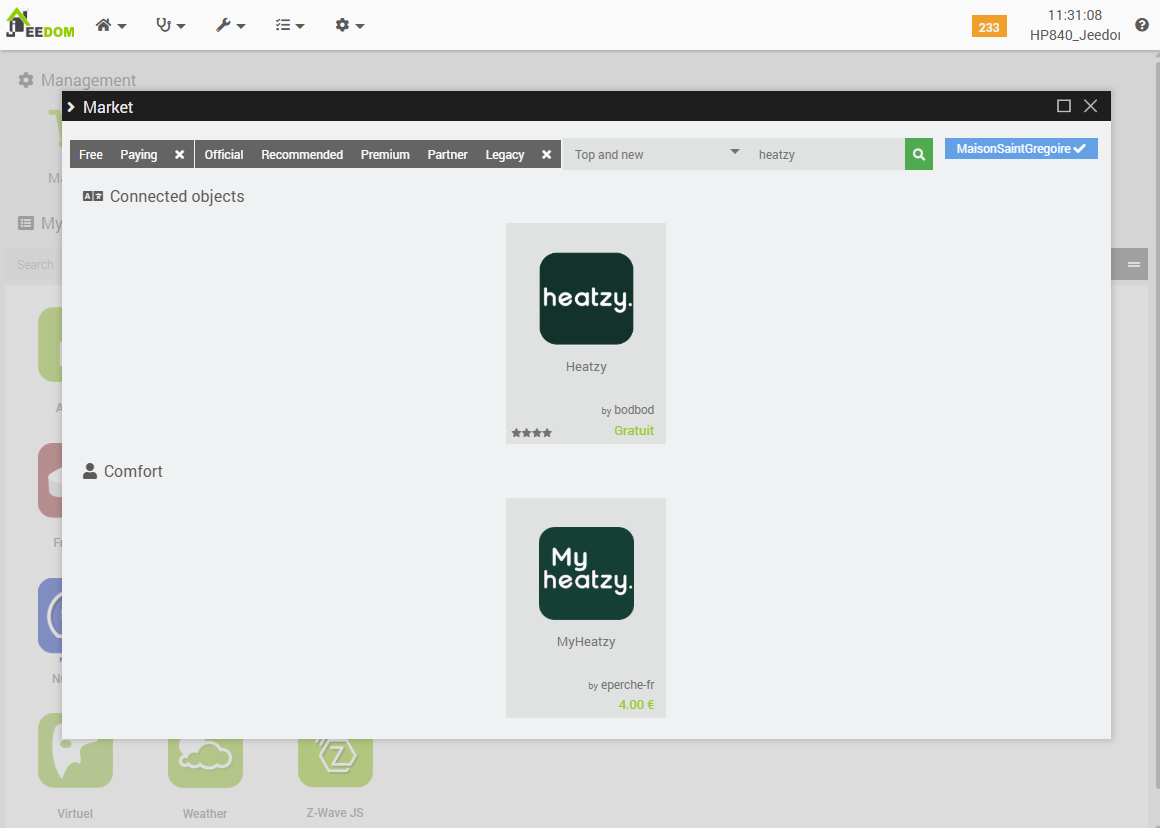
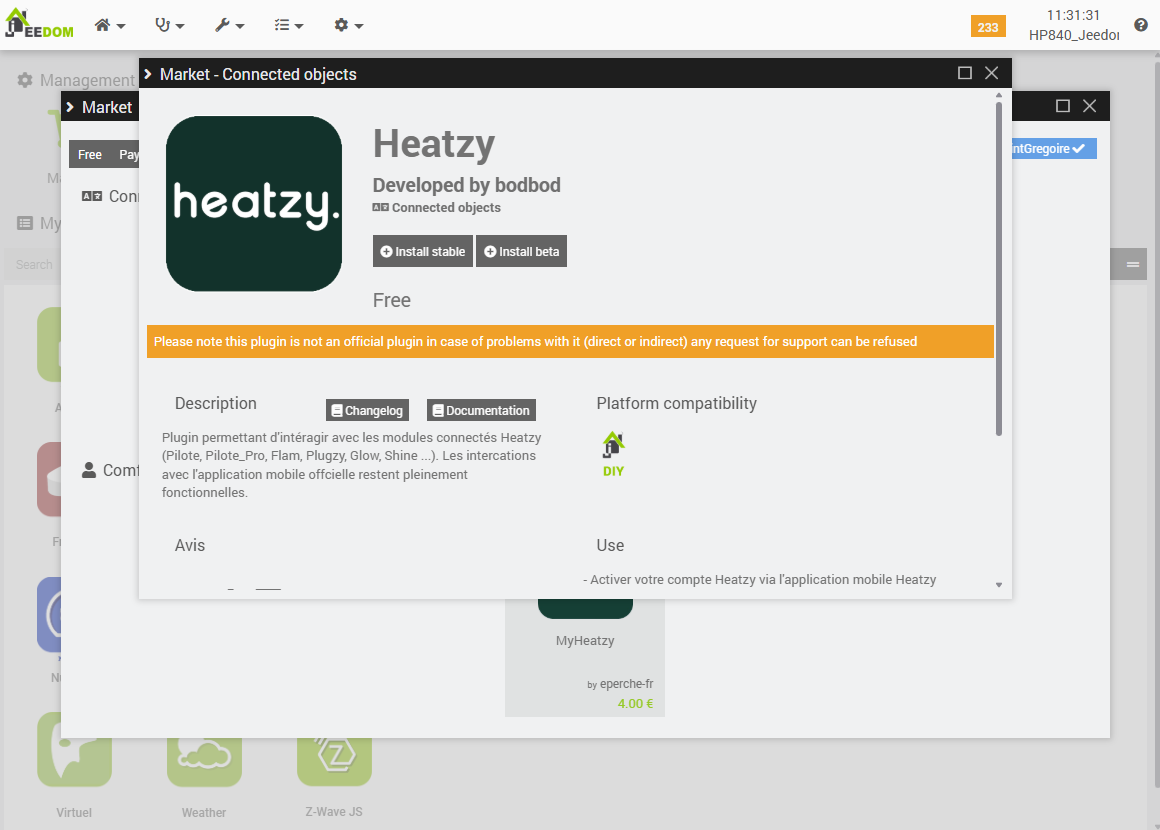
1. Installing the Heatzy plugin
We’re using the free module. Its documentation is here and seems manufacturer-supported as it’s linked on their blog.
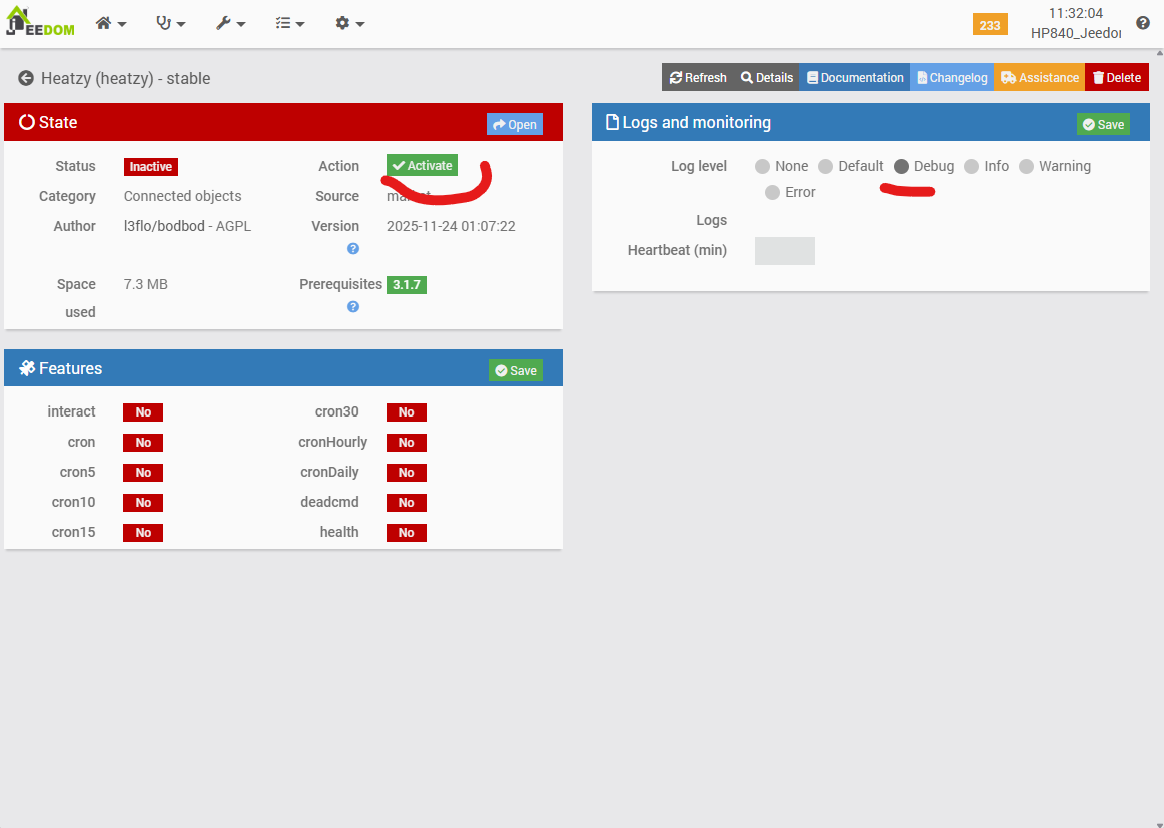
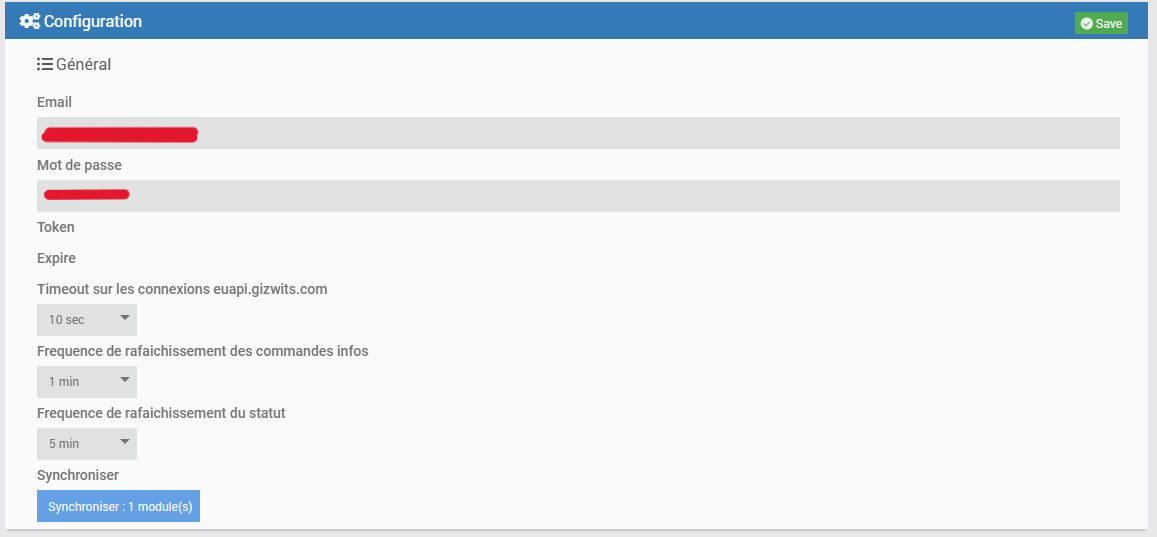
Once active, enter your Heatzy app credentials and synchronise.
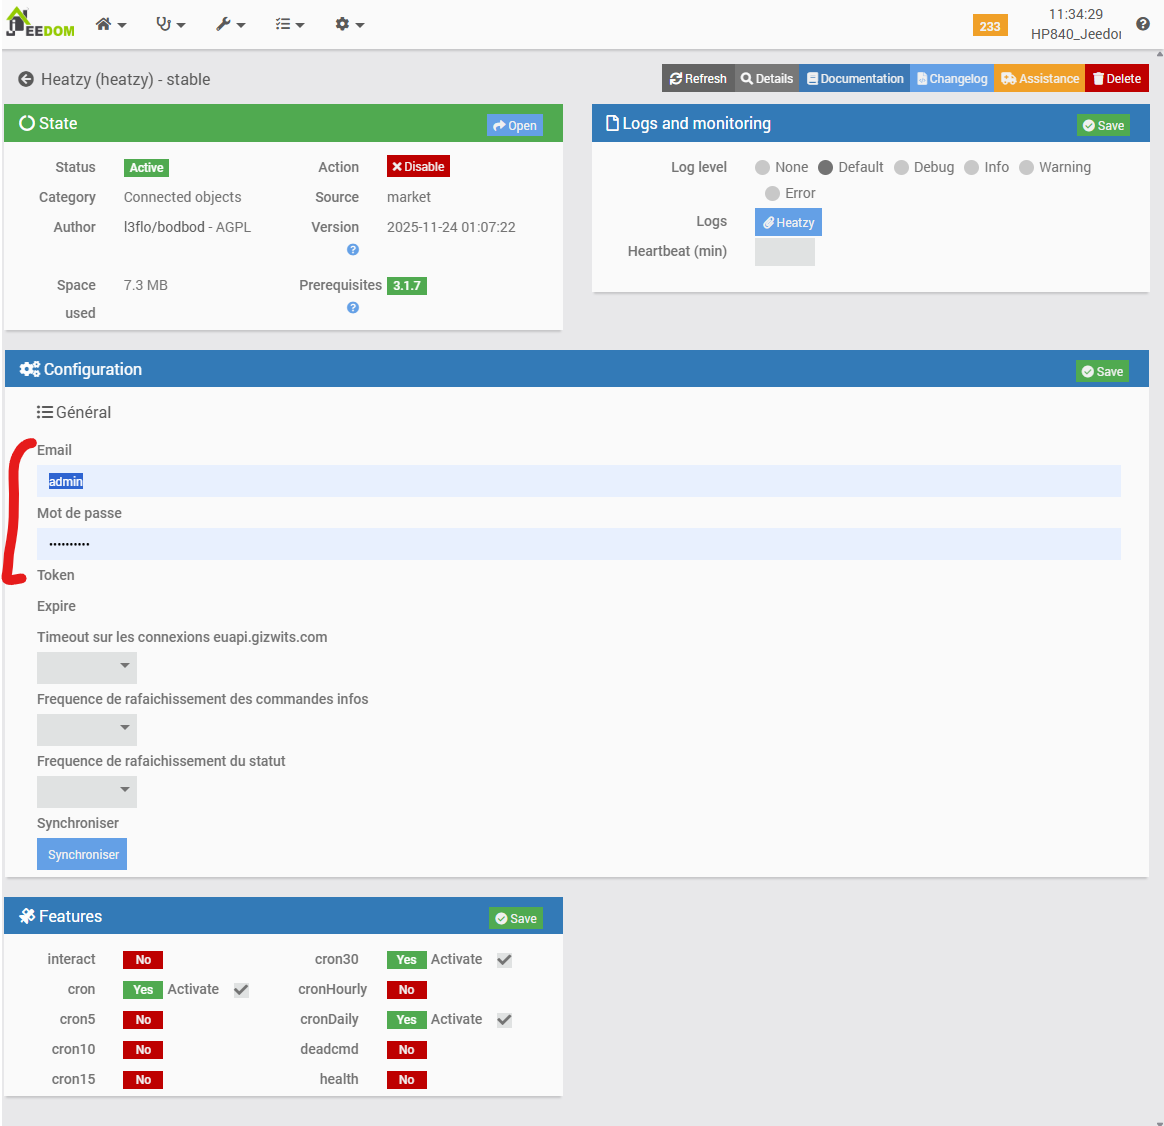
During sync, the bulb reacts and configuration fields update with the auth token. The configuration page must also be updated once the authentication token has been received. Note that the three fields have been filled in. Leave these at their default values.
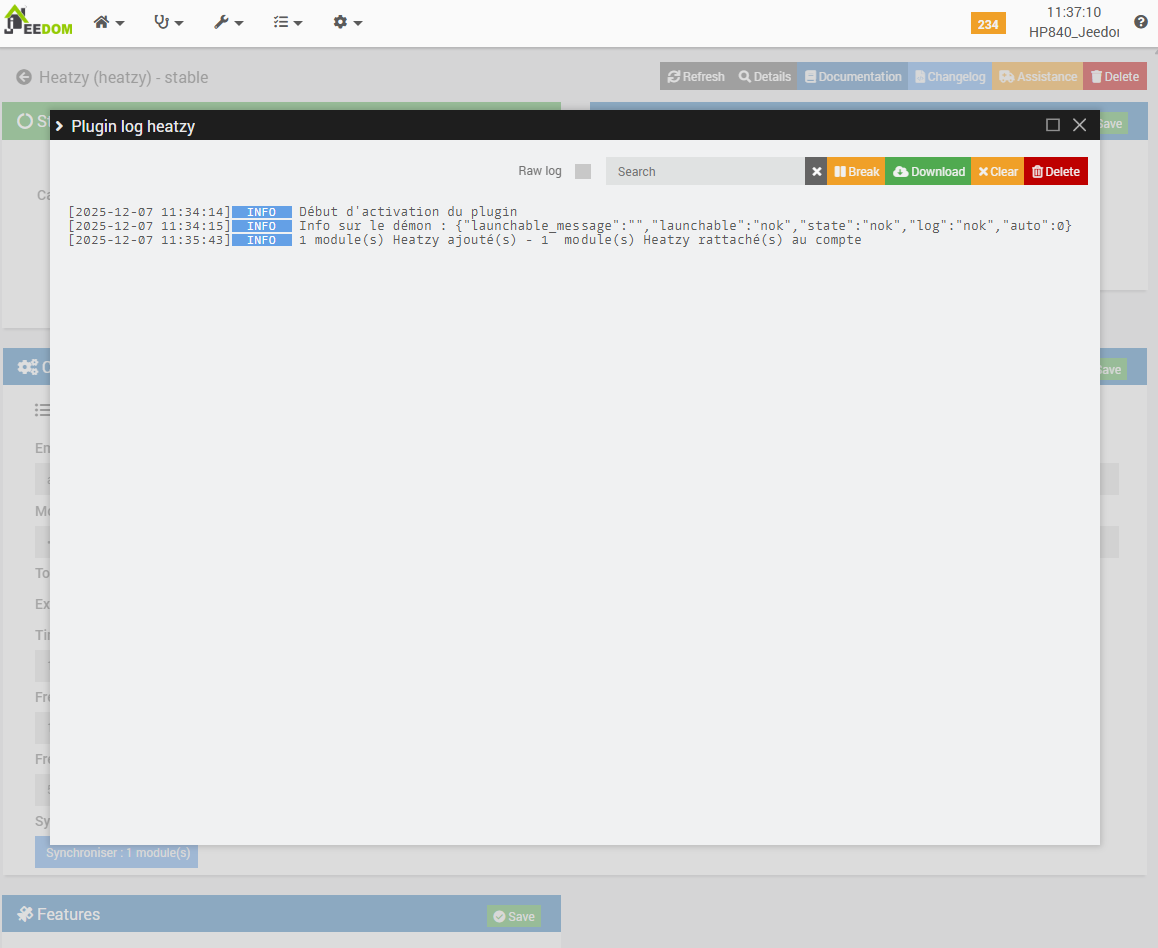
As a matter of routine, I examine the logs to review the sequence of events. In this instance, using the default logging level, it can be observed that the server synchronization sequence successfully retrieved a module. This is a favorable result, as the alternative would have been a cause for concern.
2. Module configuration
Since a module has been successfully retrieved into Jeedom from the Heatzy infrastructure, we shall proceed with its configuration. To do so, the plugin interface is accessed via the corresponding entry in the dedicated menu.
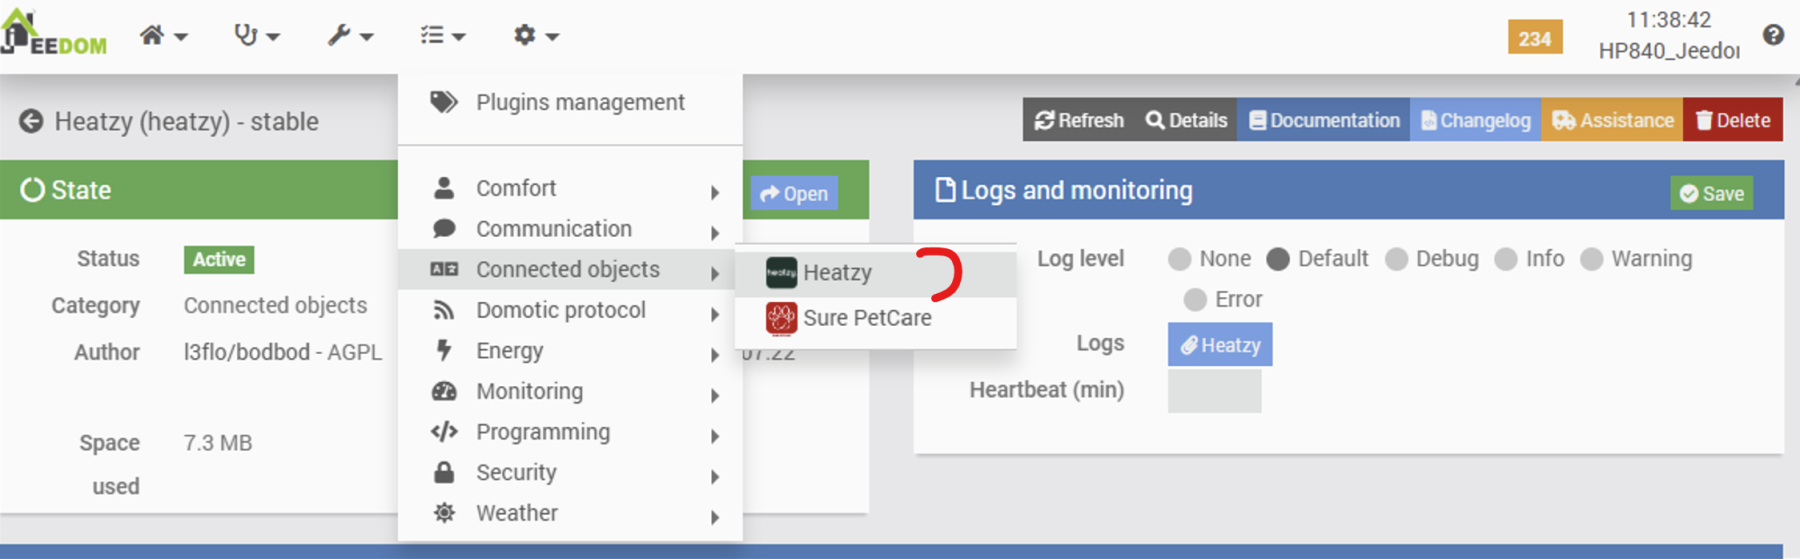
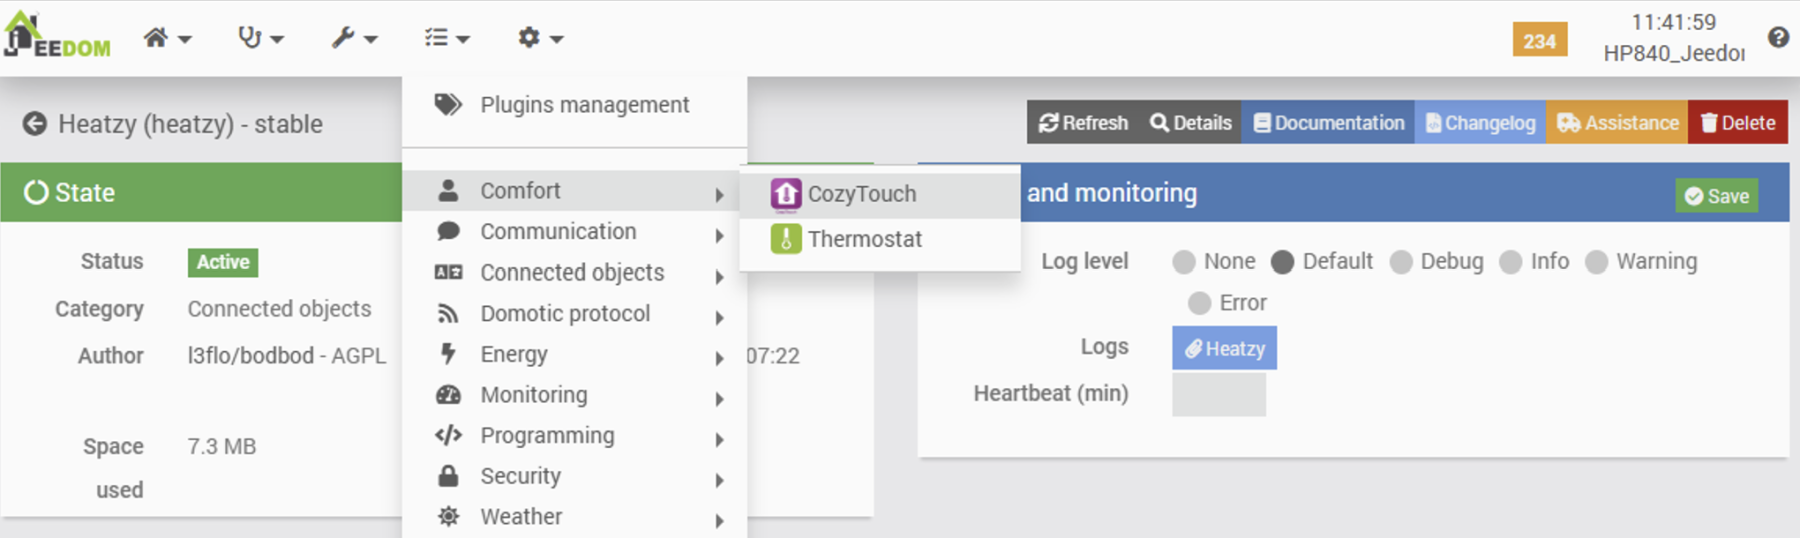
It is noteworthy that this plugin is accessible via the ‘Connected Objects’ menu, whereas other heating-related plugins (such as the Cozytouch plugin or the ‘standard’ Jeedom Thermostat plugin) are located under the ‘Comfort’ menu. While this does not constitute a technical issue per se, and may appear as a minor detail, it nonetheless results in a lack of overall consistency within the interface.
Once the functional configuration page of the plugin is accessed, the presence of a module is confirmed. Its identifier matches the MAC address previously identified within the Freebox administration interface, which also corresponds to the ID retrieved by the Heatzy mobile application during the pairing process. This indicates a consistent synchronization across all interfaces.
A minor point to note is the absence of English translations for the labels. We shall now proceed to the Health tab for further inspection.
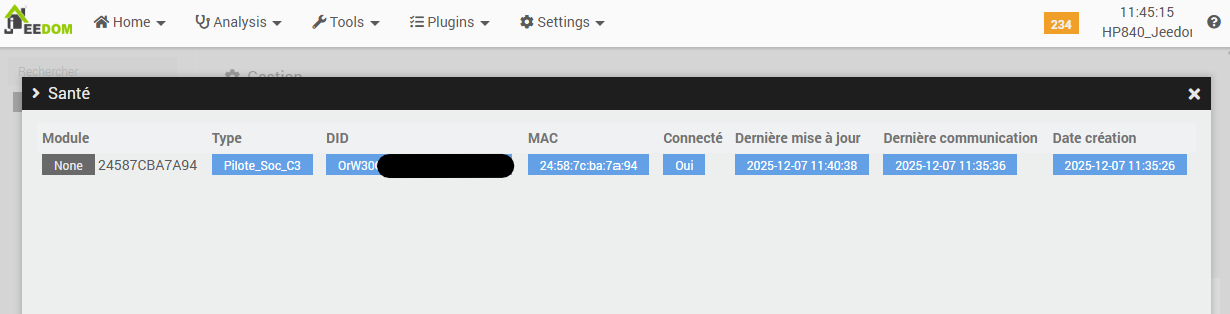
This section contains potentially significant information, including the connectivity status and key timestamps for data reporting, creation, and other events. We shall now proceed to the configuration of the new module.
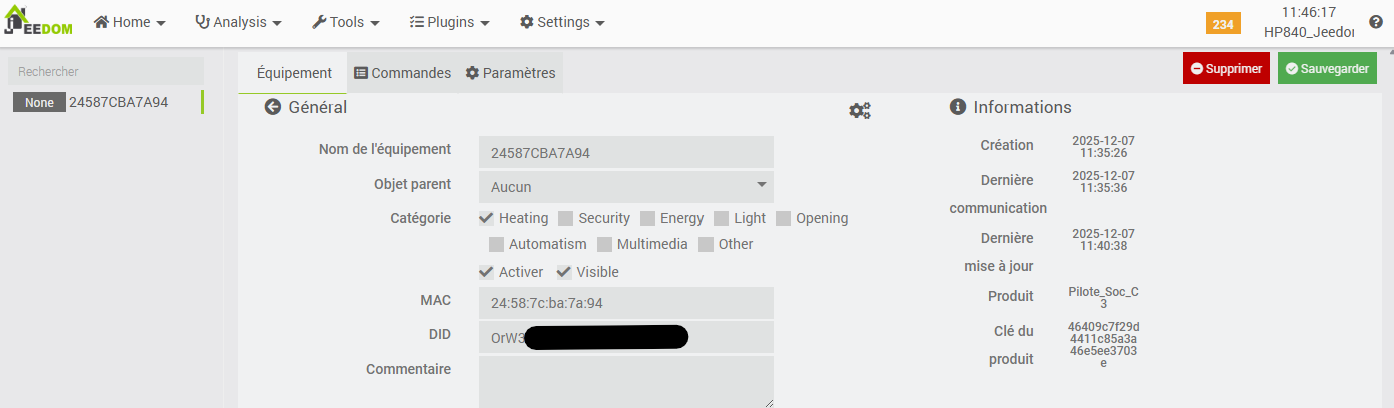
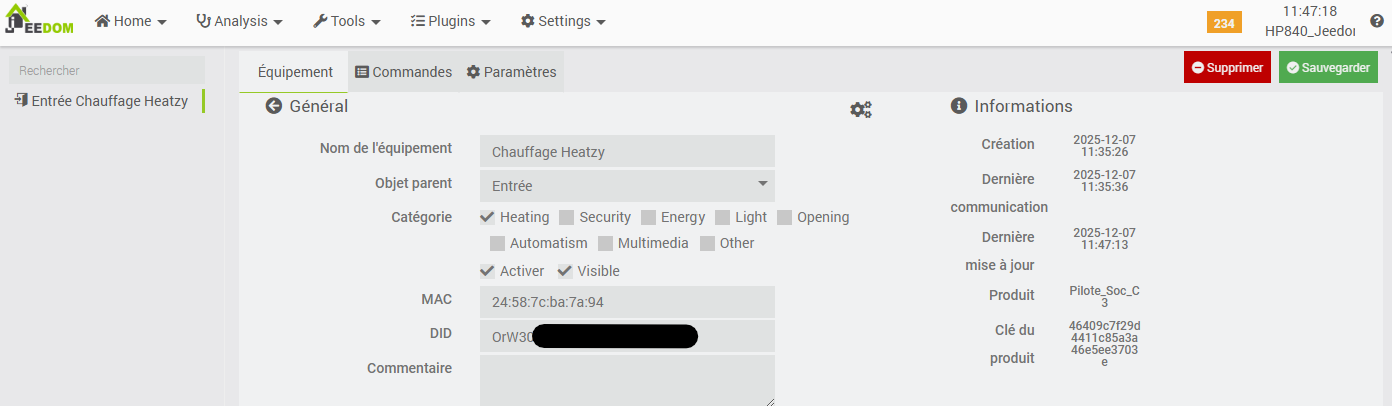
The process is straightforward: the module is renamed and assigned to its respective room. It is observed that the information previously identified in the Health tab is displayed here, specifically for this device, whereas the Health page provides a comprehensive overview of all connected equipment.
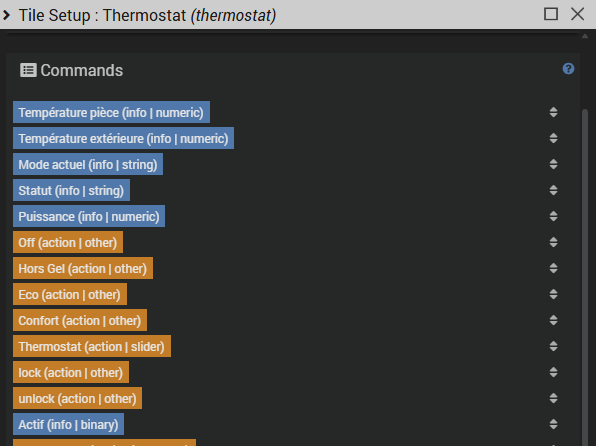
We shall now proceed to the Commands tab where, as expected, the following elements are listed:
- Information cascaded from the Heatzy infrastructure,
- Commands that allow for interaction with the module (via the Internet), equivalent to the functionality provided by the mobile application.
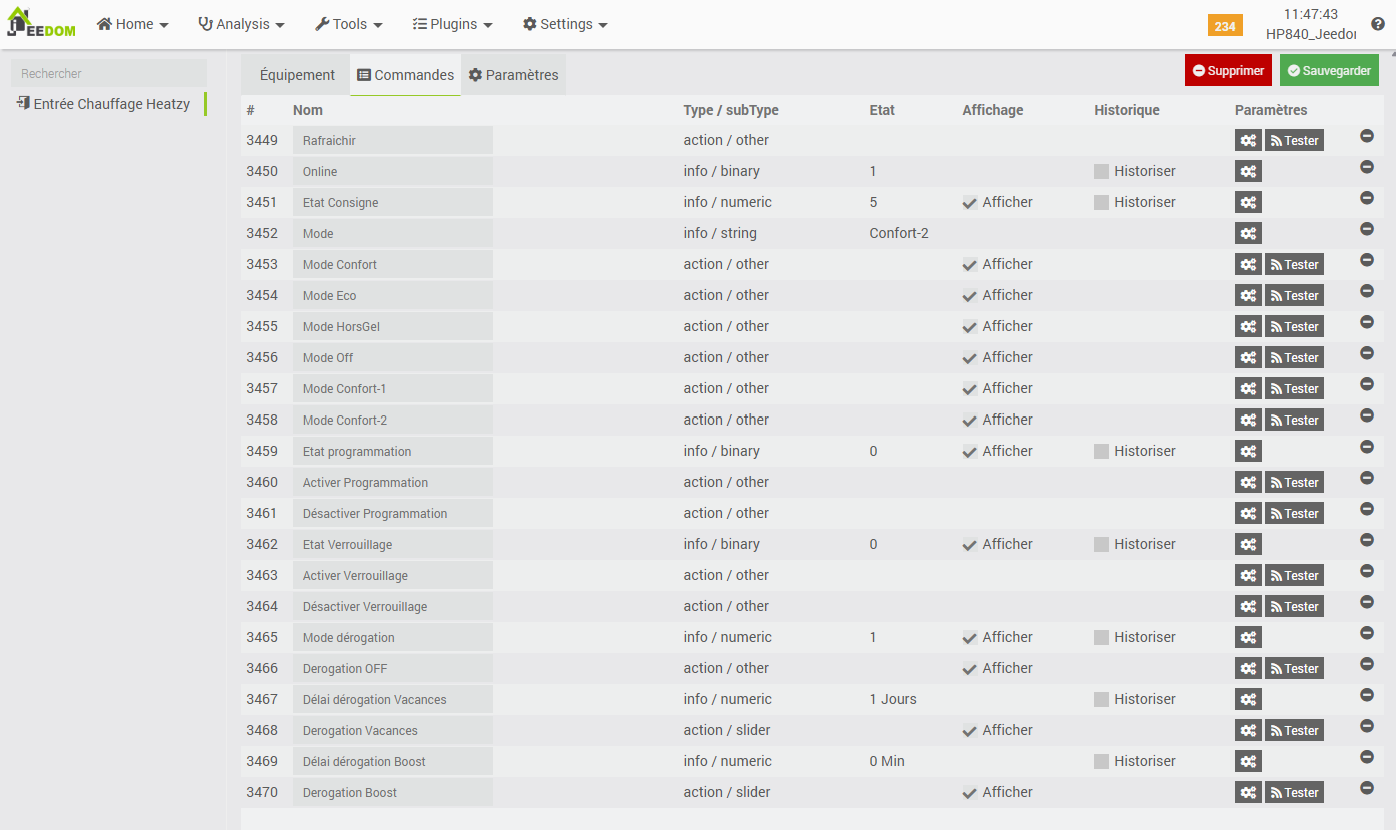
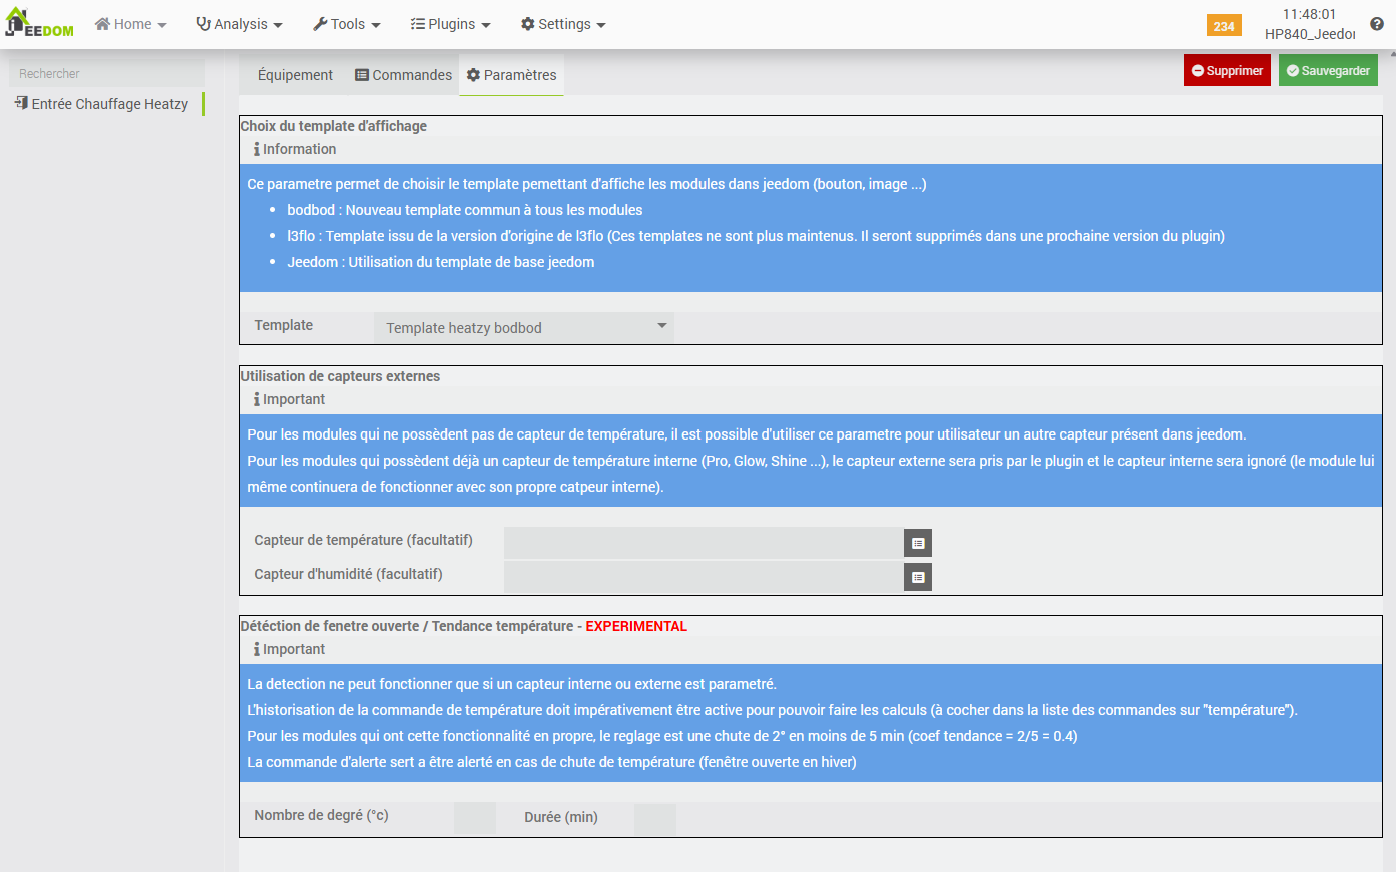
The Settings tab is also noteworthy, as it provides several interesting features:
- The ability to link temperature and humidity sensors to the module: this is apparently not for direct radiator control based on these parameters, but rather to display them on the plugin widget. It also determines temperature trends, making them accessible via the “Temperature Trend” info command, thus eliminating the need for manual calculations.
- The simulation of window-opening detection within a room, based on a configurable temperature drop of X degrees within Y minutes. This information is made available through the “Open Window” info command, allowing for a simple alert trigger without the need for physical sensors or complex calculation scenarios.
Special thanks to the developer for these thoughtful additions.
For my part, although I am configuring a temperature sensor in the same room, I do not intend to utilize these specific features of the Heatzy module. Instead, I plan to integrate the module with the Jeedom Thermostat plugin, which I already employ. This approach allows for the unified management of my radiators, regardless of the underlying technical control method for each unit (pilot wire, on/off, on/off with diodes, or other plugins such as CozyTouch).
Let us now save these settings and examine the widget on the dashboard.
3. Display, testing, and final installation
The widget is relatively conventional and, by default, displays a significant number of commands.
This can be significantly simplified by hiding individual commands within the module’s functional configuration page under the Commands tab, or by modifying the widget’s display on the dashboard and unchecking the Visible box.
Following customization, the view on the left is obtained, which is more than sufficient for testing purposes. At this stage, two bugs are noted:
- When the widget display is disabled in the module configuration, it reappears after a few minutes.
- It is not possible to modify the order of the buttons, whether by adjusting the command order within the module or through the widget settings.
A series of tests was conducted using the commands on the module’s widget:
- Frost protection mode → indicator flashes ✅
- Off mode → indicator flashes ✅
- Comfort mode → indicator remains off ✅
- Comfort -1 and -2 modes → not tested; only the “Pro” version of this module supports these two commands. Furthermore, utilizing Jeedom with its Thermostat plugin renders these modes unnecessary.
- Eco mode → indicator remains on ✅
Current assessment:
- The indicator can be controlled via Jeedom and its Heatzy plugin, which transmit commands to the remote Heatzy infrastructure; the latter then updates the physical module through reverse communication.
- A latency of several seconds is occasionally observed between the initial click and the module’s reaction on the indicator. This may impact the WAF (Wife Acceptance Factor), as a delay of this duration is sufficient to create the impression of a malfunction, leading to repeated attempts. This is a characteristic consequence of “cloud-based” operation via the Internet (and potentially the API implementation within the plugin, though this remains to be verified).
The final stage is straightforward: it involves verifying the module’s correct operation with the radiator in its permanent position. This process does not warrant a dedicated chapter, as there is limited visual information to present. Shown here is the specific unit that previously encountered issues with a Qubino pilot wire module (which, it should be noted, has been confirmed functional on a different radiator).
The electrical wiring is even simpler than that of the indicator setup: the wall phase powers both the radiator phase and the Heatzy Pilot phase; the wall neutral powers both the radiator neutral and the Heatzy Pilot neutral; and the Heatzy pilot wire output connects directly to the radiator’s black pilot wire.
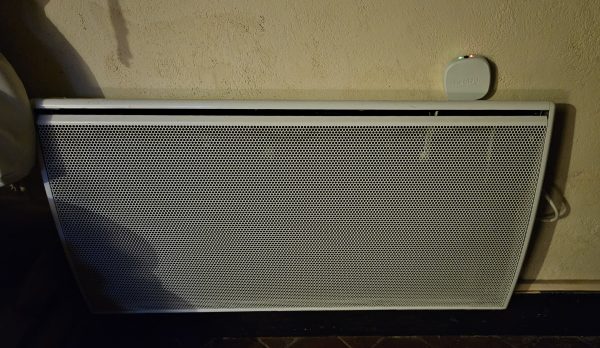
Due to its significant volume, the module does not fit into any flush-mounted junction box, nor can it be placed between the wall and the radiator (a configuration that is discouraged due to heat exposure). It is simply positioned atop the radiator’s control unit, which remains relatively shielded from rising hot air.
In this position, the status LED remains clearly visible, allowing for a quick visual verification of the module’s state independently of the radiator. This is a significant advantage over small, wall-mounted pilot wire modules, which can be difficult to troubleshoot when the radiator fails to heat as expected without a visible confirmation of the command.
Upon connection, the system functioned perfectly: the radiator prioritizes pilot wire commands, activating the heating element as soon as the module receives the corresponding order. The installation is a success.
However, after several days of operation, and following my standard practice of auditing plugin logs, I observed numerous generic “Bad Gateway” errors (HTTP 502), typically indicating network issues or server overload. Consequently, I increased the logging level to DEBUG, which revealed the following entries.
[2026-01-25 11:50:01][DEBUG] HttpGizwits::Bindings: erreur http 502
[2026-01-25 11:50:01][WARNING] heatzy::Synchronize : HttpGizwits::Bindings - impossible de se connecter à : https://euapi.gizwits.com
[2026-01-25 11:50:01][DEBUG] heatzy::cron: Synchronize cron5 =
[2026-01-25 11:52:00][DEBUG] heatzy::cron: Arret du cron car Synchronize en cours ...
[2026-01-25 11:53:00][DEBUG] heatzy::cron: Arret du cron car Synchronize en cours ...
[2026-01-25 11:55:00][DEBUG] heatzy::cron: Arret du cron car Synchronize en cours ...
[2026-01-25 11:56:02][DEBUG] heatzy::cron: Arret du cron car Synchronize en cours ...
[2026-01-25 11:58:00][DEBUG] heatzy::cron: Arret du cron car Synchronize en cours ...
[2026-01-25 11:59:00][DEBUG] heatzy::cron: Arret du cron car Synchronize en cours ...
[2026-01-25 12:00:00][DEBUG] heatzy::cron: Arret du cron car Synchronize en cours ...
[2026-01-25 12:02:00][DEBUG] heatzy::cron: Arret du cron car Synchronize en cours ...
[2026-01-25 12:03:00][DEBUG] heatzy::cron: Arret du cron car Synchronize en cours ...
[2026-01-25 12:05:00][DEBUG] heatzy::cron: Arret du cron car Synchronize en cours ...
[2026-01-25 12:06:02][DEBUG] heatzy::cron: Réinit du cache Heatzy_Synchronize car > 600s (=1769338200)
[2026-01-25 12:06:02][DEBUG] heatzyCmd::execute : Commande execute : Chauffage Heatzy - refresh (3449)Code language: PHP (php)
This error is cause for concern, as the logs normally indicate updates occurring every minute. In this instance, once the error appears at 11:50 AM, no activity is recorded until 12:06 PM, representing a sixteen-minute interval without any data refresh in Jeedom. It is probable, however, that initiating a command change via Jeedom would trigger a new connection to the Heatzy infrastructure, potentially bypassing this error (unless a genuine failure exists on the remote infrastructure). I have not yet been able to verify this hypothesis by testing at the exact moment the error occurs.
It should also be noted that Gizwits, a Chinese cloud IoT platform, is the foundation upon which Heatzy relies for communication with its modules. This raises questions regarding the sovereignty of personal data.
In the meantime, I have increased the timeout threshold from 10 to 30 seconds within the plugin’s technical configuration page.
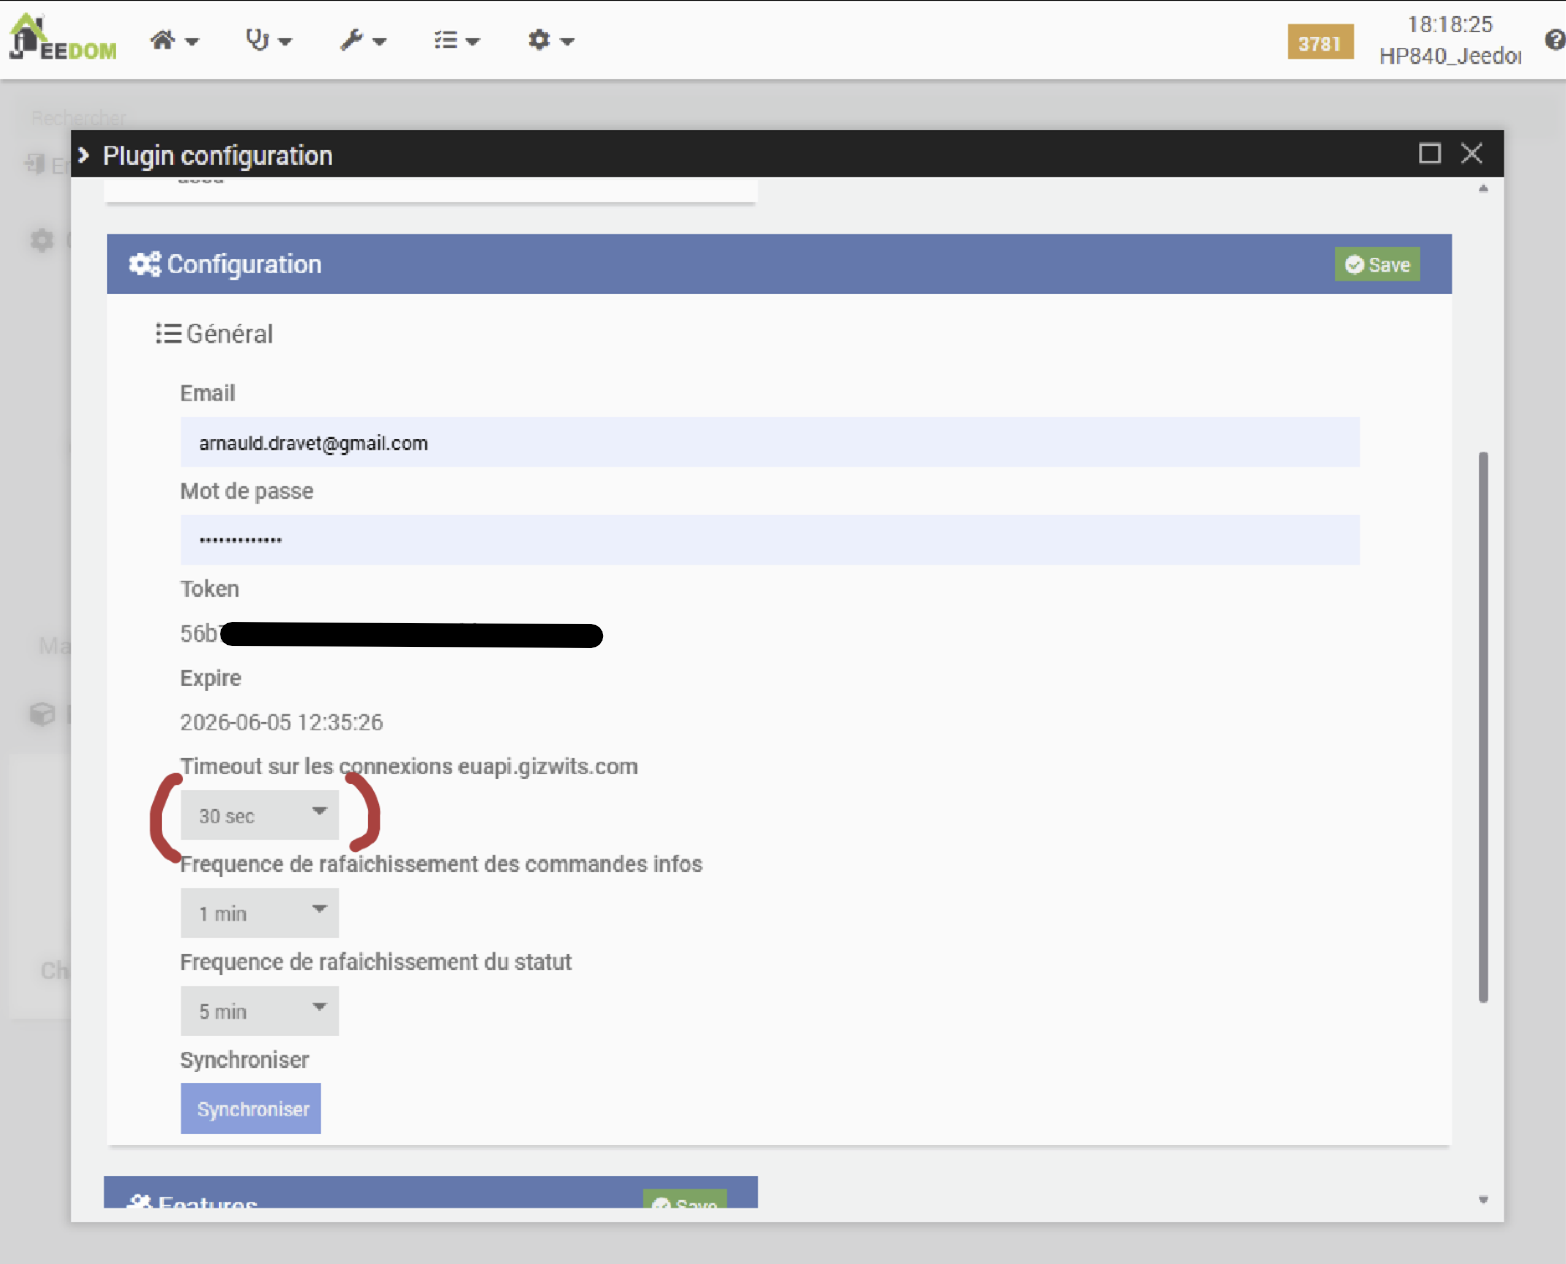
Time will tell what effect this modification has had. I should clarify that, despite these observations, we have generally had no cause for complaint regarding command execution from Jeedom for this radiator.
Update one week later (02/03/2026): Errors are still present in the logs. Some remain identical, while others are likely related to infrastructure maintenance (device not found).
[2026-01-28 18:05:13]WARNING heatzy::Synchronize : HttpGizwits::Bindings - impossible de se connecter à : https://euapi.gizwits.com
[2026-01-29 10:05:12]WARNING heatzy::Synchronize : HttpGizwits::Bindings - impossible de se connecter à : https://euapi.gizwits.com
[2026-01-29 15:50:11]WARNING heatzy::Synchronize : HttpGizwits::Bindings - impossible de se connecter à : https://euapi.gizwits.com
[2026-01-30 03:02:00] ERROR  heatzy::updateHeatzyDid : OrW30xxxxxxx - 9014 - device not found -
[2026-01-30 03:03:38] ERROR  heatzy::updateHeatzyDid : OrW30xxxxxxx - 9014 - device not found -Code language: PHP (php)
The connection timeout has now been increased to 60 seconds. We shall now proceed to the “homogenization” of the radiator control by integrating this unit into the Thermostat plugin.
Thermostat plugin integration
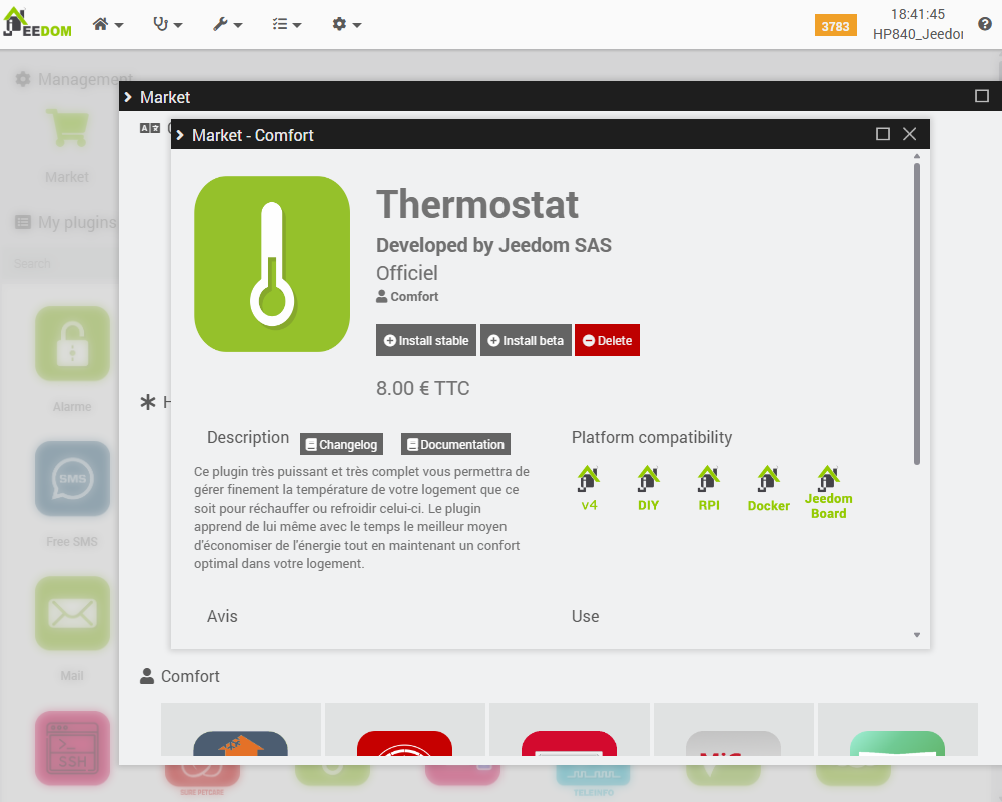
The Thermostat plugin is a Jeedom-supported paid plugin (8€). This might seem high, but as mentioned, it allows unifying the control of different radiator types into a single interface. It also offers:
- Fully customized management of various modes.
- Self-learning of heating capacities over time (based on the radiator, the room, outdoor temperature, and thermal inertia) to anticipate the start of heating according to the desired temperature at a specific time (when integrated with the Calendar plugin).
- Integration of opening sensors to perform fully configurable actions (alerts, heating suspension, etc.).
- Alert management for multiple event types.
1. Installing the plugin
We shall now briefly cover the installation and activation of the plugin from the Jeedom Market.
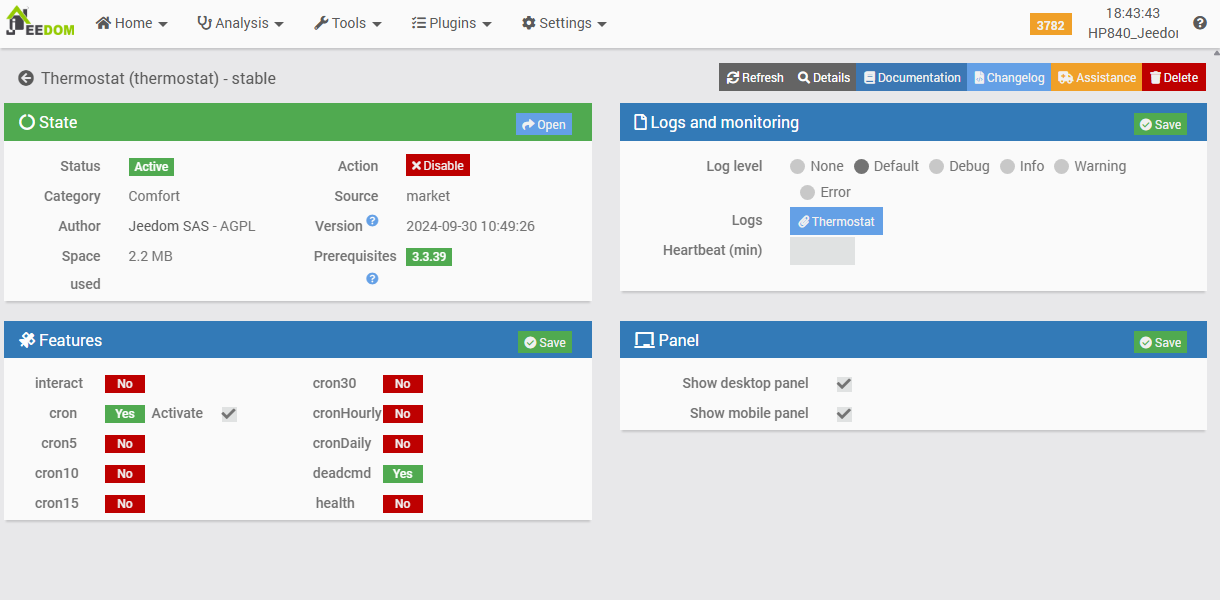
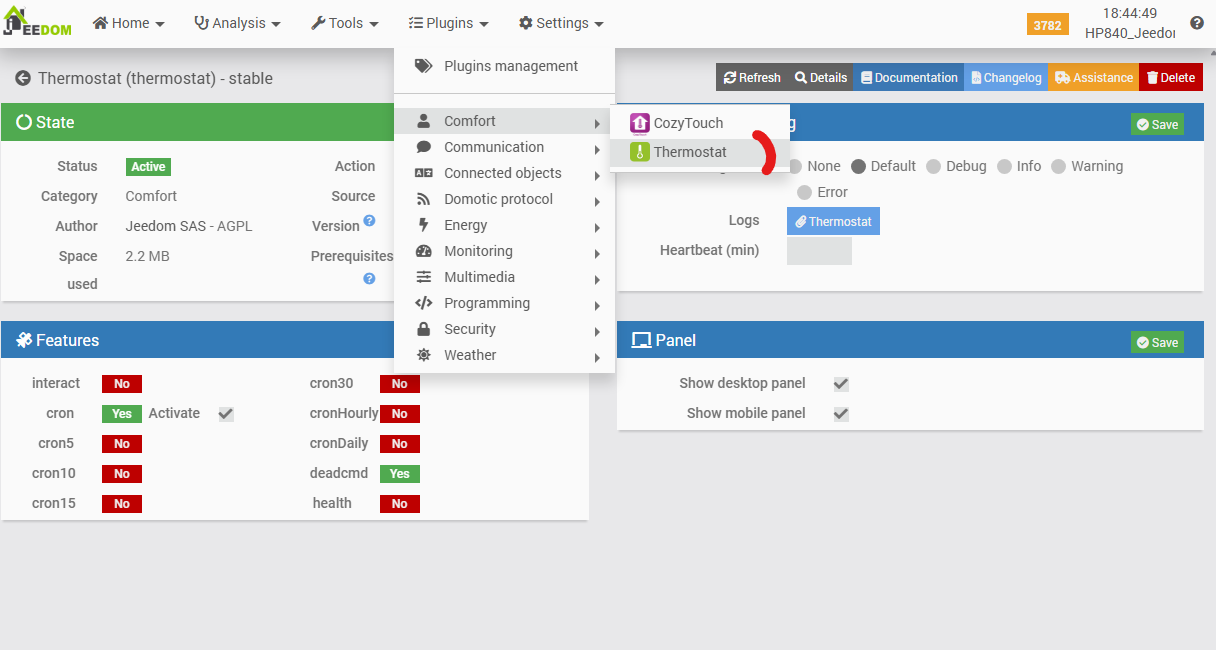

Note in the previous screenshot that several thermostats have already been configured. Those for the Office, Master Bedroom, and Large Bedroom control radiators equipped with Qubino modules. Three additional radiators, equipped with a Cozytouch bridge (and the associated Jeedom plugin), will soon complete the setup.
2. Adding a thermostat
We shall now create the thermostat associated with the radiator controlled by the Heatzy module, located in the Entrance hall.
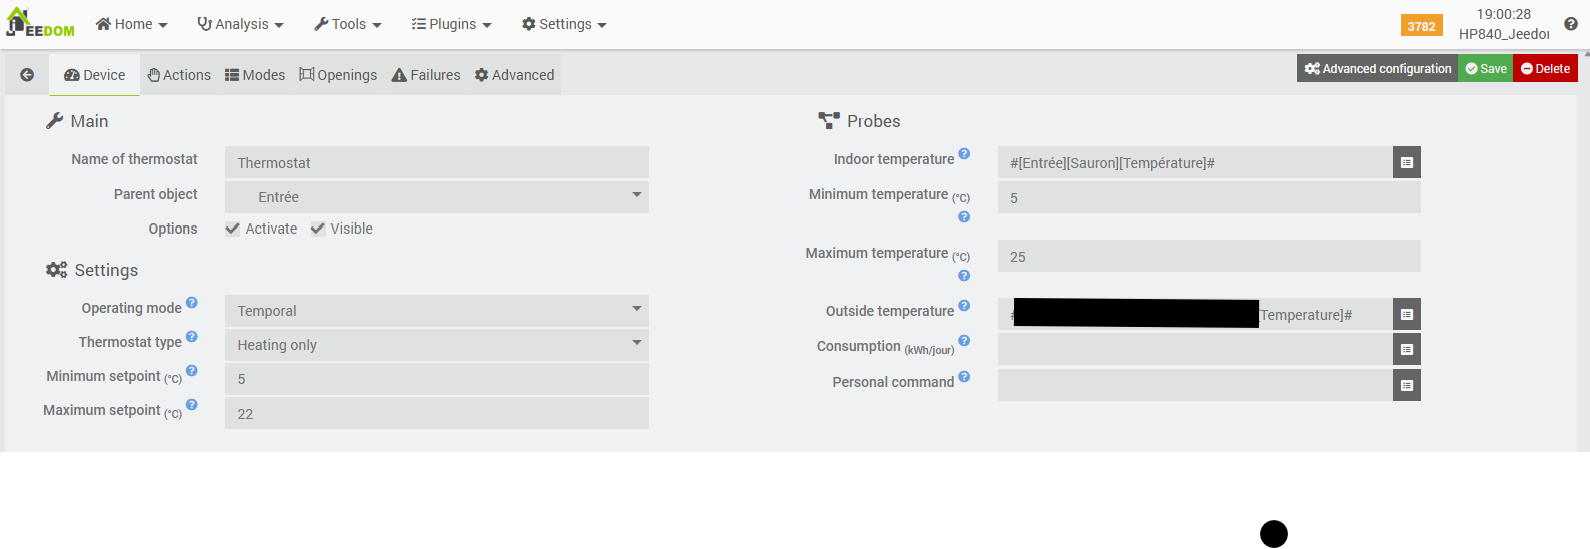
The first tab contains only “basic” options:
- Thermostat name and its assigned room, activation status, and dashboard visibility.
- Time-based operating mode. This is the most precise mode, capable of self-learning, though it requires both indoor and outdoor temperature sensors (in this case, provided by the Weather plugin’s “temperature” info command).
- Standard configuration settings:
- “Heating only” mode (noting that the plugin can also manage air conditioning).
- Minimum and maximum setpoint temperatures for the thermostat widget slider.
- Indoor temperature sensor (a Fibaro Motion Sensor in this instance) and outdoor sensor (Weather plugin).
- Minimum and maximum temperature thresholds for the indoor sensor, used to trigger plugin alerts.
The Actions tab is particularly noteworthy, as it brings us to the core of the matter: the commands associated with starting or stopping the heating process.
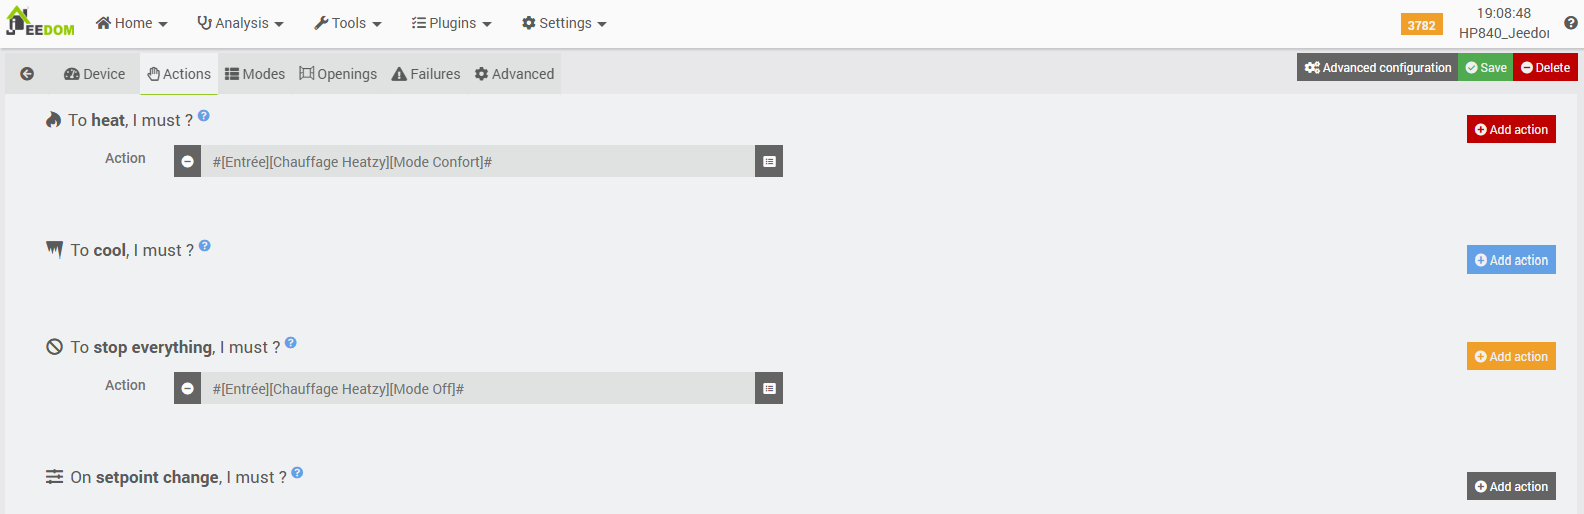
The setup is quite straightforward: we call the “Comfort Mode” (theoretically the highest heating setting on our radiator) and “Off Mode” commands exposed by the previously configured Heatzy plugin. Note that it is also possible to add a command for cooling (in the case of air conditioning or, for instance, an automated window or door opening).
The Modes tab then allows us to define our own setpoints and assign a name to each.
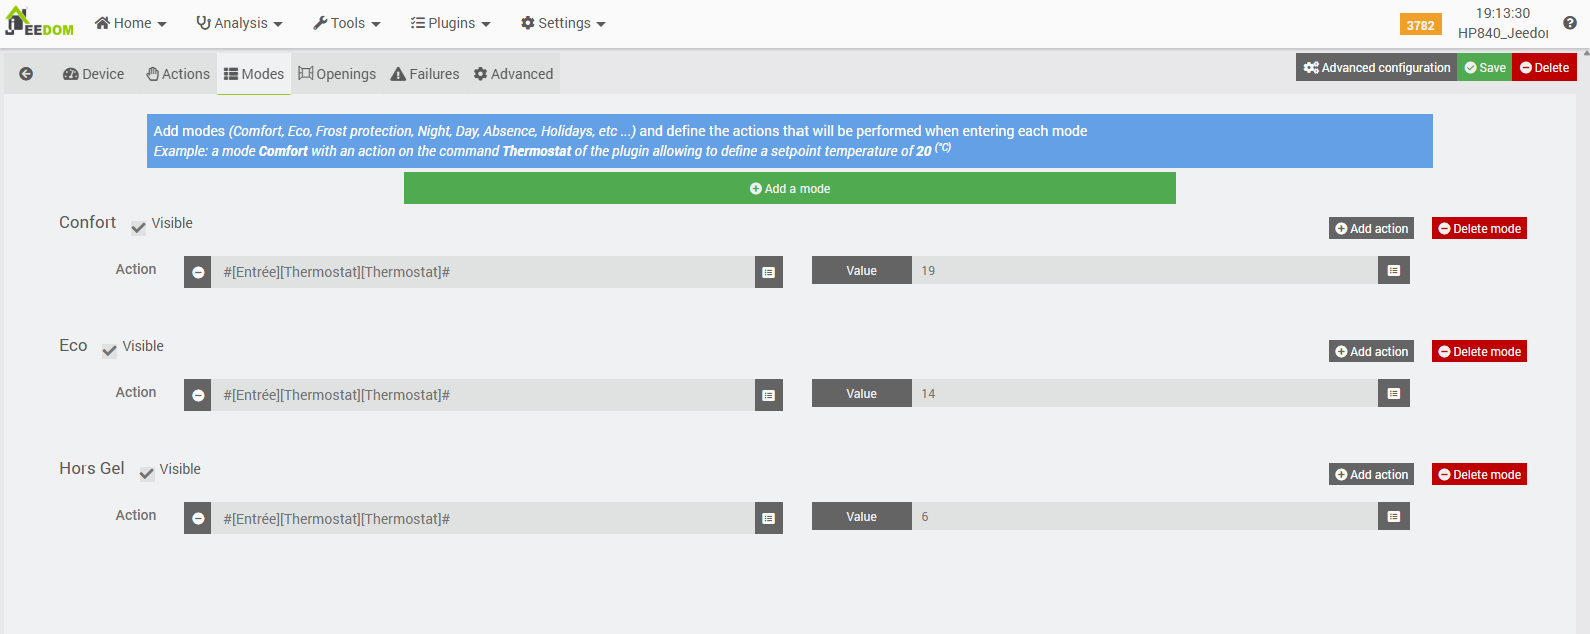
Here, I have created three customized setpoints, though any number can be created and named as desired:
- Comfort, with a target temperature of 19°C.
- Eco, with a target temperature of 14°C.
- Frost Protection, for extended winter absences, with a target temperature of 6°C.
It is essential to understand that these setpoint temperatures in Jeedom will effectively supersede any programming configured directly on the radiator itself, once it is remotely controlled by Jeedom. If heating is required to reach one of these target temperatures (based on the readings from the configured indoor temperature sensor), Jeedom will command the radiator to enter Comfort mode, as specified in the previous “Actions” tab. Conversely, once the Jeedom setpoint is achieved, Jeedom will stop the radiator (or execute whichever command was configured as the stop action in the “Actions” tab).
Consequently, it is crucial to set the radiator’s own “Comfort” mode to the highest possible temperature—exceeding any setpoints configured here. This ensures the radiator heats at full capacity when Jeedom issues its own Comfort command, effectively delegating all thermal regulation to Jeedom and the plugin’s self-learning algorithms.
The following tab manages the opening sensors.
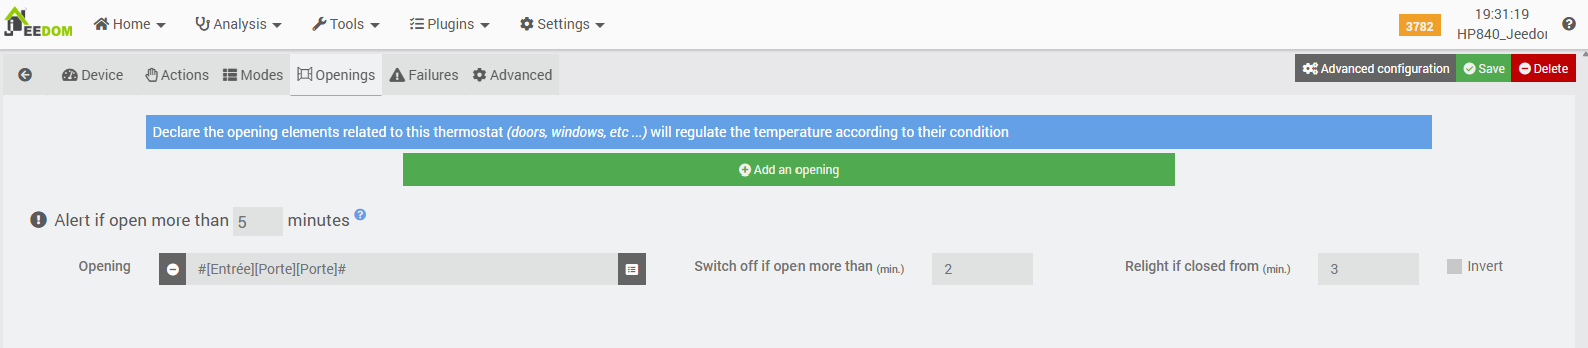
There is no obligation to declare your potential opening sensors here. Nevertheless, if you do so, it will allow the plugin to adapt your heating based on events linked to that sensor. For example, here, after two minutes of detected opening on the front door sensor, it will command the radiator to stop. It will resume heating three minutes after the door has been closed.
The following tab is dedicated to managing potential failures.
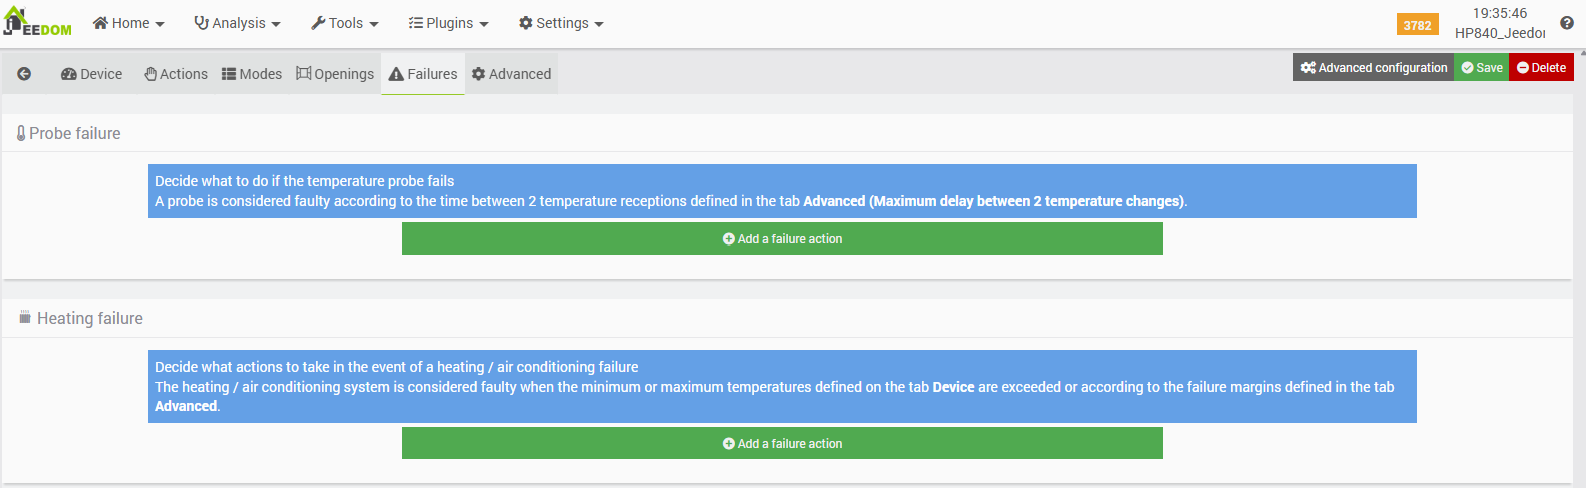
This provides the capability to execute specific actions in the event of:
- A detected (or suspected) failure of the temperature sensor, based on the maximum time that should theoretically elapse between two different temperature readings when the radiator changes modes (see “Advanced” tab).
- An anomaly related to a room temperature reading that falls below or exceeds the minimum and maximum temperatures previously configured in the first tab, adjusted by the specified margins (see “Advanced” tab).
As you can see, I have not defined any specific actions here.
The “Advanced” tab allows for the fine-tuning of certain settings.
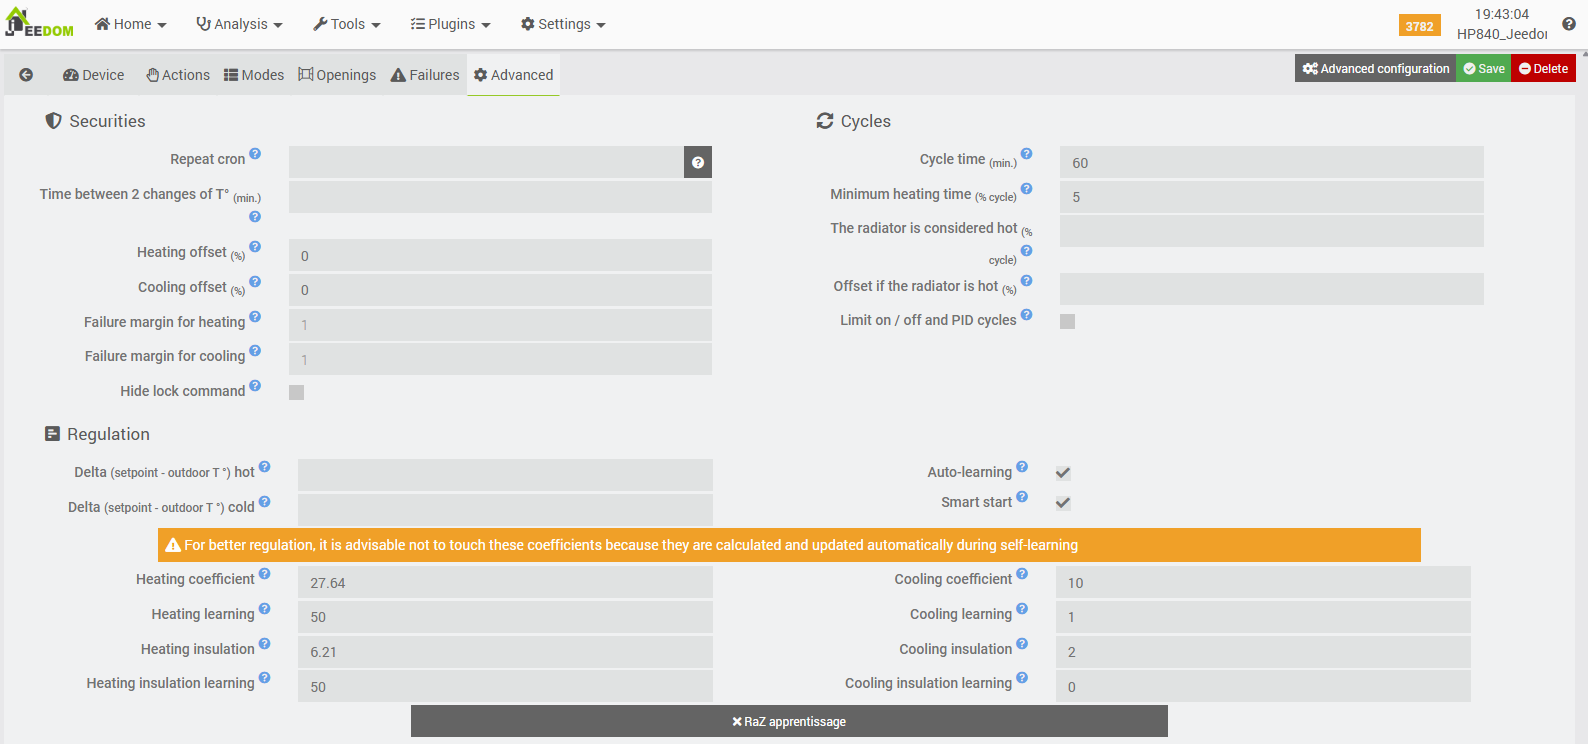
At this stage, there is no need to modify any settings here. However, it is worth noting that some of the parameters for managing failures are located in this tab. The plugin documentation provides a fairly thorough description of all settings, as does this excellent topic on the forum (French, sorry).
Once saved, our thermostat appears in two places.
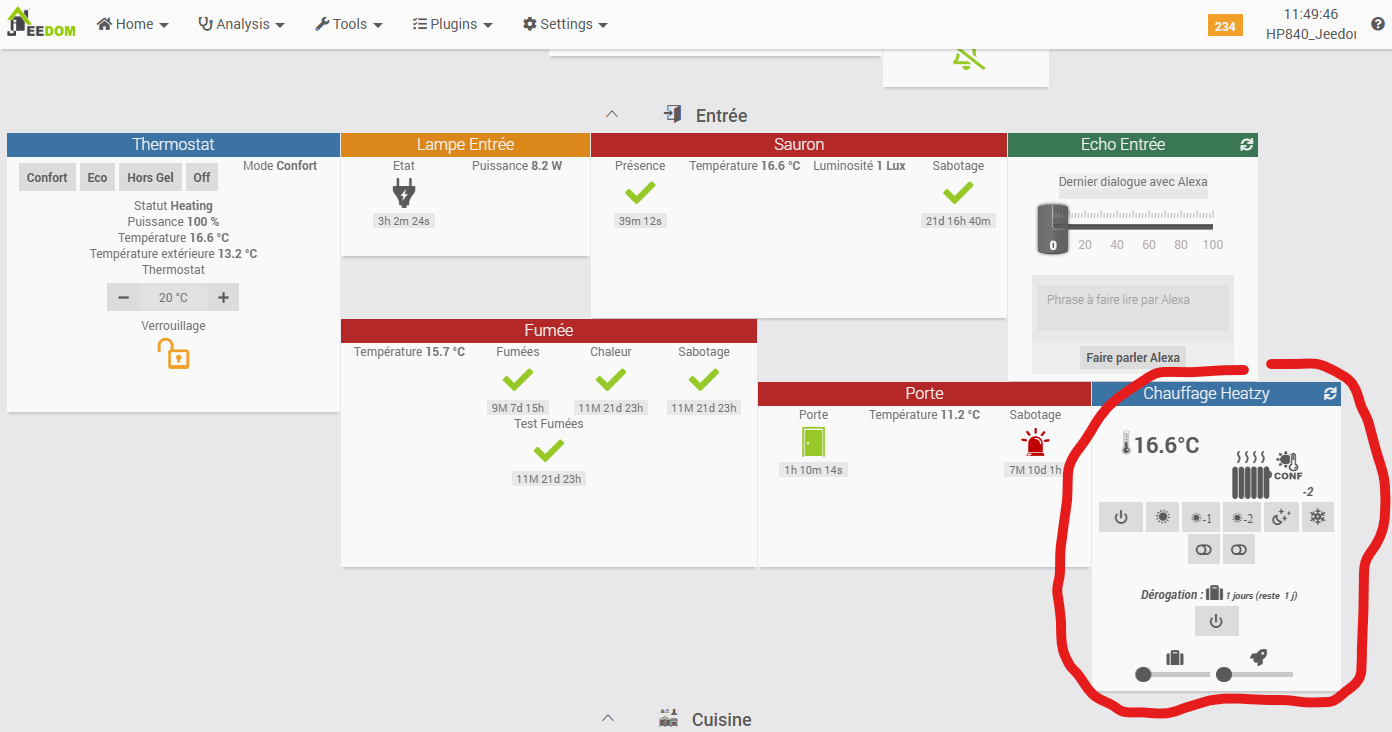
3. Widget & plugin dashboard
First, we have access to a widget on the main Jeedom dashboard.
This widget has been slightly customised by putting the dashboard in edit mode, with the following command order:
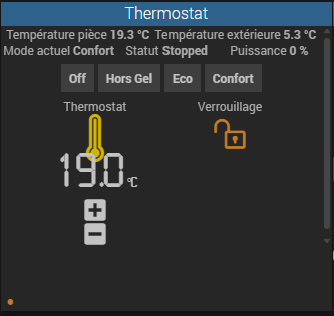
This tile is fully functional: it allows for fine-tuning the setpoint (using the +/- buttons) or selecting one of the pre-defined setpoints/modes established in the thermostat configuration. The lock button prevents any updates, whether from accidental interactions on the widget (unintended clicks during scrolling, etc.) or through established automations (for example, it may be simpler to lock thermostats when departing for a holiday than to modify scenarios or calendars).
A specific plugin dashboard can also be found, accessible via the main menu and the Thermostat sub-menu.
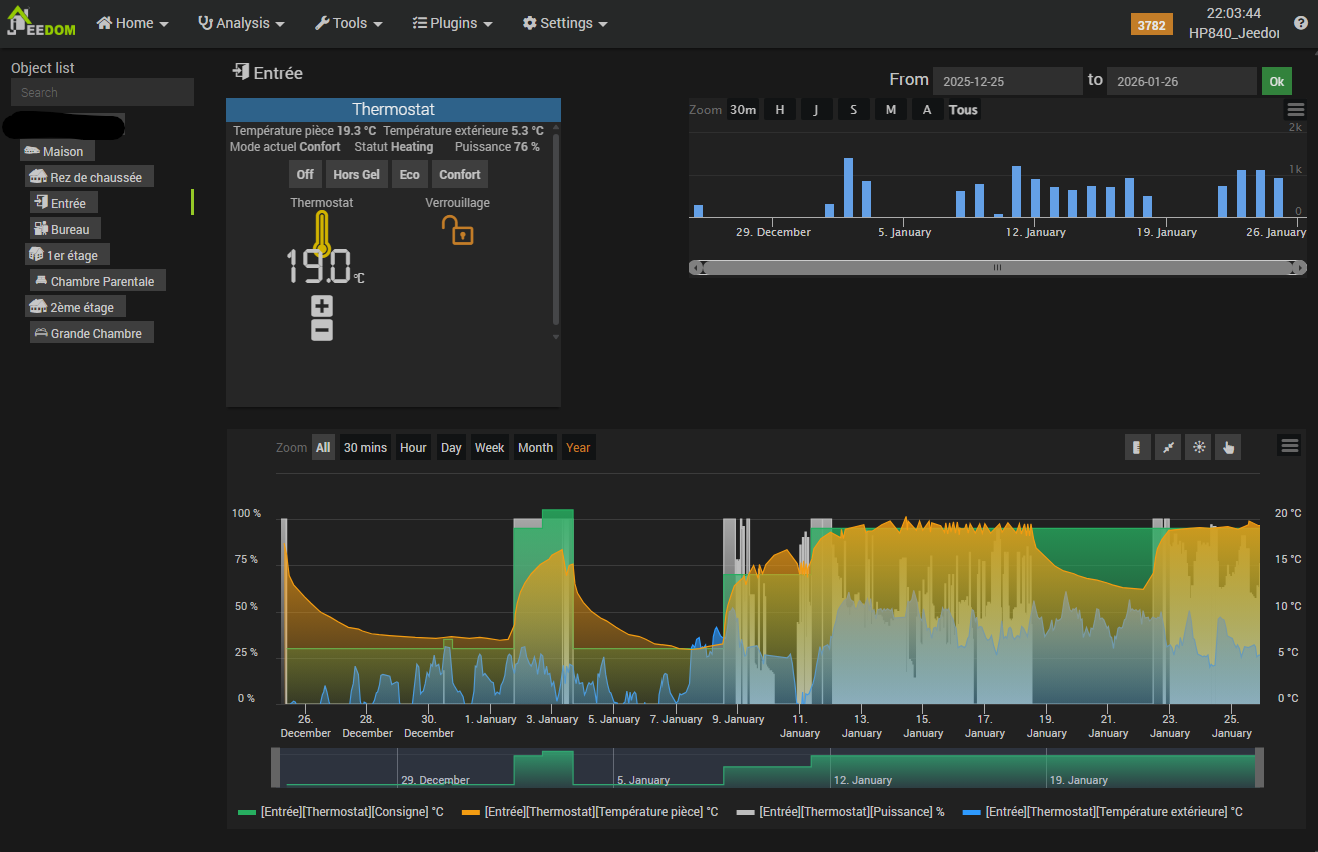
This dashboard presents a list of our thermostats on the left, and selecting one reveals further details:
- The associated widget.
- A graph showing the cumulative heating time per day (displayed in minutes for me, though the documentation suggests it should be in hours).
- A simultaneous graph displaying the setpoint temperature, the measured room temperature, the “virtual” power requested from the radiator by the thermostat (calculated based on heating/stop cycles), and the outdoor temperature.
This allows for a straightforward visualization of how setpoint changes influence the power requested from the radiator, the time required to heat, and the impact of outdoor temperatures on the heating process.
Once again, this plugin is adaptable to any type of radiator regardless of its control method, as only a start and stop command are required, along with at least one internal temperature sensor for regulation (and an external one for those wishing to utilize time-based mode and self-learning).
The commands exposed by the plugin for each thermostat also allow for interaction via scenarios (as shown in the practical example below) or through the Alarm plugin (e.g., switching the thermostat to Frost Protection mode when the “Long Duration” alarm is activated).a the alarm plugin for example (set the thermostat to frost-protection mode if the alarm is activated in “long duration” mode).
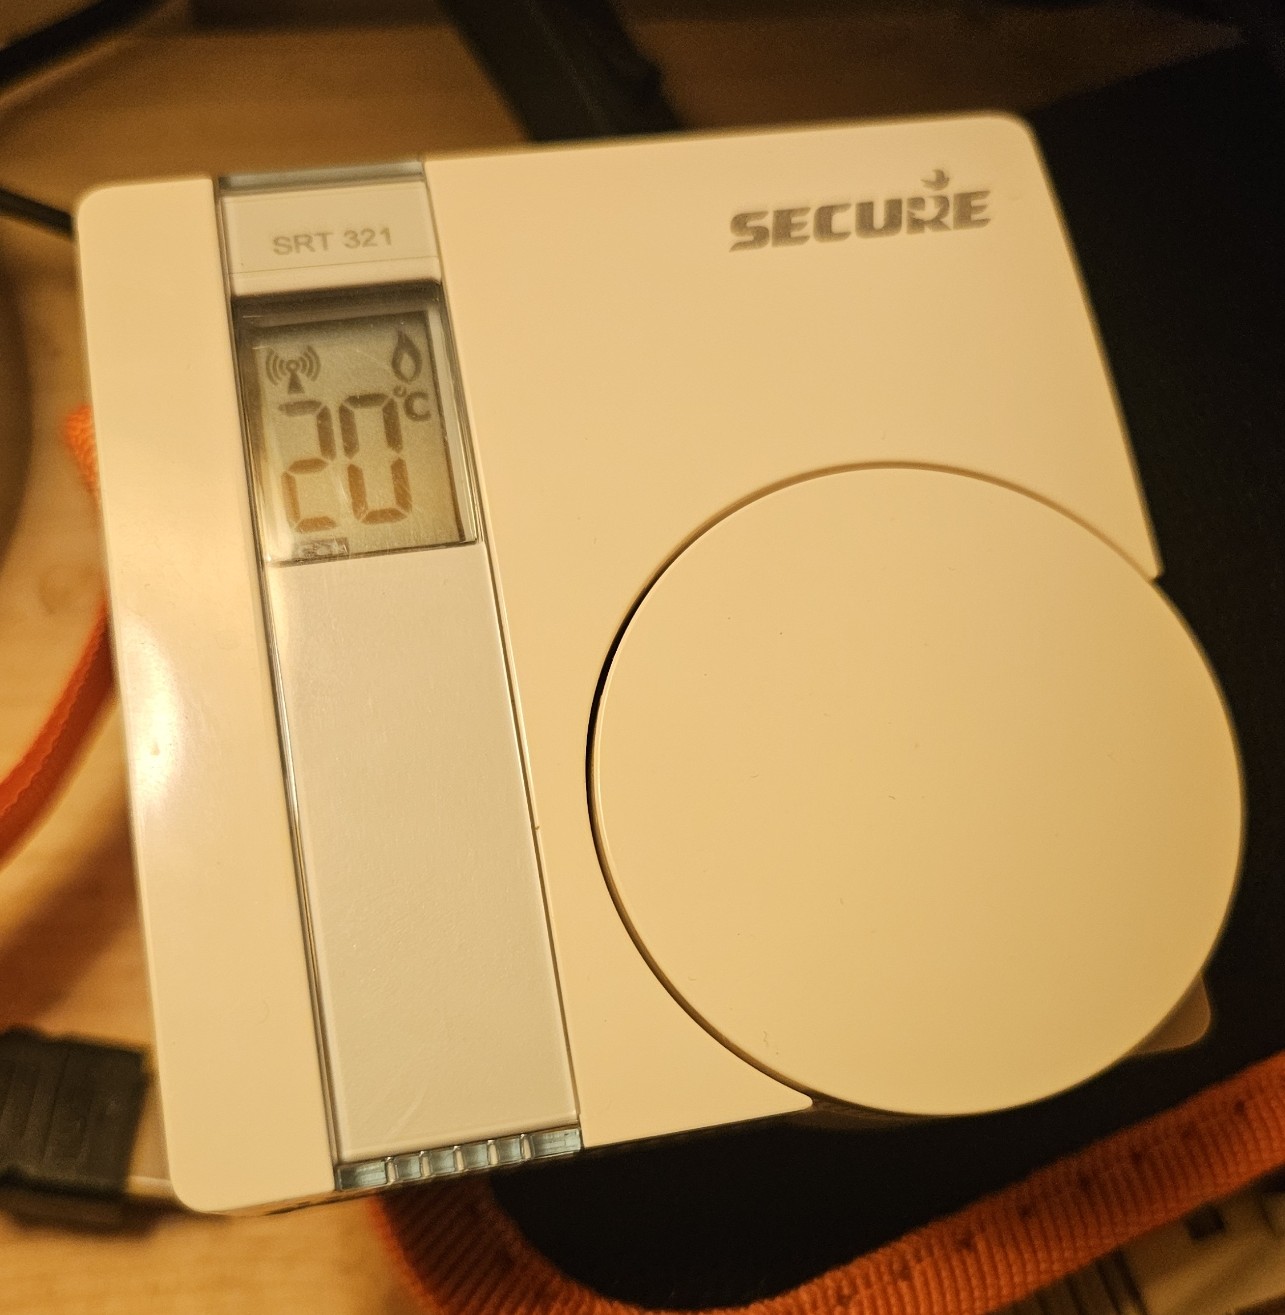
Pairing with a Z-Wave SRT-321 wall thermostat
In my case, to make things more practical when hosting guests, I have paired the “Jeedom” thermostats in certain rooms with a physical SRT-321 module. This battery-operated device features a temperature sensor, a control dial, and a display.
Because it is not mains-powered, it is not always “online”; consequently, pushing values from Jeedom to this module takes a little time to reflect, which we will revisit. This module is fully capable of acting as a standalone thermostat by associating it directly with a Z-Wave module managing a radiator—though that is not our configuration here with the Heatzy. Even with a Z-Wave module, such pairing is possible while keeping the Jeedom integration active.
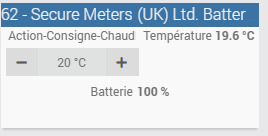
For the Heatzy module in our entrance hall, the wall thermostat will serve several purposes: its dial allows for manual setpoint adjustments, it acts as a visual thermometer (displaying the room temperature when the dial is pressed), and it functions as the indoor temperature sensor accessible by Jeedom.
1. Z-Wave inclusion & configuration
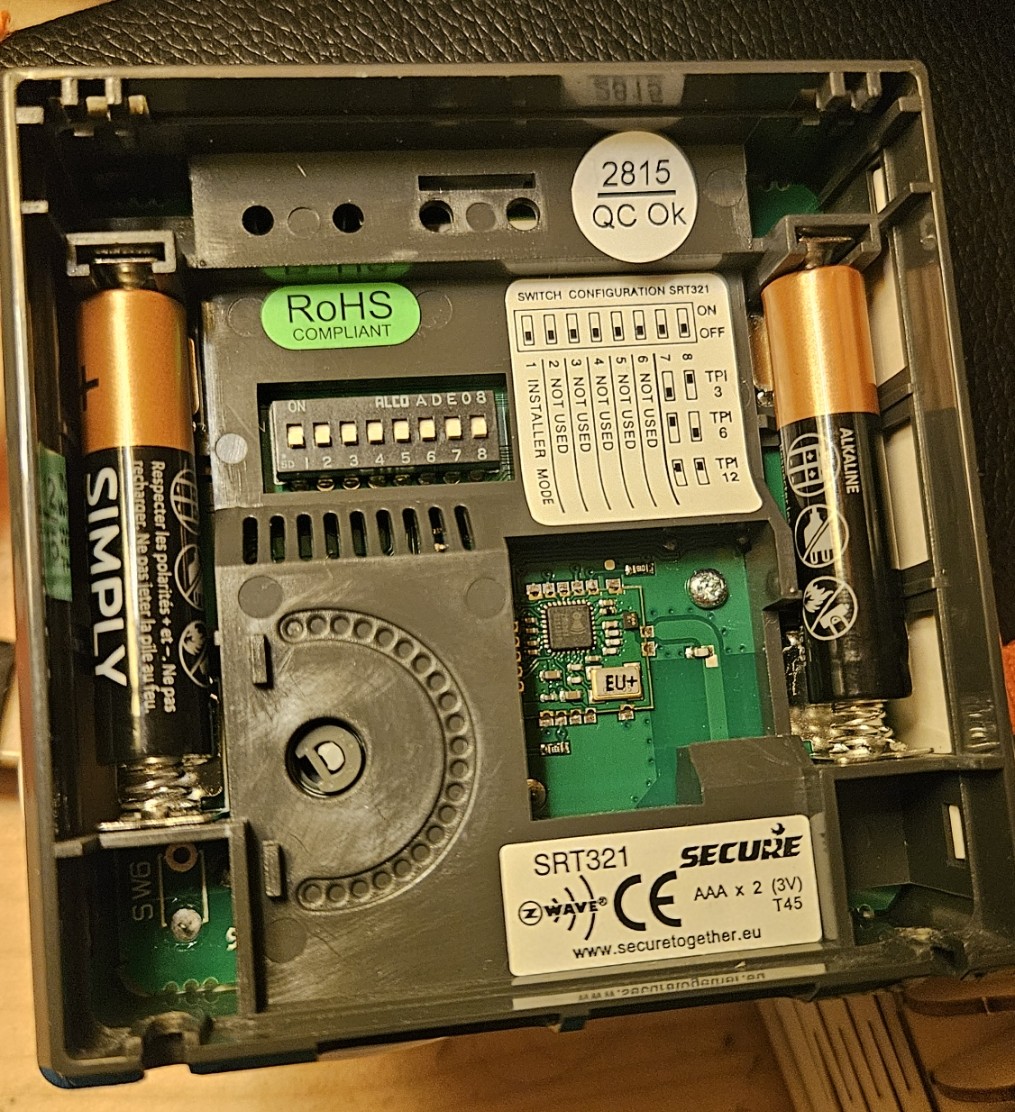
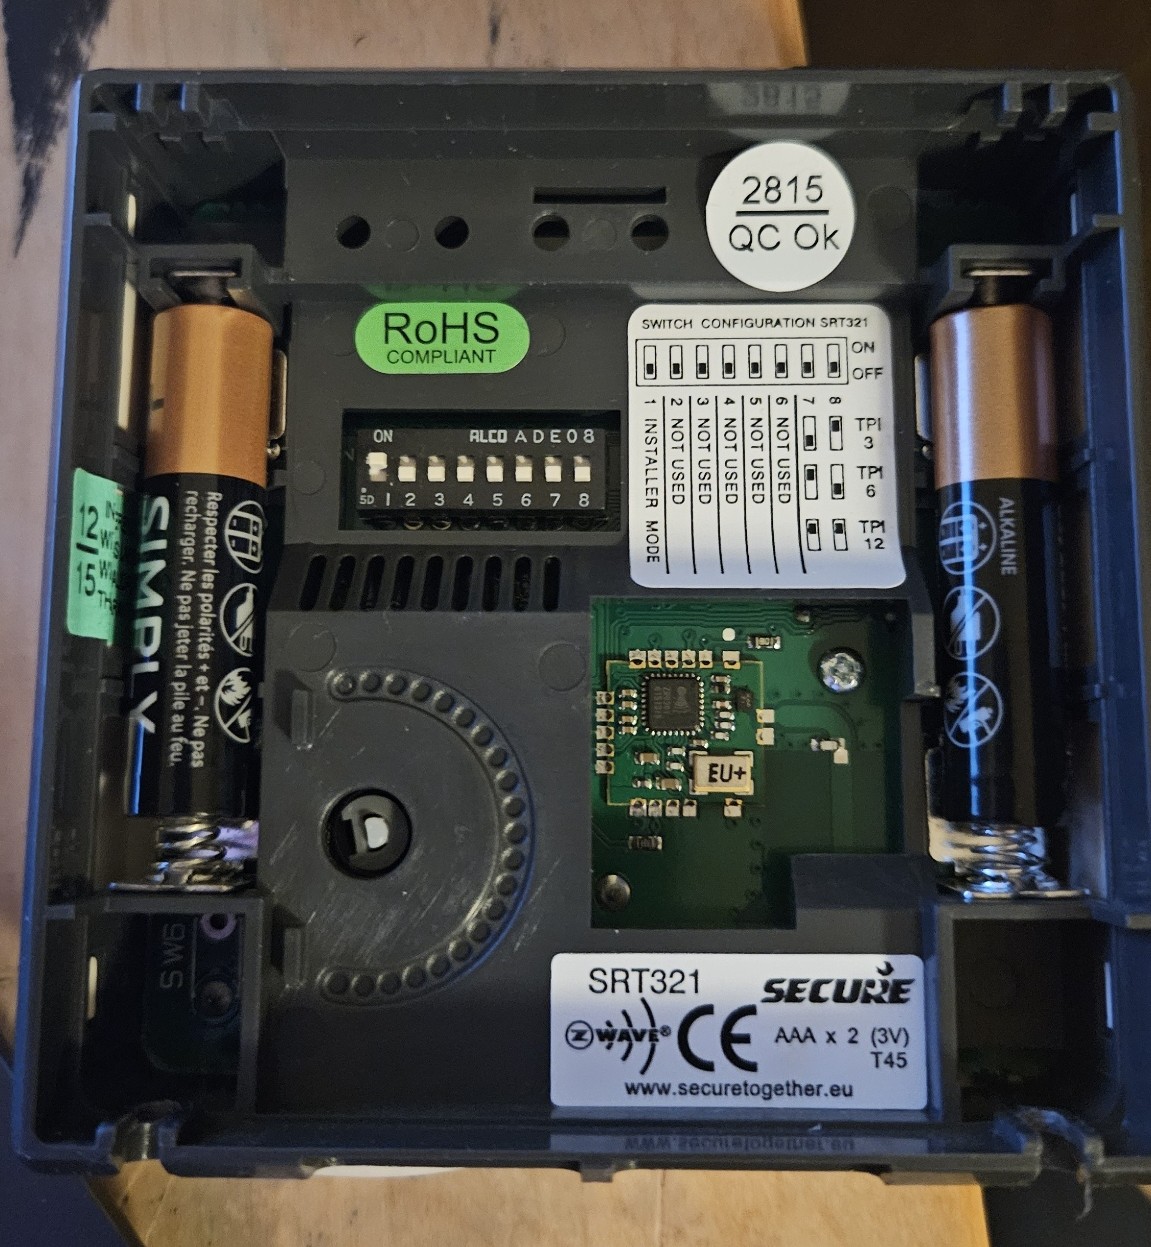
The inclusion of this module is a bit particular. Indeed, after removing its back support (which also serves as a very practical and robust wall mount), you see a micro DIP switch with 8 switches.
- The last 2 switches are used to configure the “time-based” mode of the thermostat (same optimised mode as Jeedom’s Thermostat plugin) and specifically the number of heating cycles per hour. In our case, it doesn’t matter as we will not use this module in thermostat mode via direct association.
- Switch #1 is the one to be set to 1 (up) to put the module in configuration mode, then everything is done with the dial, before setting switch 1 back to 0 (down).
In Jeedom, switch the Z-Wave JS plugin to inclusion mode, then perform the following steps on the SRT321 (ensuring you are in close proximity to the controller):
- Use the dial to set the module’s screen to “L” (Learning mode), then press the dial.
- Jeedom should respond and discover the module; the screen will then display “LP”.
- It is highly recommended to wake the module several times: turn the dial until the screen displays “n”, press the dial (it will show “nP”), and repeat this 1 or 2 times.


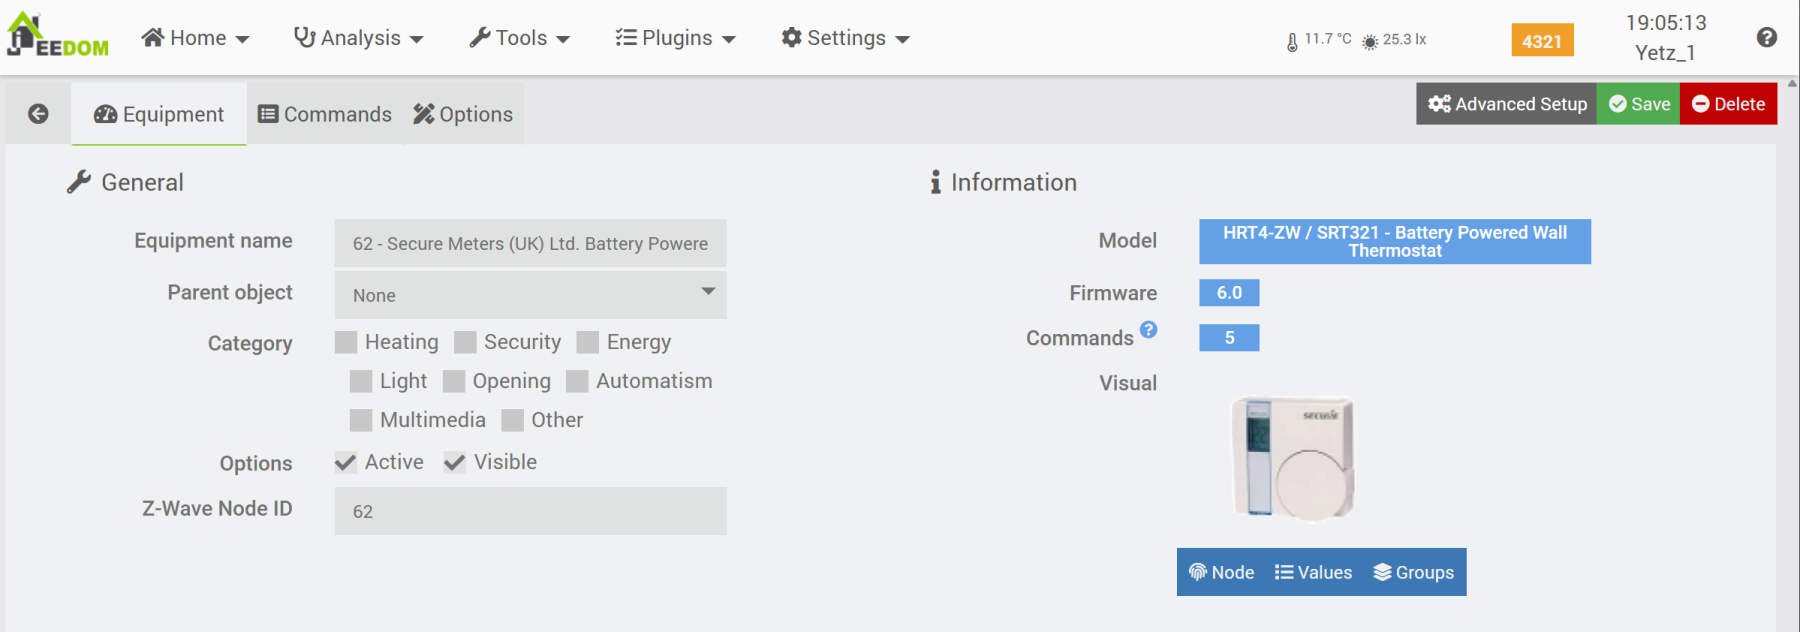
Normally, at this stage, your Jeedom should display the following (for the most observant among you: indeed, the Jeedom ID in the top right is different from before; I performed the pairing process on a different Jeedom than the one used up to this point, but this has no impact on the tutorial 8) ).
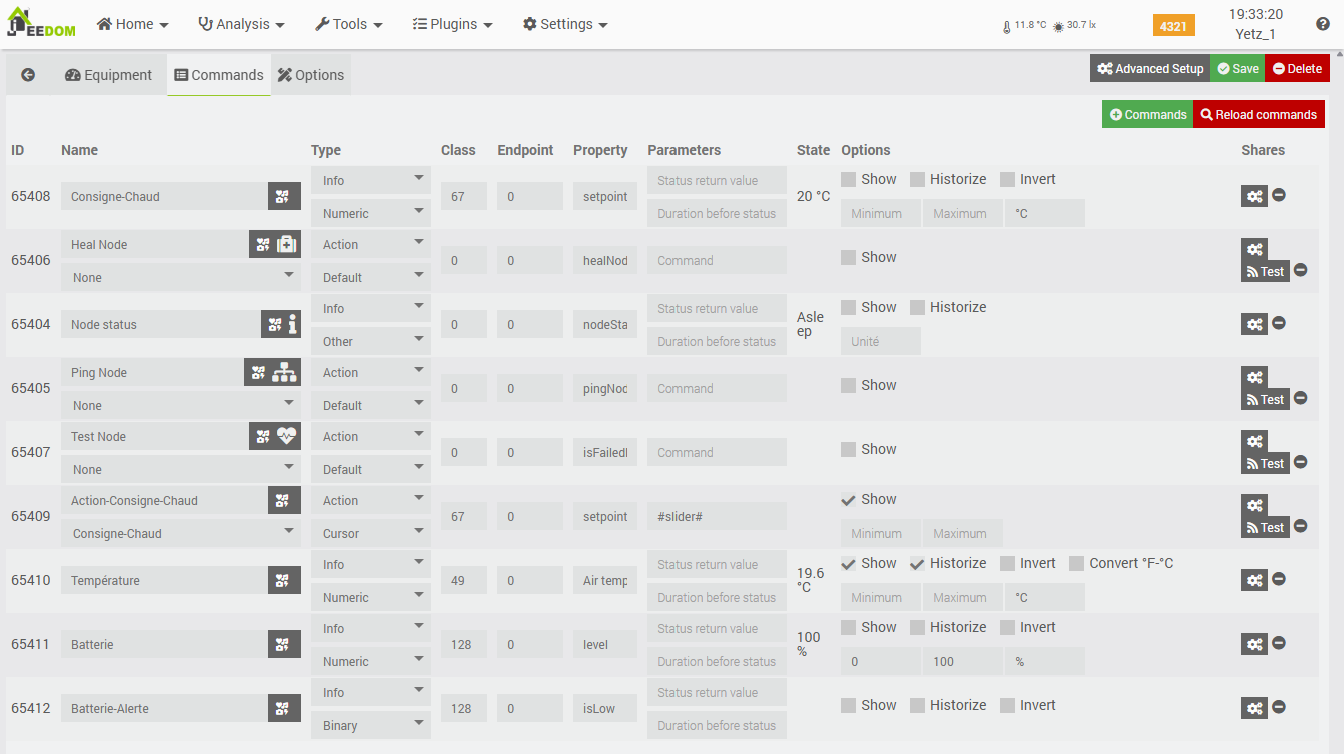
We can examine the available commands, focusing on the three that are of particular interest to us:
- The “Consigne-Chaud” info command: returns the setpoint temperature configured on the SRT via its dial (this updates as soon as the dial is used, as it wakes the module).
- The “Action-Consigne-Chaud” action command: used to update the setpoint temperature on the SRT from Jeedom (this requires the battery-powered module to wake up to receive and display the new temperature).
- The “Température” info command: contains the temperature measured by the SRT321’s internal sensor.
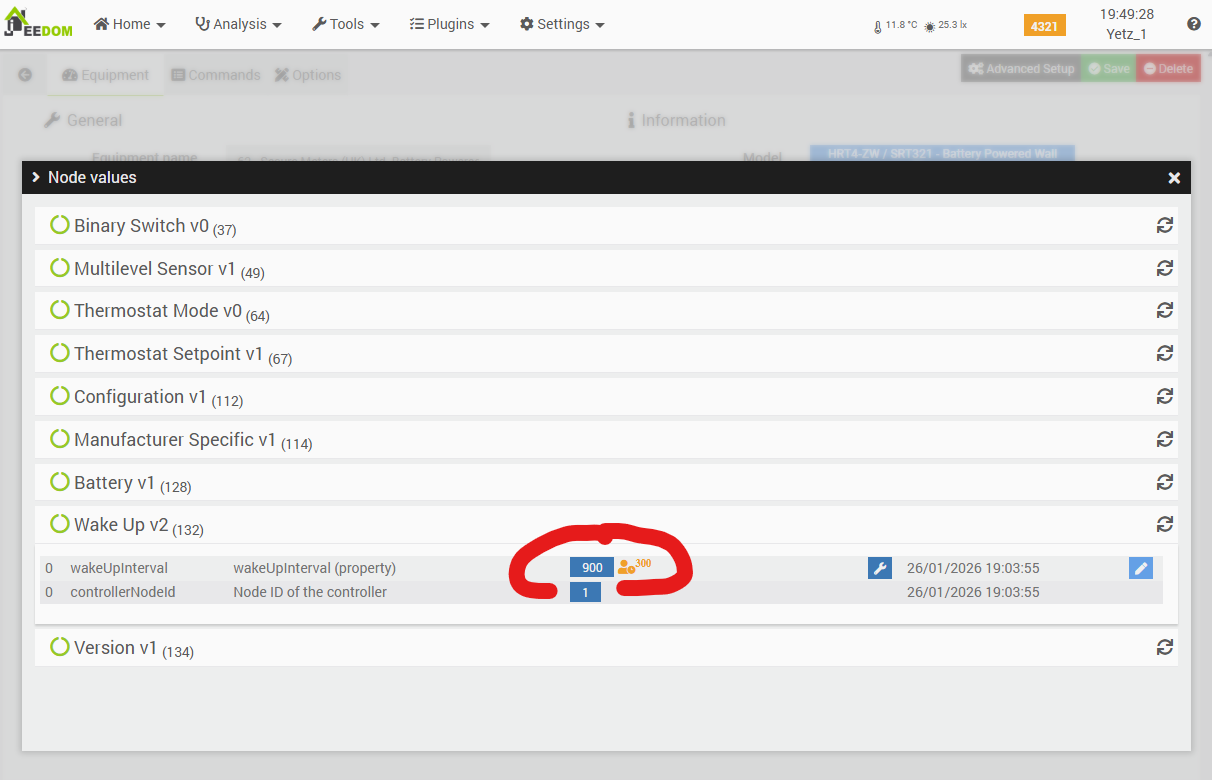
We need to find a compromise regarding the module’s wake-up interval. This is easily adjusted, but a short interval will quickly drain the batteries. In my case, I set it to 5 minutes for my tests (300 seconds), then return it to its default value of 15 minutes (900 seconds).
A quick word on its widget, should you wish to activate it: it is quite basic and would require some customization to improve its appearance (using the “PimpMyJeedom” plugin, for example). In my case, I prefer not to display it as it isn’t necessary. Within Jeedom, temperature adjustments will always be made via the Thermostat plugin widget and automatically synchronized to the SRT321 via a scenario. Similarly, any setpoint change made using the SRT321 dial will be detected and then updated on the Thermostat plugin’s setpoint through the same scenario.
Note: In the remainder of this tutorial, the device has been renamed “SRT321” and assigned to the “Entrance” parent object, which also contains the radiator we intend to control via its Heatzy module.
2. Jeedom ↔️ SRT-321 link scenarios
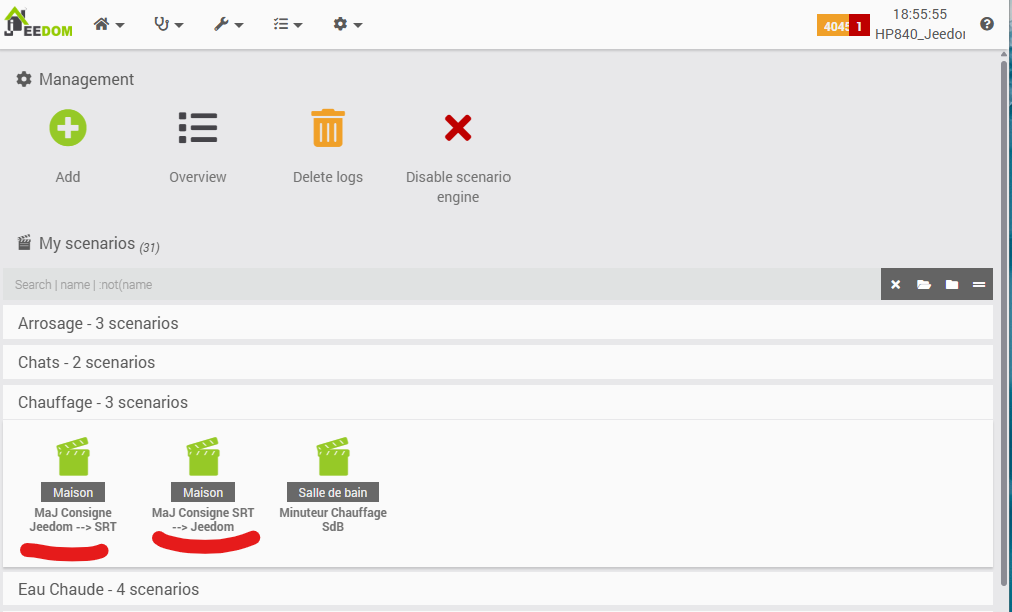
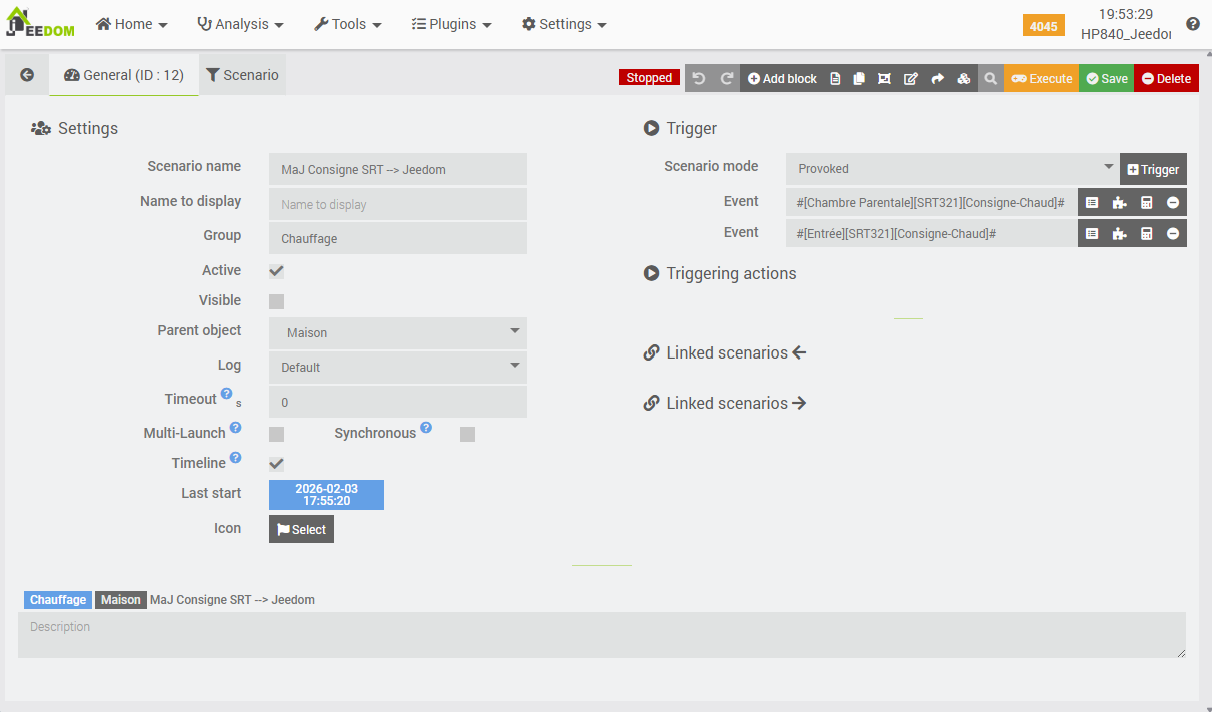
We see here the two scenarios we will review:
- One scenario monitors SRT changes and reports them to the room thermostat.
- The other does the reverse to report any change made on the Jeedom thermostat to the SRT (via web dashboard or mobile app).
Let’s zoom in on the first scenario, which detects a setpoint change on the Jeedom “Entrance” thermostat to report it on the SRT-321 display associated with the same room.
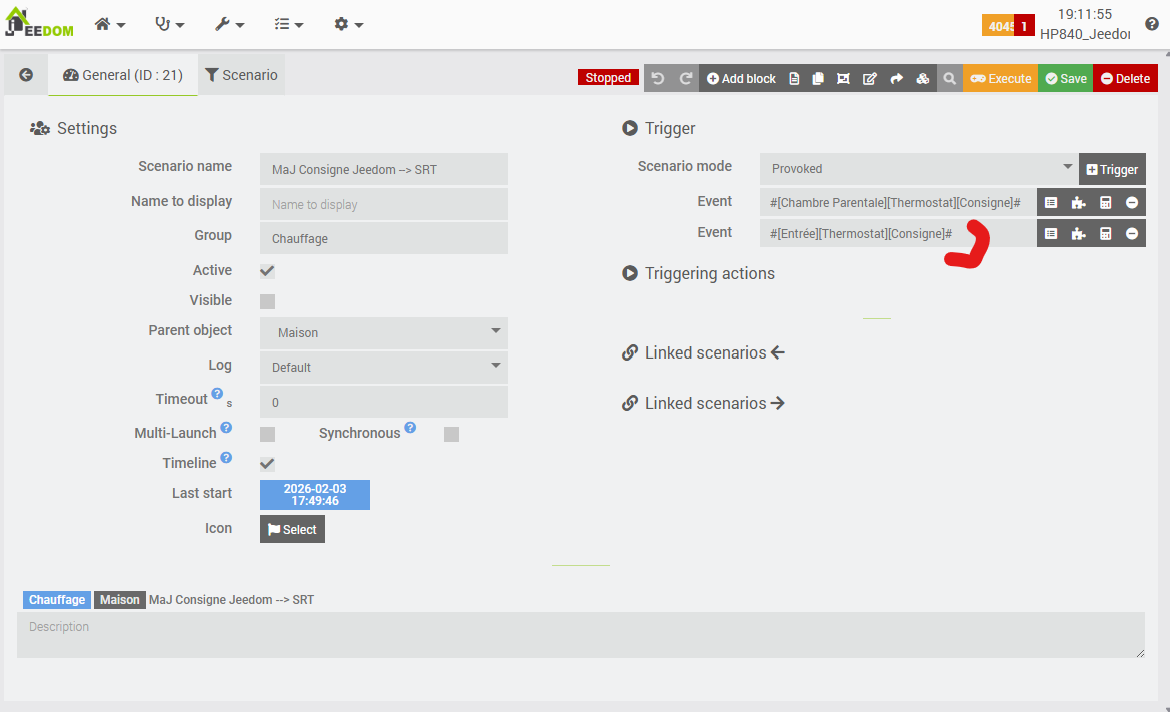
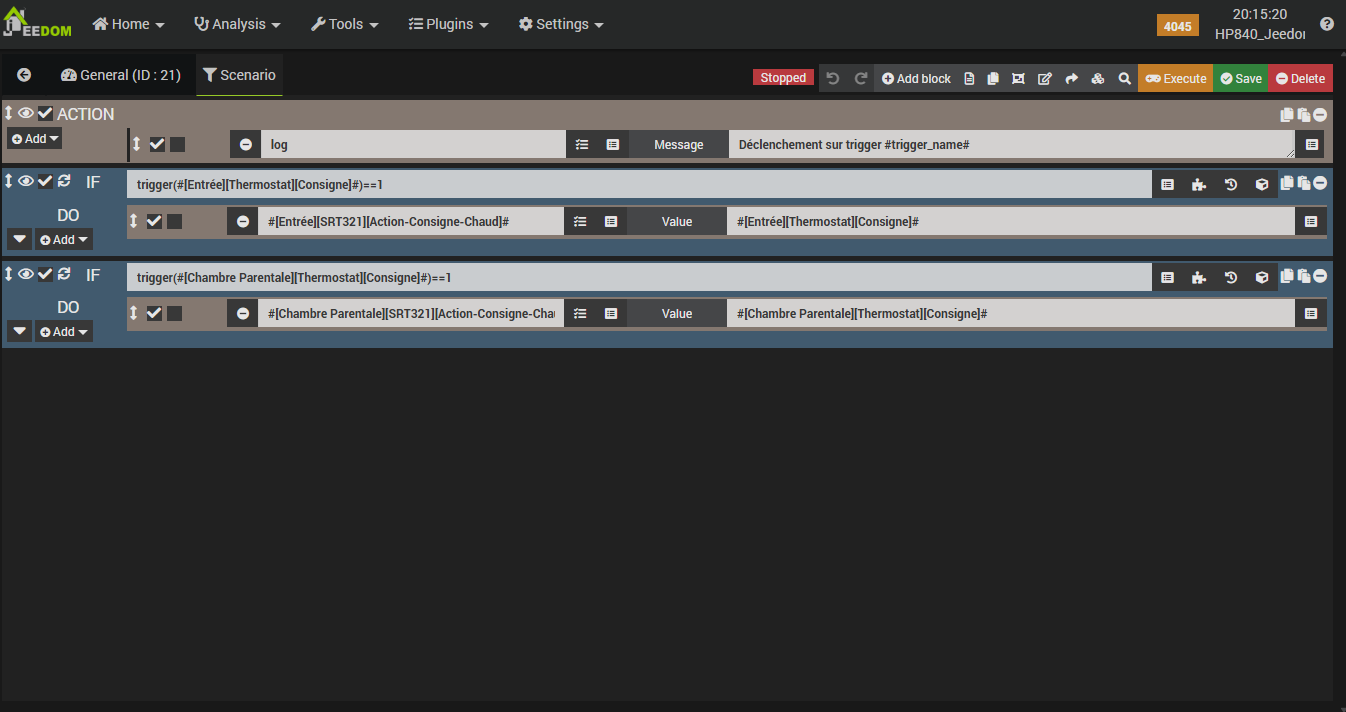
As you can see, the principle is very simple, but there is a slight subtlety: this scenario handles the updates for several SRT modules throughout the house. Therefore, we will “monitor” the setpoint changes of multiple Jeedom thermostats and reflect a specific thermostat’s change onto the “correct” SRT—the one located in the same room:
- 1st screenshot on the left: the scenario is triggered by a change in the setpoint value of two Jeedom thermostats.
- 2nd screenshot: we verify the trigger using trigger(), and accordingly, we assign the value of the room’s Jeedom thermostat to the corresponding SRT321 thermostat.
The logic is generally the same for the other scenario; however, we will verify if the setpoint temperatures of the two thermostats are actually different before updating the Jeedom thermostat setpoint with the one from the SRT321. This is to avoid an infinite loop between the two scenarios (manually updating the Jeedom thermostat updates the SRT via the 1st scenario, which triggers the 2nd scenario, which updates the Jeedom thermostat, triggering the 1st scenario again, and so on).
With our verification in this scenario, there will indeed occasionally be a minor “ping-pong” effect (when the setpoint is first changed via the SRT), but it will resolve very quickly.
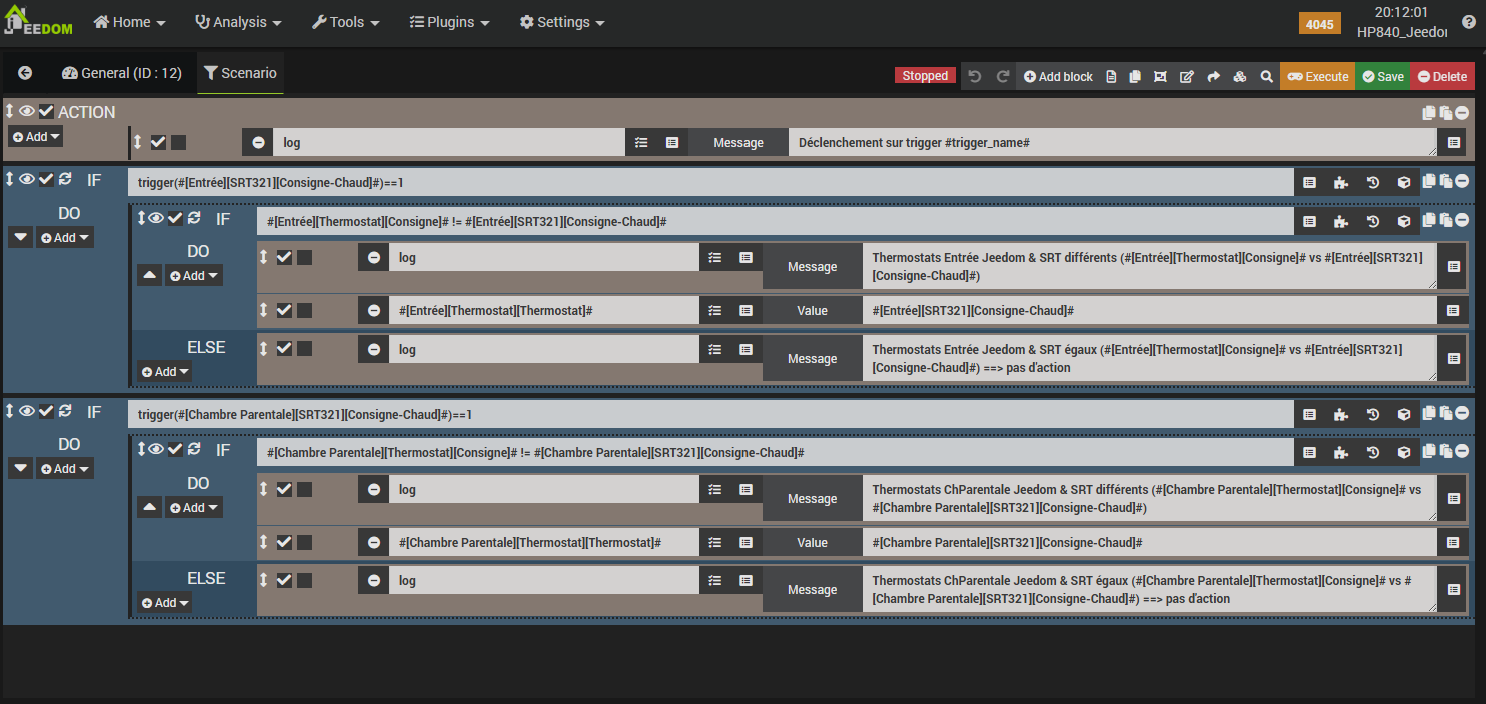
Regarding the triggers, it follows the same principle as the first scenario: we monitor the two SRT321s installed in the house. Within the actions, there are now two conditions: the first determines which SRT321 triggered the scenario, while the second checks if the SRT setpoint differs from the Jeedom thermostat setpoint. If they are different, the Jeedom setpoint is updated with the value from the SRT.
A minor observation: when the setpoint is changed on the SRT, it instantly wakes the module, and Jeedom retrieves the updated value immediately. Consequently, scenario #2 triggers right away and updates the Jeedom Thermostat setpoint, which then adjusts the room temperature via the radiator it controls. Conversely, when the setpoint is updated via the Jeedom thermostat, the temperature displayed on the SRT321 will only refresh during the module’s next scheduled wake-up, as it is battery-powered and therefore not permanently connected to the Z-Wave network.
Hence the necessity to adjust the wakeUpInterval parameter according to your needs, as discussed earlier, to find the right compromise between frequent wake-ups for faster updates at the expense of higher battery consumption, and less frequent wake-ups for a longer battery lifespan.
At this stage, we have successfully integrated a Heatzy pilot wire module onto an old radiator that was incompatible with the Qubino module. We integrated it into Jeedom via a manufacturer-specific plugin, then incorporated it into the generic Thermostat plugin. Finally, as the icing on the cake, we enabled interaction with a physical thermostat for greater day-to-day convenience.
Analysis
Let’s summarize our observations. For once, we will move from the specific to the general.
1. Specific findings on the Heatzy module & plugin
Let’s start with the pros:
- Documentation is fairly abundant, though it could benefit from being organized more logically on the Heatzy website. 🙂
- It’s French! Cocorico! Theoretically, this means excellent support for the “pilot wire” standard…
- And indeed, it has functioned flawlessly for several months now regarding interoperability with this radiator, which correctly interprets the commands received via the module’s pilot wire—unlike my Qubino ZMNHJD modules (which do, however, work well with other radiators).
- The Wi-Fi can be made to work on the 5GHz band with some effort, but without any guarantee of long-term stability (in fact, I notice today that the module is controllable via Wi-Fi, yet it does not appear in my Freebox’s list of connected devices…).
- The visible LED allows for a quick visual check of its status and rapid detection of any discrepancies between the module/pilot wire state and the actual state of the radiator (heating or not).
- As a Wi-Fi module, it is likely easier to install for a beginner, as it requires neither a Z-Wave network nor a dedicated home automation hub.
It is also worth noting that Heatzy is among the manufacturers compatible with the “Zen” and “Liberté” offers from the french company Survoltage. In exchange for purchase discounts or even slight compensation, they offer to automatically and remotely regulate your heating cycles during required load-shedding periods to relieve the electrical grid, utilizing your connected equipment.
These offers allow individuals to better offset the cost of equipment acquisition while contributing to the regulation of peak loads on the electrical grid. This is known as distributed demand response (stay tuned for an upcoming article on this subject summarizing my research, as it was a new concept to me).
Now, the cons:
- Imperative requirement for an internet connection to function; no “local” mode available.
- Why is geolocation required? I suspect it is linked to remote load-shedding capabilities, which likely need to be managed by geographical zones in relation to local production capacity. However, this is not explicitly stated—or at least, I haven’t found where—which raises significant questions for me regarding the data collected and, by extension, how it is hosted and secured.
- Lack of compatibility with the 5GHz band, as well as with dual-band setups if they share the same SSID. This could be a dealbreaker for those without sufficient technical knowledge. A hardware upgrade (though likely costly) might eventually allow the manufacturer to support both 2.4GHz and 5GHz.
- The physical size of the module, which may make it quite visible in your installation (though, as mentioned, this is an advantage for seeing the LED).
- The use of a Chinese IoT platform, considering that relatively personal information (such as location) is stored there.
- Occasional latency issues. In my opinion, dual management via both the Heatzy mobile interface and the Jeedom interface should be avoided: choose one or the other to minimize the risks of desynchronization and outdated displays.
- Log errors! Refer to the specific section below dedicated to the connected mode.
- Observations regarding the Jeedom plugin widget: nothing that shouldn’t be easily fixed (but I did not try to submit a patch).
- When disabled (to display the Thermostat plugin widget instead), it reactivates itself automatically.
- The order of the buttons does not appear to be customizable.
Finally, it is worth noting that it would be preferable—contrary to what was done in this tutorial—to include this Wi-Fi module in a dedicated “IoT” wifi network. This network should group your Wi-Fi sensors and be governed by very strict, monitored inbound and outbound filtering rules, aligned with the behaviors documented by the manufacturers (specifically regarding the data flows and ports used for specific purposes).
2. Pilot wire: interoperability & limits
I use Qubino “Pilot Wire” Z-Wave modules on a daily basis, but with certain radiators, the control either fails or functions poorly. This is currently the case for two fan-assisted towel rails in my bathrooms and a Thermor radiator, for which we specifically tested in this article whether replacing it with a different module would improve matters.
Impedance and leakage current
Some modules use electronic components (Triacs/Optocouplers) to generate the “pilot” signal, and these components allow a tiny residual current to pass through even when they are supposed to be at “0” (this is known as leakage current).
The pilot wire input on certain radiators is highly sensitive (high impedance). it detects this small leakage current and “believes” it is receiving a command (often the ECO command or a malformed signal), even though the module is attempting to send the COMFORT command (which technically corresponds to an absence of voltage).
Workaround #1: pilot wire module + additional resistor
To correct the leakage current of a pilot wire module, you can add a load resistor (220kΩ or 100kΩ) between the pilot wire and the neutral (€8 for a pack of 10). This resistor serves to “absorb” the leakage current so that the radiator clearly perceives a “true” 0V. This is what I did on my two towel rails.
Workaround #2: standard relay module + diodes
“Pilot” commands can be generated using simple hardware and without extensive knowledge:
- To generate 2 commands (e.g., Comfort / Eco) → 1 single-output relay module (e.g., Fibaro FGS-214) + 1 1N4007 diode.
- To generate 4 commands (Comfort, Eco, Stop, Frost Protection) → 1 double-output relay module (e.g., Fibaro FGS-223) + 2 1N4007 diodes.
On a double module, the diodes will “filter” the positive or negative half-wave on the module’s two outputs:
- Output Q1: anode (the side without the stripe) of Diode 1. The other end is connected to the radiator’s pilot wire.
- Output Q2: cathode (the side with the white stripe) of Diode 2. The other end is also connected to the radiator’s pilot wire.
Consequently, by manipulating the On/Off commands for both outputs within Jeedom, we obtain the following combination table:
| Desired Command | Q1 (Relay 1) | Q2 (Relay 2) | Pilot Wire Signal |
| COMFORT | OFF | OFF | 0V (Nothing passes) |
| ECO | ON | ON | 230V (Both half-cycles join) |
| STOP | ON | OFF | Positive half-wave (via diode 1) |
| FROST-PROTECTION | OFF | ON | Negative half-wave (via diode 2) |
For those less inclined toward DIY, please note that ready-to-use blocks are also available (for instance, on Domadoo) which can be plugged directly into the output of the relay module.
Opening
We are reaching the limits of the Pilot Wire system:
- French manufacturers (Heatzy, Delta Dore, Legrand/Netatmo) likely test their products directly on the French radiator market (Atlantic, Sauter, Thermor, Noirot, etc.). They know how to calibrate their electronics to handle the specific tolerances of these brands.
- Foreign manufacturers like Qubino (Slovenia, acquired by Shelly) have implemented the “theoretical” standard (230V voltages, half-waves). The same applies to radiator manufacturers who export their products to France.
In France, choosing a solution designed by a French company for the pilot wire (such as Heatzy) theoretically means:
- Avoiding electronic incompatibilities (leakage currents misinterpreted by the radiator) and having a presumed guarantee of “Plug & Play” functionality on the majority of radiators in the domestic market, as the product is more likely to have been specifically validated on these devices.
- Saving yourself from electrical DIY (not having to add resistors or diodes into an already cramped junction box).
To opt for Pilot Wire control is therefore to accept—as of today—shopping in a smaller aisle. Indeed, this French peculiarity acts as a natural filter on the market: it discourages home automation manufacturers from supporting a standard used only by one “small” country (for instance, there are currently no Pilot Wire Z-Wave modules left on the market), and it de facto excludes the multitude of low-cost generic products designed for the global standard (On/Off or local thermostat).
We (french residents) are therefore compelled to consume within a ‘French-centric’ ecosystem. While this limits competition and sometimes maintains higher prices, it is also the only guarantee of having hardware that natively respects the subtleties of our radiators without risky DIY work.
This is not necessarily a “bad” thing: on one hand, consuming within this restricted circle often fosters local innovation (the French Tech) and French-language customer support, unlike a generic module purchased from a mega e-commerce platform; on the other hand, as we will see in an upcoming article on distributed demand response, it allows participation in a collective effort toward energy savings and clear, concrete ecological gains at a national level.
“Connected” mode: limitations & advantages
What we mean here by “connected” mode is that a module requires an active Internet connection to function and communicate with a third-party infrastructure, which must also be reachable from the mobile application and/or Jeedom. This is a far cry from a “local” mode within your home, such as with certain Z-Wave or Zigbee modules (which are becoming increasingly rare for radiators). Consequently, a number of questions arise, and certain implications must be understood and accepted:
- Dependency on a third-party provider (whether it is Heatzy or any other):
- What levels of commitment are there regarding the quality and availability of their service?
- What recourse is available in the event of failure to meet these commitments?
- What happens if the company fails? Do the servers stop, rendering the module useless?
- Increased privacy risks:
- Both concerning the provider’s operators and, more generally, regarding hacking or data leaks (not a day goes by without news of new breaches).
- As a reminder, pairing via the mobile app requires geolocation!
- Dependency on third-party networks and hosting providers (to reach and host the service) and on their reliability/redundancy.
Regarding the quality of service, specifically:
- As seen earlier, a slight latency can sometimes be observed between the moment a command is sent via the Jeedom interface and the moment it is relayed by the Heatzy infrastructure back to the module.
- We have also noted recurring warnings and errors in the logs. While this might not seem problematic, how can we be certain that these errors haven’t impacted the Thermostat plugin’s performance? In the case of simple periodic “refreshes,” it is not very serious; however, without error recovery coded into the module (and there appears to be none), certain commands may fail to be sent by Jeedom during periods of service or connection unavailability.
On the other hand, as we have also seen, this type of module connected to a “master” infrastructure allows for integration into a national energy consumption management and regulation process: distributed demand response.
Conclusion
Mission accomplished: this radiator has now been operating flawlessly for several months.
In summary, this setup—combining the Heatzy Pilot Wire Wi-Fi module, the Jeedom Heatzy plugin, the Jeedom Thermostat plugin, and an SRT321 wall thermostat—allows for full utilization of the pilot wire while standardizing the control of diverse radiators within a single interface. Despite some limitations (dependency on the Internet and the Heatzy cloud, recurring HTTP 502 errors, and latency inherent to the connected model and the use of battery-powered modules), the system remains stable, effective, and flexible enough to be integrated into advanced home automation focused on comfort and energy optimization.
By the way, this installation meets the requirements of the french Decree 2023-444 (postponed to 2030) without requiring a massive investment—it might even be reimbursed thanks to aid from certain demand response operators, a subject for an upcoming article—while maintaining full control via Jeedom.
Furthermore, this installation complies with the 2030 mandate for smart thermostats at low cost. My main concern remains the Gizwits dependency; for critical local control, Z-Wave remains preferable when compatible. This would change if a local control API existed alongside cloud capabilities.
For me, the major point of vigilance remains the dependency on Internet & the Gizwits infrastructure, which serves as a reminder that for critical, 100% local control, a Z-Wave solution remains preferable whenever compatibility allows. This observation would no longer apply if a local control API existed in addition to its cloud capabilities.
What’s next?
- Coming soon, to automate your electrical load shedding: an article on using the RTE Ecowatt Tempo plugin, a “tomorrow’s color” notification scenario, and an automatic shutdown scenario for heavy power consumers during red days.
- Coming soon, because I wasn’t really familiar with it: an article on what diffuse load shedding is and how it works.
- Building a low-cost local pilot wire module based on an ESP32 (and other modules in the works).