Reducing your electricity consumption benefits both your finances and the environment—and it all starts with information. While energy-conscious habits (such as turning off unused lights and minimizing electric heating) play an important role, the real game-changer is the ability to monitor and compare your usage in real time, from anywhere. This empowers you to track your progress and quickly detect unusual spikes, whether you’re at home or away.
In this article, I’ll walk you through how I monitor my own electricity use leveraging the Jeedom automation system with a French electricity meter. My setup consists of a “master” Jeedom controller (running as a Debian VM on an Intel NUC with vSphere) and a hardware modem/sensor connected to the meter, which in turn is linked to a remote Raspberry Pi 3B+. The core of this solution is a method for accessing remote USB devices over a network—using USB over IP.
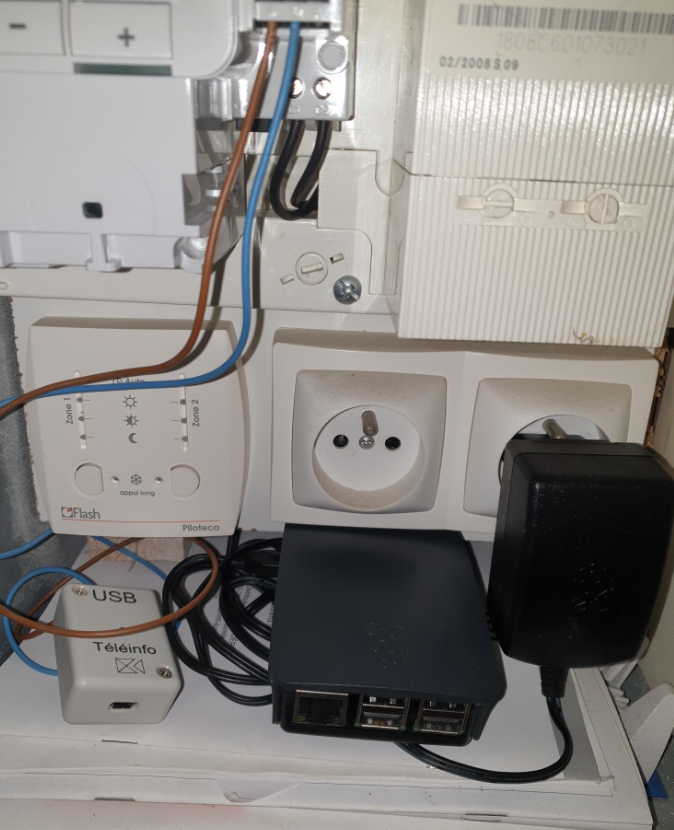
Because my electricity meter is physically distant from my Jeedom virtual machine, I can’t connect the USB electricity modem directly to Jeedom. To resolve this, I installed a small Raspberry Pi 3B+ inside the electricity cabinet and connected it to the modem. The Raspberry Pi sends meter data over IP/Wifi to the main Jeedom controller, which treats the modem as if it were directly USB connected.
This system allows you to record and display electricity consumption in real time (useful for instantly seeing the impact of turning on a specific appliance), but also over time, making it easy to compare consumption between different months and years, and even within the different tariff periods of your subscription. With a few additional settings, this system can also estimate your electricity costs. Used with Z-Wave sensors, smart plugs, or switches that measure their own consumption, it allows you to quickly identify the devices and habits that contribute most to your energy consumption, and even easily reduce your load.
Note that there are three alternative approaches to the USB over IP method with Jeedom:
- You can deploy a “slave” Jeedom instance on the Raspberry Pi inside the electricity cabinet, then use the Teleinfo plugin together with the Jeedom Link plugin to transmit data from this slave instance to the main Jeedom controller. However, this method is comparatively heavy just for data forwarding, as it requires running two separate Jeedom instances.
- Alternatively, you can use the Teleinfo plugin’s daemon mode on the Raspberry Pi. This plugin is specifically for electricity consumption monitoring in Jeedom and, in daemon mode, does not require a full Jeedom installation on the Pi. I personally prefer the USB over IP solution since it is generic: it works for any USB device—not just the electricity modem and not just for Jeedom.
- A third option is to use another type of Teleinfo modem, which transmits data to Jeedom using a wireless protocol (“over the air”). I plan to publish a separate guide for this approach.
Therefore, the USB over IP solution described here is a robust and generic choice when you want to use a remote USB device on a Linux system via an available TCP/IP network. It is not limited to electricity monitoring.
The hardware & Software I use
Here’s a quick overview of the components required for this setup:
- My main Jeedom controller runs on a Debian virtual machine hosted on an old Intel NUC (the setup for this machine is described here).
- The electricity modem is connected via USB to a Raspberry Pi 3B (a Pi Zero W would likely work as well), which will remain permanently installed in the electrical cabinet.
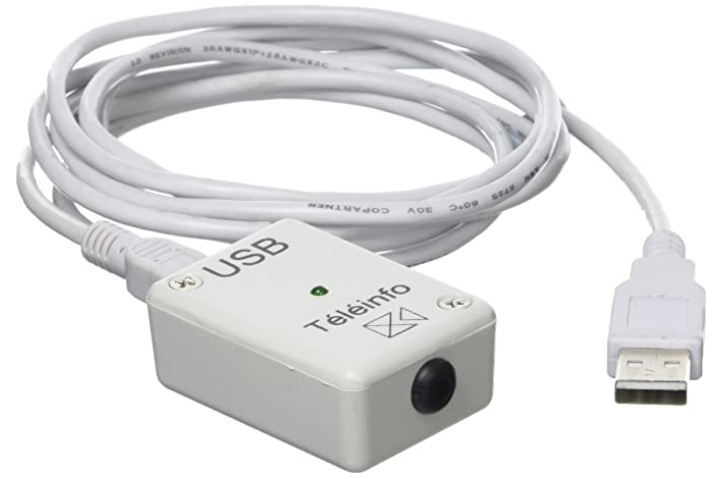
- An “EDF Téléinformation Modem”: This is the tricky part—each country generally has its own style of electricity meter. This tutorial is specific to French installations! In France, all electric meters are equipped with two wires that can be used for monitoring power consumption. The data sent over these wires is simple and officially documented, and the modem converts it into USB data that the Raspberry Pi can read. If you are in another country, you need to check how your electricity system works and what type of hardware or adaptation you will need.
- Some basic electrical wiring.
- The “Teleinfo” plugin (free) to monitor and record live data on the main Jeedom controller from the remote sensor.
- Optional & not described in this guide the “Suivi conso” Jeedom plugin (€8), which can also be installed on the main Jeedom controller to format and display collected data attractively.
Configuring the remote “USB server” RPI3B
Start by installing a fresh image of Raspbian on the Raspberry Pi 3B. (If you need guidance, you can refer to my quick setup tutorial. For this article, I’ll pick up from the point where Raspbian is already installed and running.)
a. Modem wiring
First, prepare the Teleinfo modem for wiring: unscrew its case and insert two small wires—one into each of the two internal connectors.
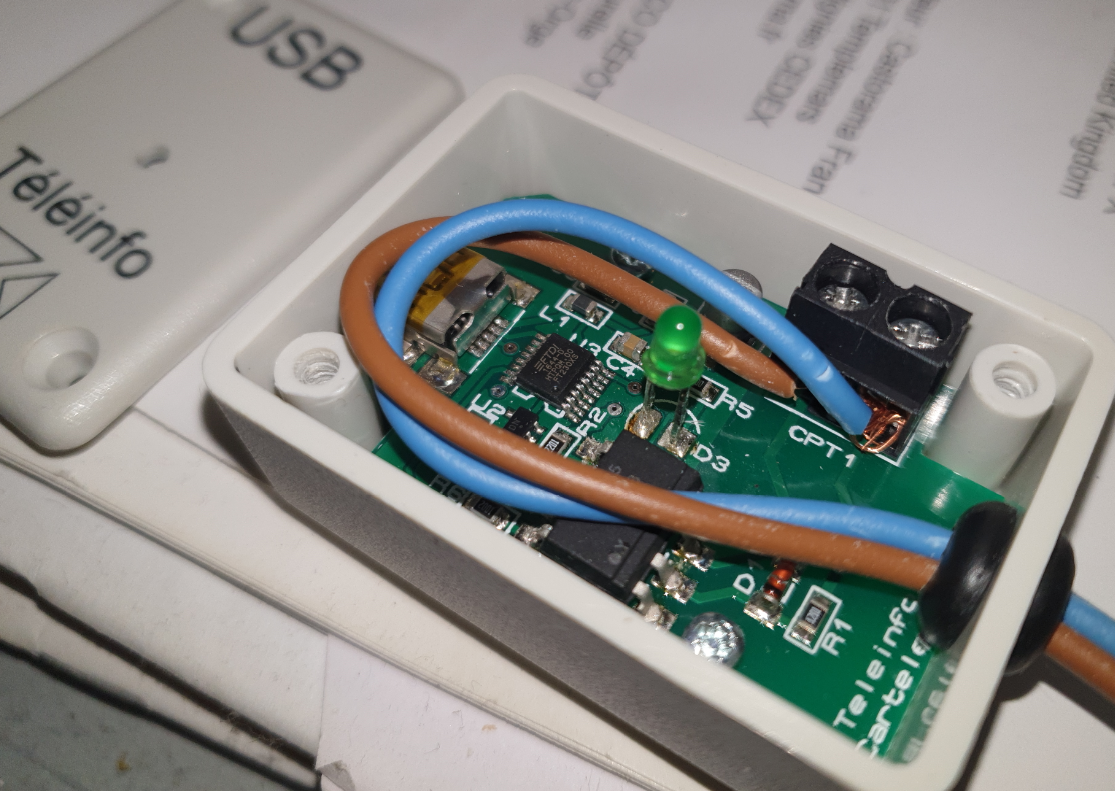
Now, gently remove the top cover from the electricity meter to expose the I1 and I2 terminals (ignore the “A” terminal, our modem is USB powered).


Connect the two wires from the Teleinfo modem to I1 and I2—it doesn’t matter which wire goes to which terminal.
Finally, power off the Raspberry Pi, move it into the electrical cabinet, and then power it back on.
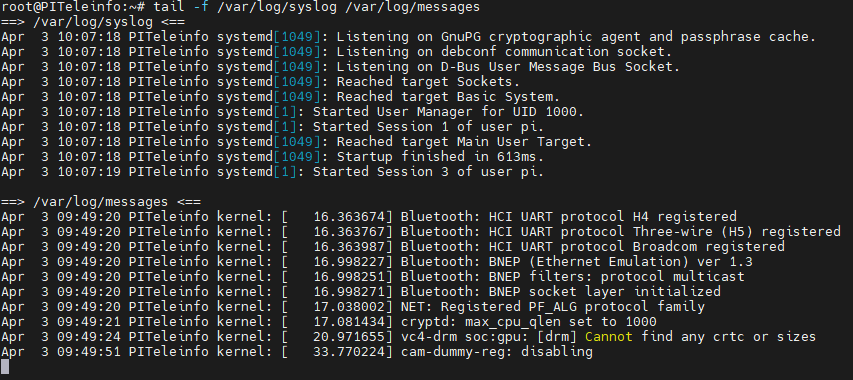
Once the Raspberry Pi has booted, I connect to it via SSH and check which USB devices are detected by Raspbian. I also monitor the main system logs to confirm that the USB Teleinfo modem is properly detected when I plug it in.

And now I plug the modem with its USB cable to the Raspberry …
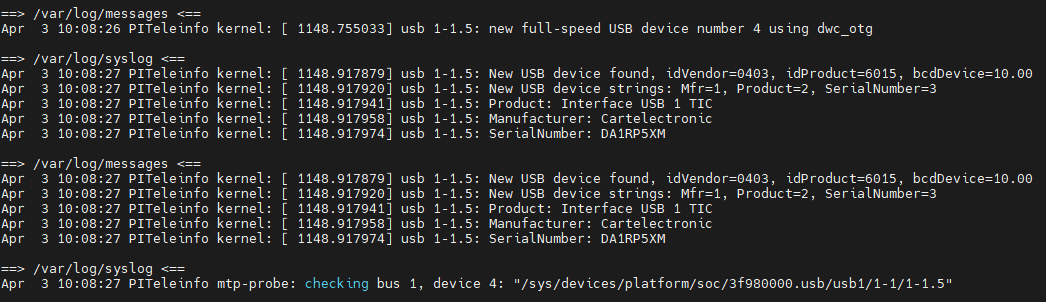


After connecting the modem, a new “Cartelectronic” device appears in the logs, identified by lsusb as a “Future Technology” device and detected as a USB serial modem on ttyUSB0 (according to syslog). This means everything is working perfectly so far.
b. Sharing the Teleinfo data over IP
Now let’s configure Raspbian so that the Raspberry Pi 3B can share its Teleinfo data over the TCP/IP network—as a server. First, install the “usbip” package:
apt-get install -y usbipThis command installs the necessary usbip modules. Next, we’ll ensure that Raspbian loads the required kernel modules at boot time by editing /etc/modules-load.d/modules.conf.
# /etc/modules: kernel modules to load at boot time.
#
# This file contains the names of kernel modules that should be loaded
# at boot time, one per line. Lines beginning with "#" are ignored.

vhci-hd
usbip-core
usbip_common_mod
usbip-host
Next, reboot your Raspberry Pi and verify that the usbip modules are now loaded.

You can also check which devices are visible to usbip with:
root@PITeleinfo:~# usbip list -l
usbip: error: Protocol spec without prior Class and Subclass spec at line 23299
 - busid 1-1.1 (0424:ec00)
   Microchip Technology, Inc. (formerly SMSC) : SMSC9512/9514 Fast Ethernet Adapter (0424:ec00)

 - busid 1-1.5 (0403:6015)
   Future Technology Devices International, Ltd : Bridge(I2C/SPI/UART/FIFO) (0403:6015)
You may see an error appear on the first line. This seems to be specific to Debian 10.12 Bullseye on the Pi 3B, but it does not affect the configuration or subsequent operation. What matters is the “1-1.5” identifier, which refers to the device we want to share (you also saw this ID in /var/log/messages and syslog). We’ll use this bus ID on the remote host in the next steps. First, let’s do a quick test to share our modem:
root@PITeleinfo:~# usbipd -D
root@PITeleinfo:~# usbip bind -b 1-1.5
usbip: info: bind device on busid 1-1.5: complete
There should be no errors—the modem is now shared correctly on the server.
c. Starting USBIP Automatically at Boot with systemd
Next, set up a systemd unit so that usbip starts automatically at Raspberry’s boot. Create the file /etc/systemd/system/usbip.service. (I based my approach on this guide, with a few modifications for Debian/Raspbian.)
root@PITeleinfo:~# joe /etc/systemd/system/usbip.service[Unit]
Description=Exports USB device over IP
Requires=systemd-networkd-wait-online.service
After=systemd-networkd-wait-online.service
[Service]
Type=simple
Restart=on-failure
RestartSec=20
User=root
Group=root
ExecStart=/usr/sbin/usbipd
ExecStartPost=/usr/sbin/usbip bind --busid=1-1.5
ExecStop=/usr/sbin/usbip unbind
[Install]
WantedBy=multi-user.targetNow, let systemd recognize the new unit and set it to launch at startup:
root@PITeleinfo:~# systemctl daemon-reload
root@PITeleinfo:~# systemctl enable usbip.service
Created symlink /etc/systemd/system/multi-user.target.wants/usbip.service → /etc/systemd/system/usbip.service.
Notice the unit is configured to wait for the network to be ready; sharing USB devices over the network isn’t possible if the network isn’t up yet. To ensure this works, enable the systemd-networkd-wait-online.service unit on your system:
root@PITeleinfo:~# systemctl enable systemd-networkd-wait-online.serviceNow, let’s start the service:
root@PITeleinfo:~# systemctl start usbip.service
Job for usbip.service failed because the control process exited with error code.
See "systemctl status usbip.service" and "journalctl -xe" for details.
We see an error—but that’s expected, since we previously started and bound usbip manually for testing. Let’s check that.
root@PITeleinfo:~# journalctl -xe
avril 03 13:02:20 PITeleinfo systemd[1]: Starting Exports USB device over IP...
░░ Subject: L'unité (unit) usbip.service a commencé à démarrer
░░ Defined-By: systemd
░░ Support: https://www.debian.org/support
░░
░░ L'unité (unit) usbip.service a commencé à démarrer.
avril 03 13:02:20 PITeleinfo usbip[1634]: usbip: error: device on busid 1-1.5 is already bound to usbip-host
avril 03 13:02:20 PITeleinfo systemd[1]: usbip.service: Control process exited, code=exited, status=1/FAILURE
░░ Subject: Unit process exited
░░ Defined-By: systemd
░░ Support: https://www.debian.org/support
░░
░░ An ExecStartPost= process belonging to unit usbip.service has exited.
░░
░░ [...]
░░
░░ L'unité (unit) usbip.service a échoué, avec le résultat failed.
root@PITeleinfo:~#
The explanation is clear: the device with busid 1-1.5 is already bound, which is normal since we manually started usbip earlier for testing.
Now, let’s reboot the Pi 3B and verify that usbip starts automatically and the 1-1.5 device is shared without intervention.
root@PITeleinfo:~# /sbin/rebootroot@PITeleinfo:~# tail -n 300 /var/log/syslog[...]
Apr 3 18:06:35 PITeleinfo dhcpcd[440]: wlan0: soliciting an IPv6 router
Apr 3 18:06:35 PITeleinfo dhcpcd[440]: wlan0: rebinding lease of 192.168.1.46
Apr 3 18:06:35 PITeleinfo dhcpcd[440]: wlan0: probing address 192.168.1.46/24
Apr 3 18:06:37 PITeleinfo ModemManager[491]: <info> [base-manager] couldn't check support for device '/sys/devices/platform/soc/3f980000.usb/usb1/1-1/1-1.5': not supported by any plugin
Apr 3 18:06:37 PITeleinfo ModemManager[491]: <info> [base-manager] couldn't check support for device '/sys/devices/platform/soc/3f300000.mmcnr/mmc_host/mmc1/mmc1:0001/mmc1:0001:1': not supported by any plugin
Apr 3 18:06:37 PITeleinfo ModemManager[491]: <info> [base-manager] couldn't check support for device '/sys/devices/platform/soc/3f980000.usb/usb1/1-1/1-1.1': not supported by any plugin
Apr 3 18:06:37 PITeleinfo systemd-networkd[169]: wlan0: Gained IPv6LL
Apr 3 18:06:37 PITeleinfo systemd[1]: Finished Wait for Network to be Configured.
Apr 3 18:06:37 PITeleinfo systemd[1]: Starting Exports USB device over IP...
Apr 3 18:06:37 PITeleinfo usbip[558]: usbip: info: bind device on busid 1-1.5: complete
Apr 3 18:06:37 PITeleinfo systemd[1]: Started Exports USB device over IP.
[...]This is perfect, the USB is automatically shared after its reboot, we are ready for the next phase: configuring the main Jeedom controller, aka the “client”.
2. Configuring the “USB client”: Jeedom
a. Mounting the remote USB device
Now, let’s configure the Jeedom virtual machine, which acts as the client to our Pi 3B usbip server. First, install the usbip package as you did on the Raspberry Pi:
root@DEBIAN10-3-JEEDOM:~# apt-get install -y usbipThis installs the necessary usbip modules. Next, ensure that Debian loads the required kernel modules at boot by editing /etc/modules-load.d/modules.conf.
# /etc/modules: kernel modules to load at boot time.
#
# This file contains the names of kernel modules that should be loaded
# at boot time, one per line. Lines beginning with "#" are ignored.

vhci-hcd
usbip-core
usbip_common_mod
Again, reboot your Debian system and confirm the usbip modules are loaded.
Now let’s do a quick test by “mounting” (connecting) the Teleinfo Modem we previously shared on the server. We need two things: the source USB ID on server side, and the server’s (Raspberry) IP.
root@DEBIAN10-3-JEEDOM:~# usbip attach -d 1-1.5 -r 192.168.1.46
root@DEBIAN10-3-JEEDOM:~#
With no errors reported, the device connection is likely successful. We can now check that the USB device is correctly detected by the system—let’s review the system logs…
root@DEBIAN10-3-JEEDOM:~# tail -f /var/log/syslog
Apr  3 11:25:41 DEBIAN10-3-JEEDOM kernel: [ 1084.463477] usb 3-1: SerialNumber: DA1RP5XM
Apr  3 11:25:41 DEBIAN10-3-JEEDOM kernel: [ 1084.496260] usbcore: registered new interface driver usbserial_generic
Apr  3 11:25:41 DEBIAN10-3-JEEDOM kernel: [ 1084.496671] usbserial: USB Serial support registered for generic
Apr  3 11:25:41 DEBIAN10-3-JEEDOM kernel: [ 1084.505932] usbcore: registered new interface driver ftdi_sio
Apr  3 11:25:41 DEBIAN10-3-JEEDOM kernel: [ 1084.506646] usbserial: USB Serial support registered for FTDI USB Serial Device
Apr  3 11:25:41 DEBIAN10-3-JEEDOM kernel: [ 1084.507371] ftdi_sio 3-1:1.0: FTDI USB Serial Device converter detected
Apr  3 11:25:41 DEBIAN10-3-JEEDOM kernel: [ 1084.507474] usb 3-1: Detected FT-X
Apr  3 11:25:41 DEBIAN10-3-JEEDOM kernel: [ 1084.512422] usb 3-1: FTDI USB Serial Device converter now attached to ttyUSB0
Apr  3 11:25:44 DEBIAN10-3-JEEDOM ModemManager[492]: <info>  Couldn't check support for device '/sys/devices/platform/vhci_hcd.0/usb3/3-1': not supported by any plugin
You should now see log lines confirming your USB device is detected and attached as ttyUSB0.
root@DEBIAN10-3-JEEDOM:~# lsusb
Bus 018 Device 001: ID 1d6b:0003 Linux Foundation 3.0 root hub
Bus 017 Device 001: ID 1d6b:0002 Linux Foundation 2.0 root hub
Bus 016 Device 001: ID 1d6b:0003 Linux Foundation 3.0 root hub
Bus 015 Device 001: ID 1d6b:0002 Linux Foundation 2.0 root hub
Bus 014 Device 001: ID 1d6b:0003 Linux Foundation 3.0 root hub
Bus 013 Device 001: ID 1d6b:0002 Linux Foundation 2.0 root hub
Bus 012 Device 001: ID 1d6b:0003 Linux Foundation 3.0 root hub
Bus 011 Device 001: ID 1d6b:0002 Linux Foundation 2.0 root hub
Bus 009 Device 001: ID 1d6b:0002 Linux Foundation 2.0 root hub
Bus 010 Device 001: ID 1d6b:0003 Linux Foundation 3.0 root hub
Bus 008 Device 001: ID 1d6b:0003 Linux Foundation 3.0 root hub
Bus 007 Device 001: ID 1d6b:0002 Linux Foundation 2.0 root hub
Bus 006 Device 001: ID 1d6b:0003 Linux Foundation 3.0 root hub
Bus 005 Device 001: ID 1d6b:0002 Linux Foundation 2.0 root hub
Bus 004 Device 001: ID 1d6b:0003 Linux Foundation 3.0 root hub
Bus 003 Device 002: ID 0403:6015 Future Technology Devices International, Ltd Bridge(I2C/SPI/UART/FIFO)
Bus 003 Device 001: ID 1d6b:0002 Linux Foundation 2.0 root hub
Bus 001 Device 001: ID 1d6b:0002 Linux Foundation 2.0 root hub
Bus 002 Device 004: ID 0658:0200 Sigma Designs, Inc. Aeotec Z-Stick Gen5 (ZW090) - UZB
Bus 002 Device 003: ID 0e0f:0002 VMware, Inc. Virtual USB Hub
Bus 002 Device 002: ID 0e0f:0003 VMware, Inc. Virtual Mouse
Bus 002 Device 001: ID 1d6b:0001 Linux Foundation 1.1 root hub
You should see “Future Technology Devices International, Ltd Bridge (I2C/SPI/UART/FIFO)”—the same device visible on the server side. This confirms everything is working as expected.
b. Starting Everything Automatically at Boot with systemd
Here too, we’ll use a dedicated systemd unit file (/etc/systemd/system/usbip.service) to monitor and mount the remote Teleinfo modem over IP.
root@DEBIAN10-3-JEEDOM:~# joe /etc/systemd/system/usbip.service[Unit]
Description=Connects remote USB device over IP
Requires=systemd-networkd-wait-online.service
After=systemd-networkd-wait-online.service
[Service]
Type=simple
Restart=on-failure
User=root
Group=root
ExecStart=/usr/local/sbin/usbip_teleinfo.sh
[Install]
WantedBy=multi-user.targetThis systemd unit launches a script (/usr/local/sbin/usbip_teleinfo.sh) containing a loop that regularly checks whether the specified endpoints are mounted, and if not, attempts to mount them. The script also traps various Unix termination signals so it can unbind the mounted remote devices cleanly. Remember to update the script with your own SERVER IP and the BUS ID as exposed by your server.
root@DEBIAN10-3-JEEDOM:~# joe /usr/local/sbin/usbip_teleinfo.sh#!/bin/bash
ENDLESS=true
LANG=C
SERVER='192.168.1.46'
BUSID='1-1.5'
trap_exit() {
ENDLESS=false
for PORT in $(/usr/sbin/usbip port | /usr/bin/grep ^Port | /usr/bin/cut -d':' -f1 | /usr/bin/awk '{print$2}'); do
/usr/sbin/usbip detach -p $PORT
done
exit 0
}
trap trap_exit SIGINT
trap trap_exit SIGTERM
trap trap_exit SIGKILL
while $ENDLESS; do
if ! /usr/sbin/usbip port | /usr/bin/grep "usbip:.*${SERVER}.*${BUSID}$" &> /dev/null; then
/usr/sbin/usbip attach -r ${SERVER} -b ${BUSID}
fi
sleep 30
done
trap_exitroot@DEBIAN10-3-JEEDOM:~# chmod 0750 /usr/local/sbin/usbip_teleinfo.shOnce again, be sure that the systemd unit responsible for confirming the network is up is enabled on your system:
root@DEBIAN10-3-JEEDOM:~# systemctl enable systemd-networkd-wait-online.serviceNow, enable this new systemd unit to ensure it starts on Jeedom’s boot:
root@DEBIAN10-3-JEEDOM:~# systemctl daemon-reload
root@DEBIAN10-3-JEEDOM:~# systemctl enable usbip.service
Created symlink /etc/systemd/system/multi-user.target.wants/usbip.service → /etc/systemd/system/usbip.service.
To test your configuration, start the service:
root@DEBIAN10-3-JEEDOM:~# sudo systemctl start usbip.serviceThis time, there should be no errors. Note: The lack of error is normal—while preparing this article, I unplugged my Raspberry Pi, so the mount point on the Jeedom controller was lost. Let’s check which USB devices are currently attached to the Jeedom box.
root@DEBIAN10-3-JEEDOM:~# lsusb
Bus 018 Device 001: ID 1d6b:0003 Linux Foundation 3.0 root hub
Bus 017 Device 001: ID 1d6b:0002 Linux Foundation 2.0 root hub
Bus 016 Device 001: ID 1d6b:0003 Linux Foundation 3.0 root hub
Bus 015 Device 001: ID 1d6b:0002 Linux Foundation 2.0 root hub
Bus 014 Device 001: ID 1d6b:0003 Linux Foundation 3.0 root hub
Bus 013 Device 001: ID 1d6b:0002 Linux Foundation 2.0 root hub
Bus 012 Device 001: ID 1d6b:0003 Linux Foundation 3.0 root hub
Bus 011 Device 001: ID 1d6b:0002 Linux Foundation 2.0 root hub
Bus 009 Device 001: ID 1d6b:0002 Linux Foundation 2.0 root hub
Bus 010 Device 001: ID 1d6b:0003 Linux Foundation 3.0 root hub
Bus 008 Device 001: ID 1d6b:0003 Linux Foundation 3.0 root hub
Bus 007 Device 001: ID 1d6b:0002 Linux Foundation 2.0 root hub
Bus 006 Device 001: ID 1d6b:0003 Linux Foundation 3.0 root hub
Bus 005 Device 001: ID 1d6b:0002 Linux Foundation 2.0 root hub
Bus 004 Device 001: ID 1d6b:0003 Linux Foundation 3.0 root hub
Bus 003 Device 003: ID 0403:6015 Future Technology Devices International, Ltd Bridge(I2C/SPI/UART/FIFO)
Bus 003 Device 001: ID 1d6b:0002 Linux Foundation 2.0 root hub
Bus 001 Device 001: ID 1d6b:0002 Linux Foundation 2.0 root hub
Bus 002 Device 004: ID 0658:0200 Sigma Designs, Inc. Aeotec Z-Stick Gen5 (ZW090) - UZB
Bus 002 Device 003: ID 0e0f:0002 VMware, Inc. Virtual USB Hub
Bus 002 Device 002: ID 0e0f:0003 VMware, Inc. Virtual Mouse
Bus 002 Device 001: ID 1d6b:0001 Linux Foundation 1.1 root hub
root@DEBIAN10-3-JEEDOM:~#
The “Future Technology Devices International, Ltd Bridge” now appears locally—perfect! At this point, your system automatically mounts the remote electrical sensor on the Jeedom controller after a reboot, whether it happens on the Raspberry Pi or on the Jeedom server.
Important: For this to work reliably, your Raspberry Pi must have a static IP address (or that you can reach it through a FQDN) ! You can set a fixed IP directly on the Pi (not using DHCP), or configure a static DHCP lease on your router or DHCP server.
Configuring the Teleinfo plugin in Jeedom
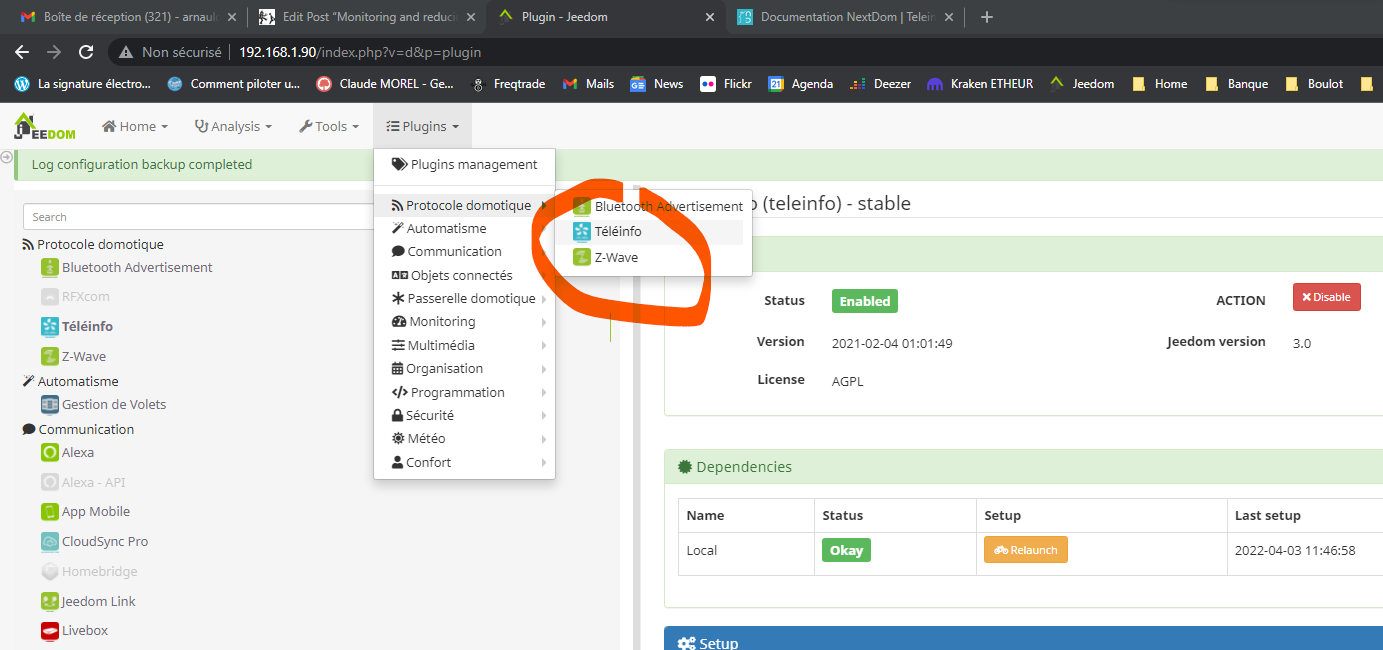
To monitor power consumption, you’ll need to install a dedicated plugin in Jeedom. I used the free “Teleinfo” plugin. Go to Jeedom’s Plugins page, open the Market, and search for “Teleinfo.” Click the button to install it; once installed, Jeedom will prompt you to open the configuration page—click Yes.
Note: The screenshot below shows my already-configured setup, so yours may look a bit different after a fresh installation. Here is what you need to do right after installing the plugin:
- (Red circle) Start by launching the dependencies compilation.
- (Purple circle) I recommend switching logs to DEBUG mode at first, so you can easily spot any errors, with a lot of details. After you’ve checked for errors, you can go back to INFO mode, then click Save.
- (Blue circle) In the Modem 1 dropdown menu, select your electrical modem. In my case, it’s mounted as
/dev/ttyUSB0. Click Save again. - (Green circle) Wait for the daemon to restart—the status should turn green. If it doesn’t after a few minutes, review the plugin logs carefully.
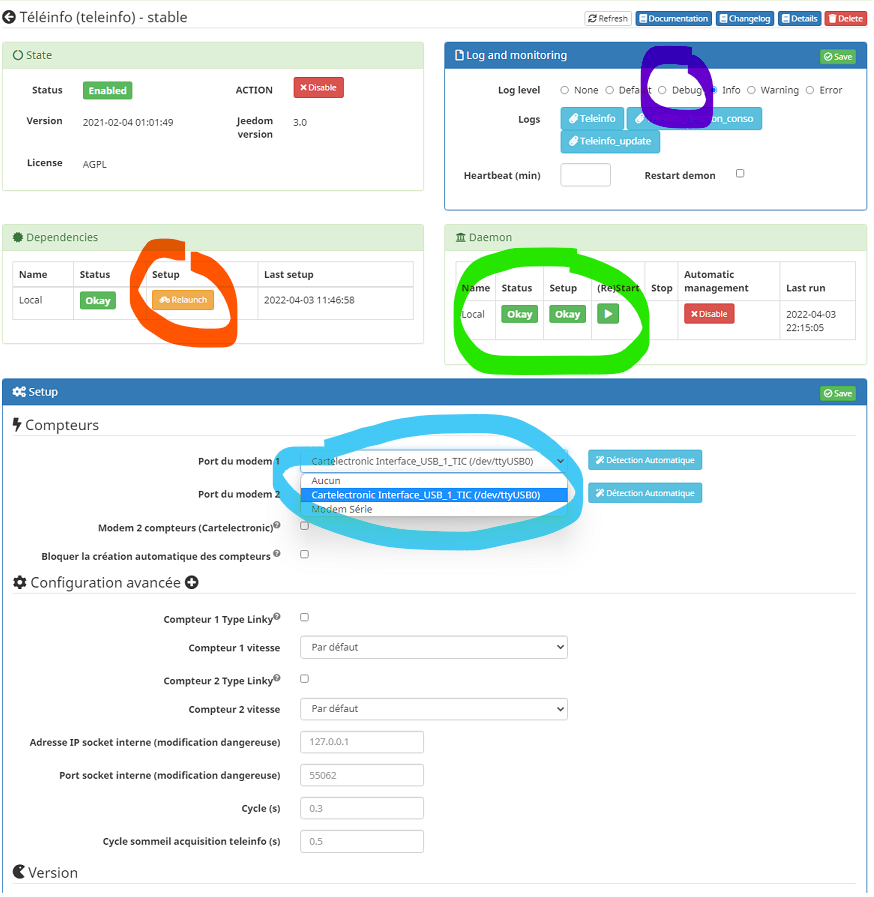
I also recommend enabling the Desktop panel view at the bottom of the configuration page (see green circle below). Don’t forget to save your changes again.

You can also click the “Diagnostic” button (shown above in blue). This will run several checks to confirm your setup and the remote sensor are working correctly.
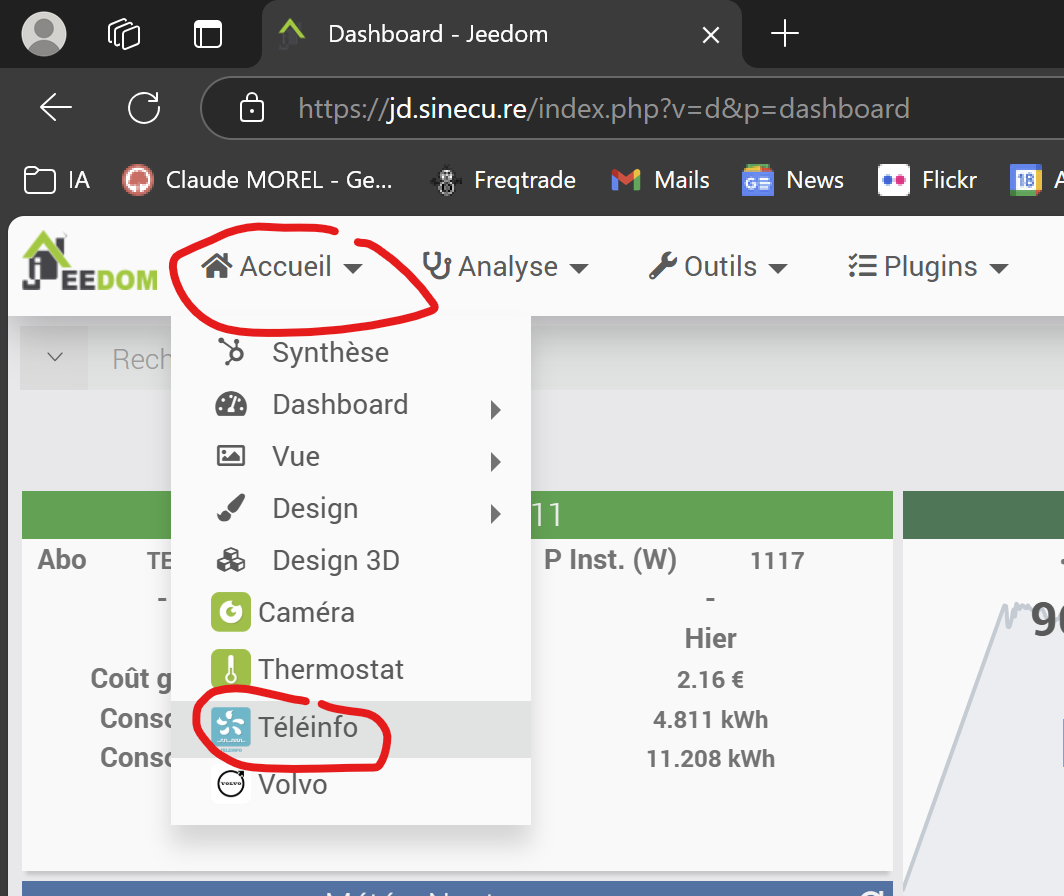
Now, go to the main page of the Teleinfo plugin.
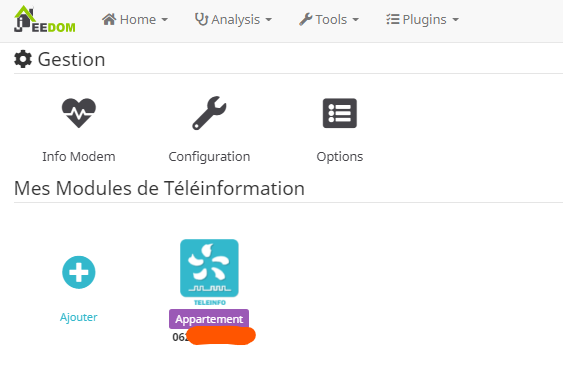
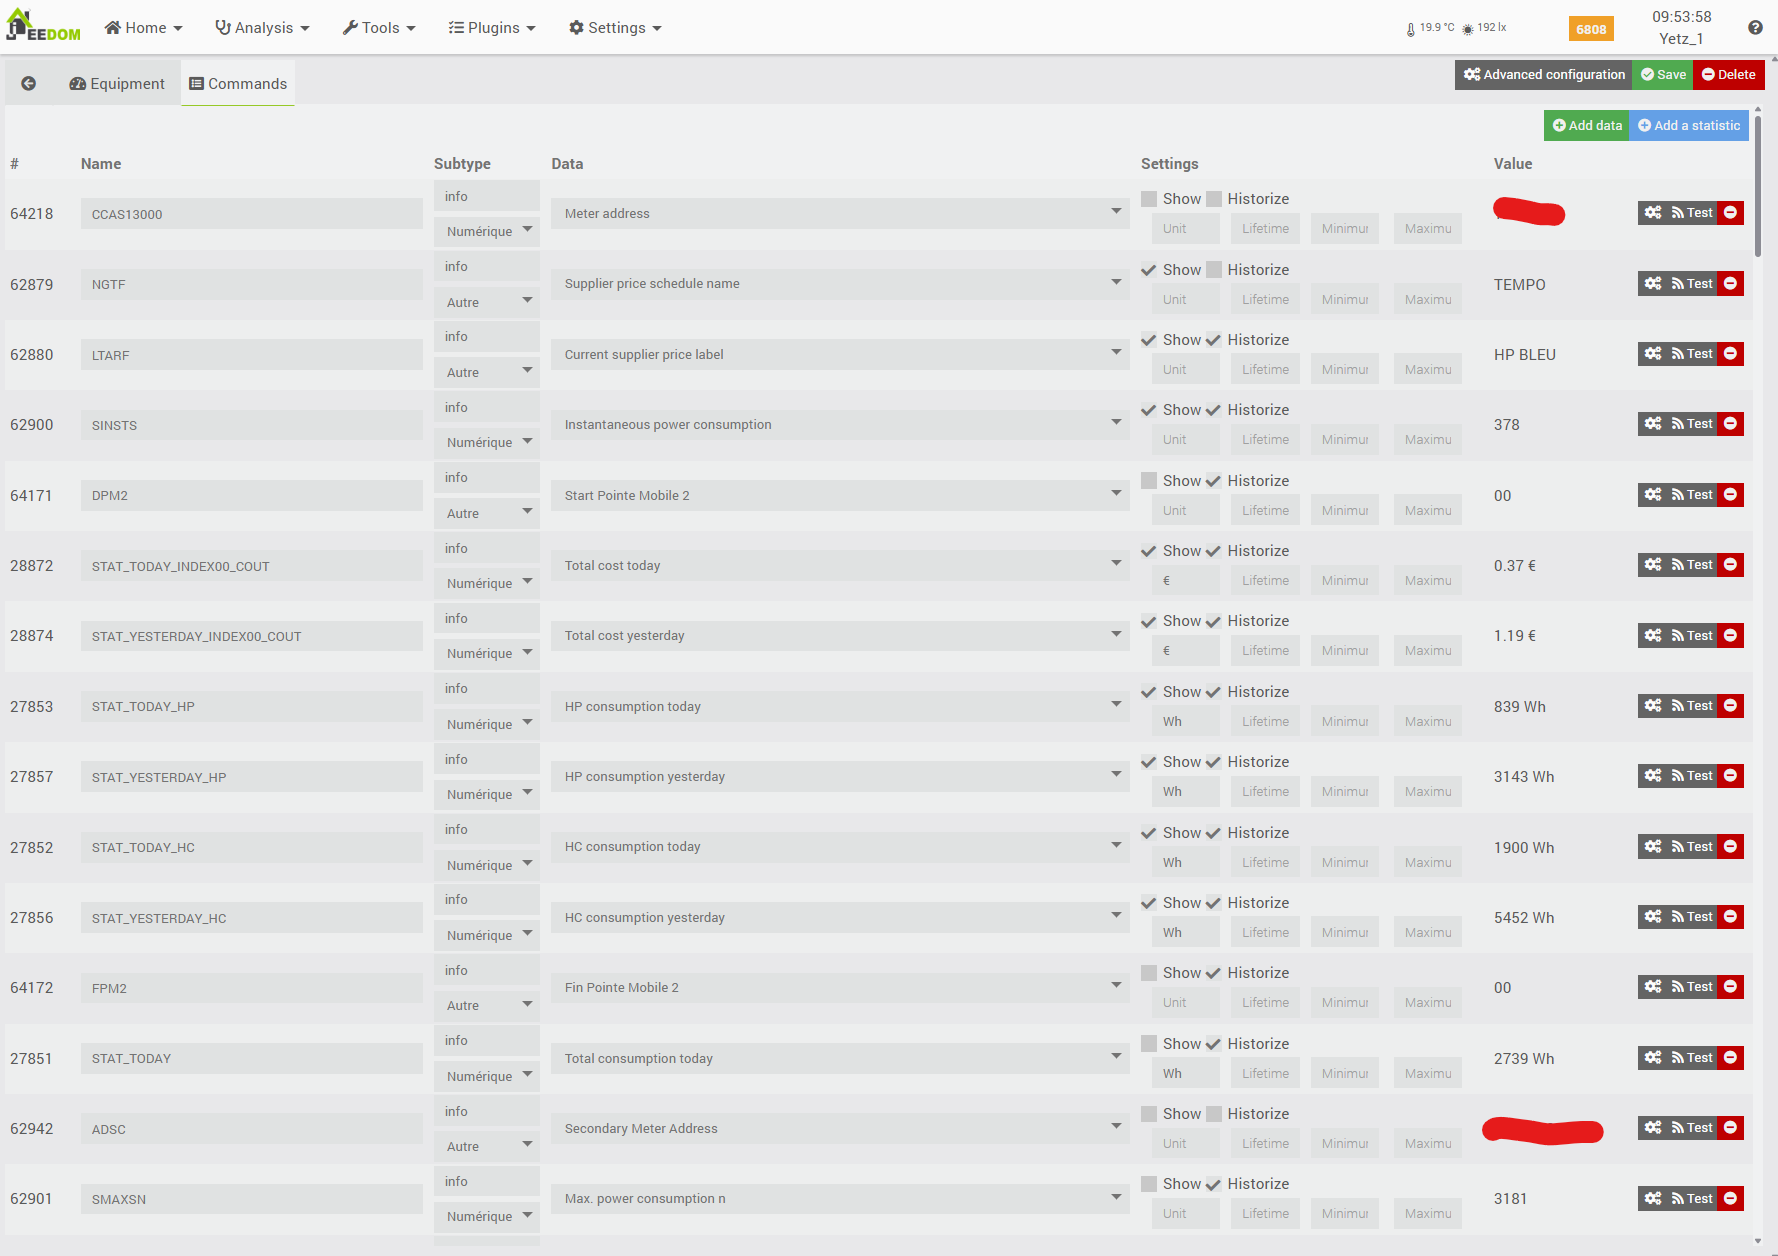
A new object is automatically added as soon as the Teleinfo daemon starts collecting data from the remote electrical sensor or modem. The plugin can immediately extract information from your electric meter, including its identifier. Click on this object to see more details.
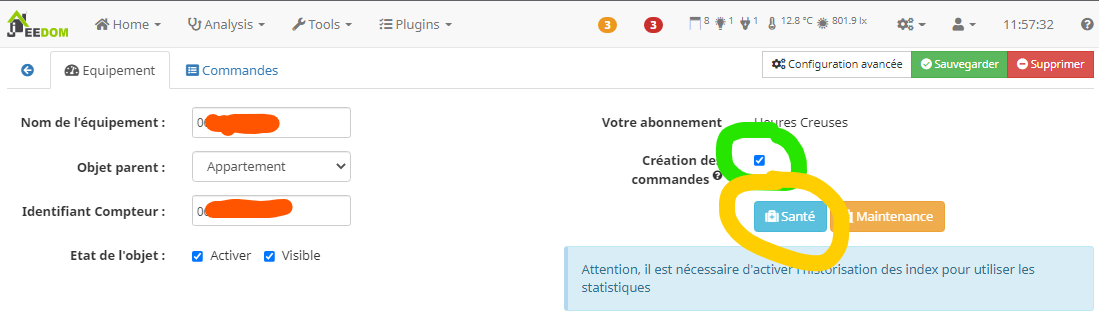
The first thing I recommend is enabling “commands creation” (see green circle above). This setting tells the plugin to automatically create new commands whenever it detects new data fields from the sensor it hasn’t seen before.
My second recommendation is to check the health of the data (see orange circle above).
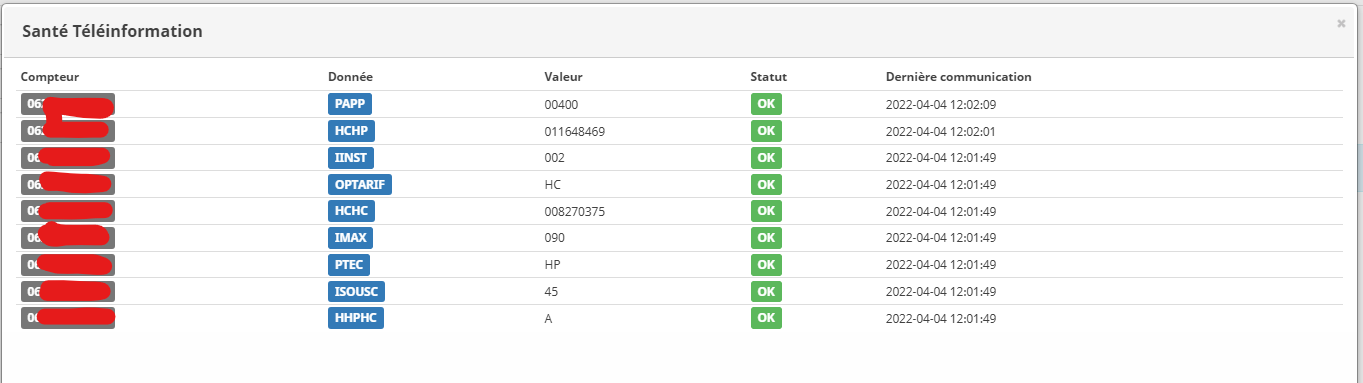
In this view, you can see which fields have already been received from your electrical sensor and when each was last updated. Next, let’s look at the commands that were automatically created for this Jeedom object.
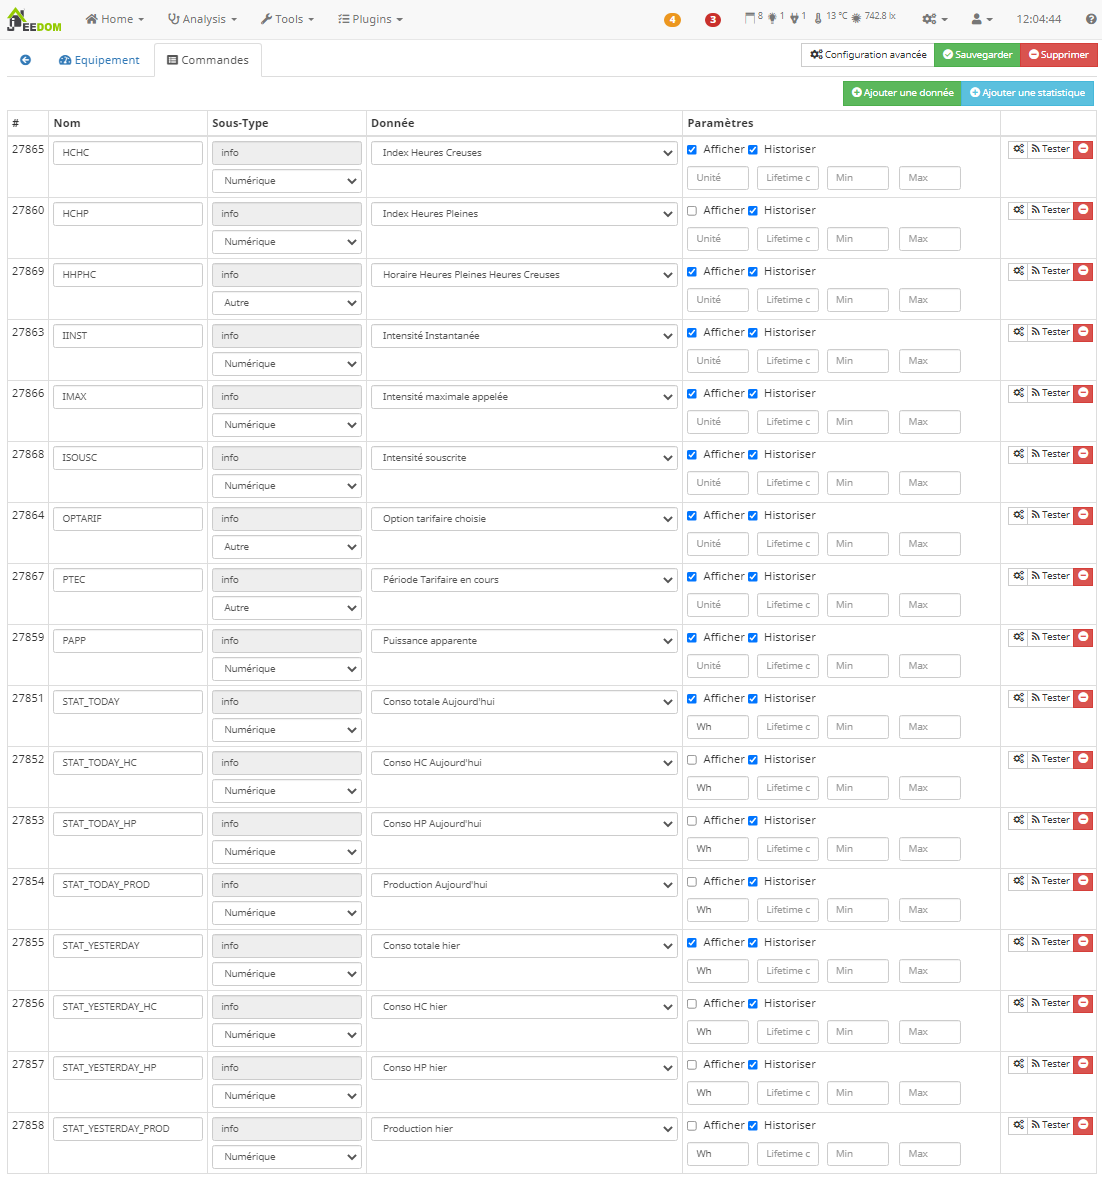
All these commands represent either data fields received from the electricity meter, each of which is converted into individual information fields in Jeedom, or data calculated by the plugin from the data received from the meter. You can display, store, and use these fields for any processing or automation you wish to implement.
Important note: The Linky electricity meter can operate in two “modes,” but only one at a time. This mode is set by your supplier, but you can request to change it. It’s free and usually takes 24 hours.
- HISTORIQUE mode: uses an olf-fashioned Teleinfo format
- STANDARD mode: uses a much more detailed format
We can see on my first screenshots that my Linky counter is using the HISTORIQUE mode. But we will change that.
Displaying a small widget on Jeedom’s dashboard
In my case, I don’t need to track every single data field over time, so I simply uncheck a few unnecessary options.
Note: in the following screen capture, I’m still using the HISTORIQUE MODe here but I did ask Electricity of France (EDF) to switch my Linky to the Standard mode. It should be done during the night.
Now, if you go back to the Jeedom homepage, you should see the very basic Teleinfo widget displayed.
Tweaking the widget
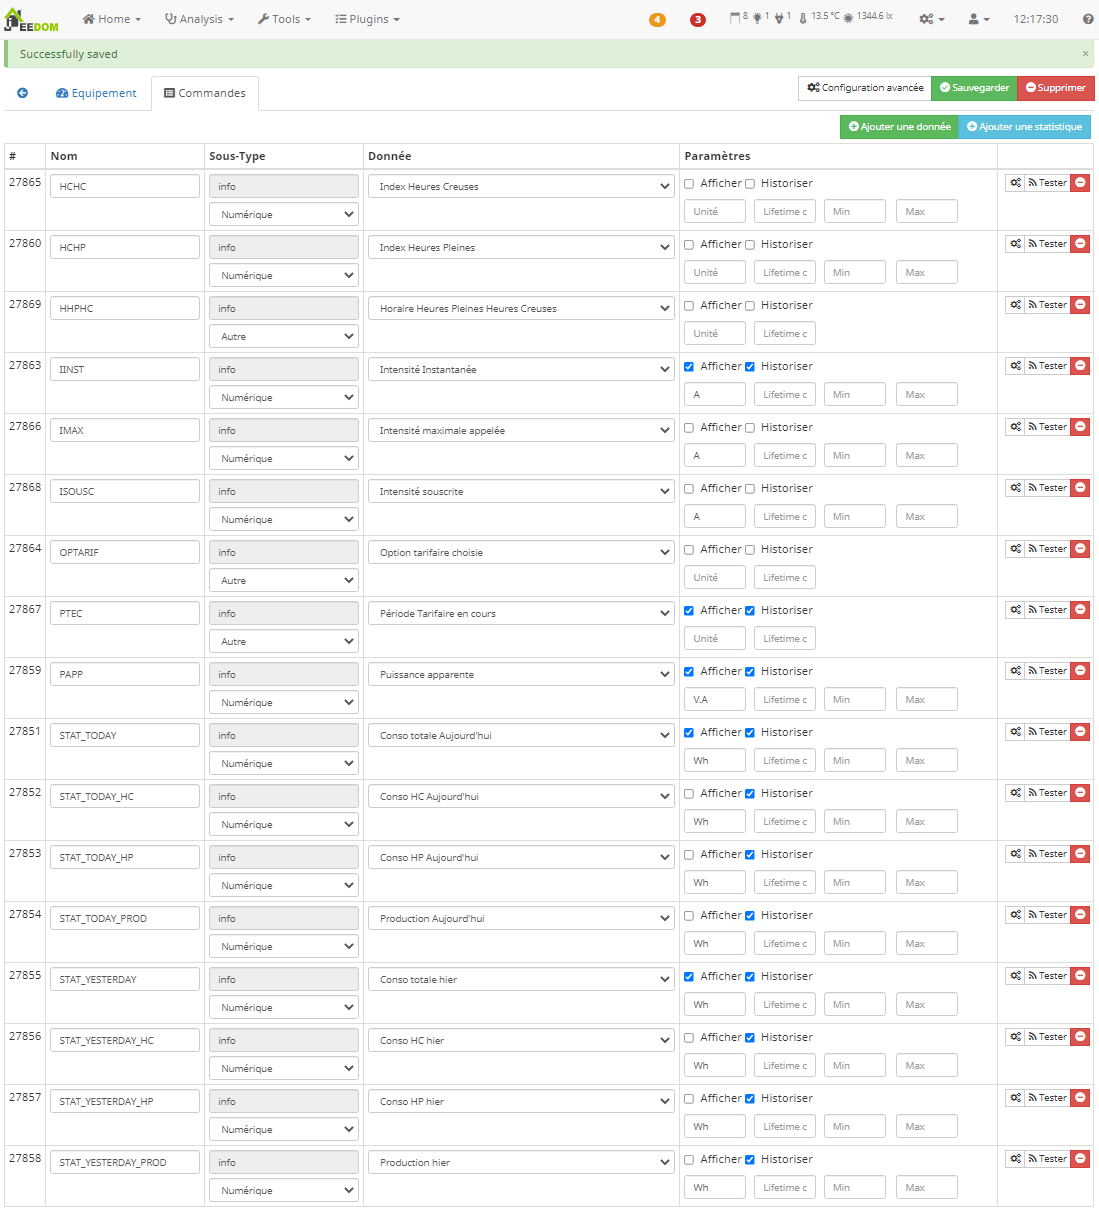
Once my electricity meter switched to Standard mode (and lots of new commands became available in the meter detected by the Teleinfo plugin), I wanted to improve the widget display. I first selected additional data fields to display. Note the new commands that appear in the meter equipment, as the Teleinfo modem now sends additional data fields.
Next, I modified the widget’s layout. This is done by clicking the small pen icon at the top right of Jeedom’s standard dashboard.


Once in Edit mode, click the three vertical dots at the top right of the counter widget you previously created.
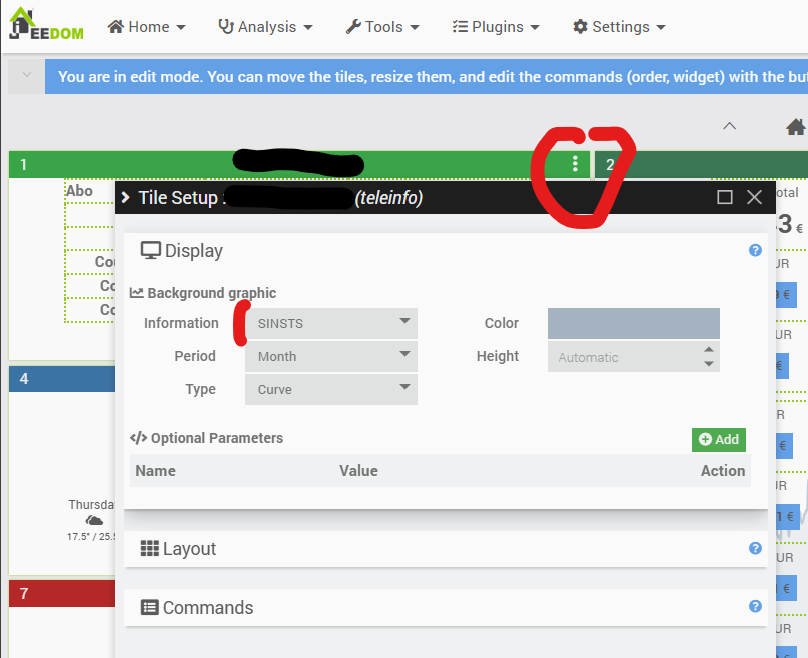
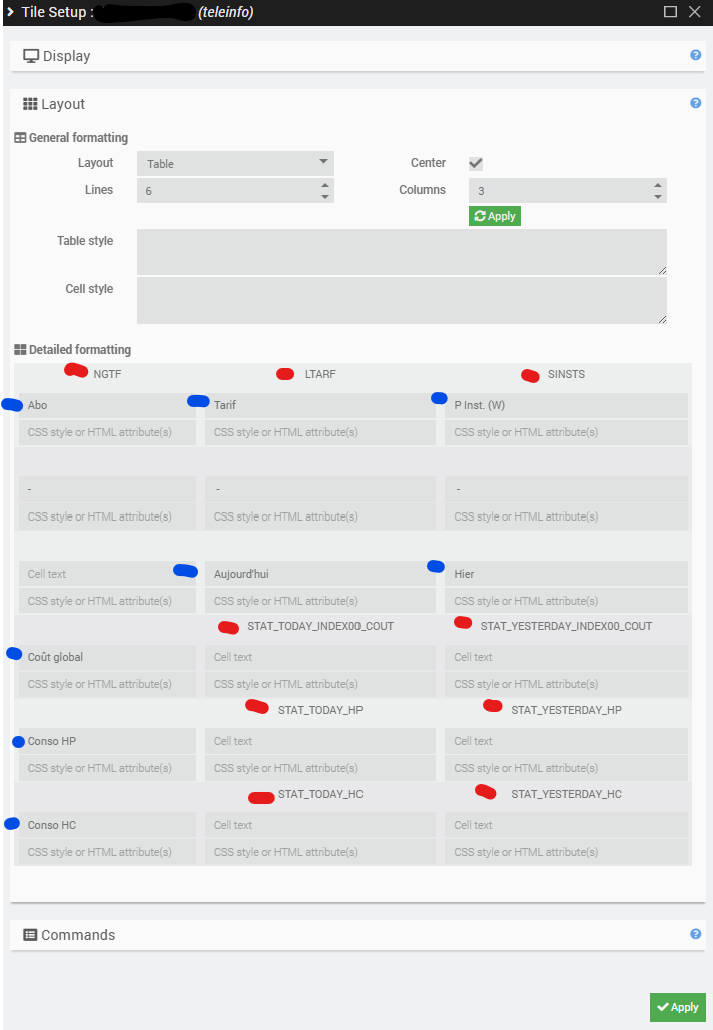
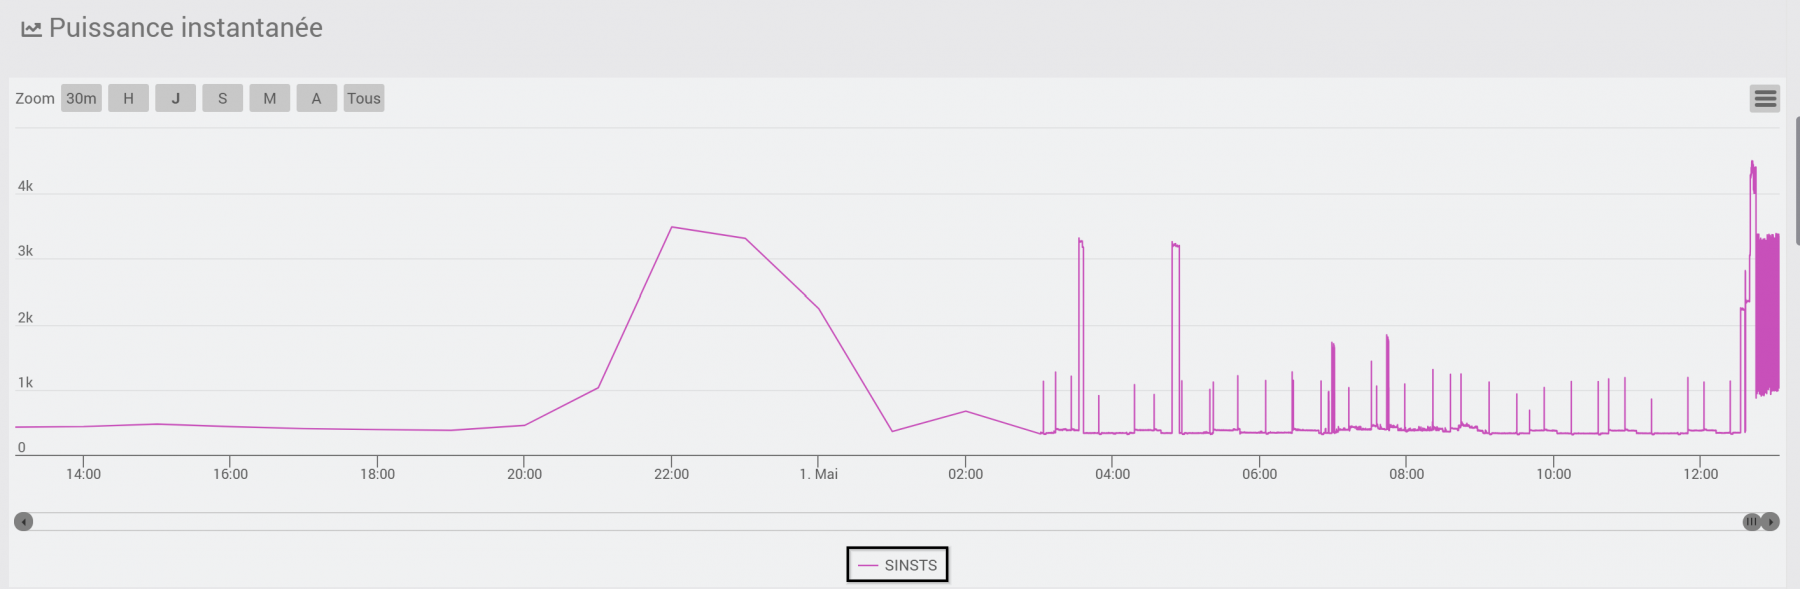
A popup will appear. In the “Display” section, choose to show the SINSTS historical values as the background of the widget—these values represent the instantaneous power delivered. Next, in the “Layout” section, create a table and assign commands (marked in red below) to specific cells, while defining labels (in blue) for other cells.
You can also customize display settings for each command in the “Commands” section—such as specifying how it appears on the web, on mobile, and adjusting other visual details.
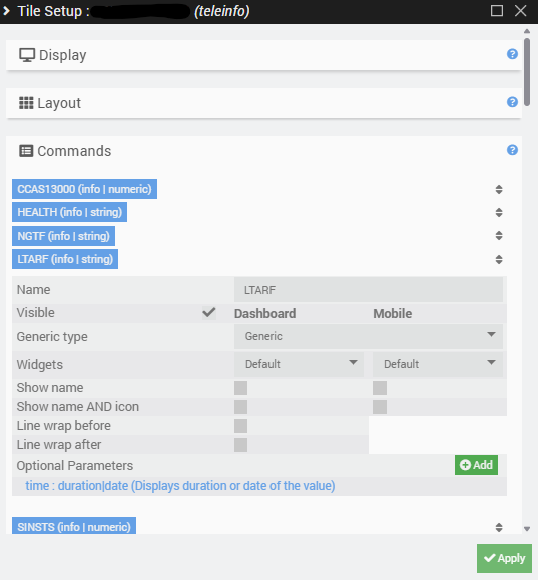
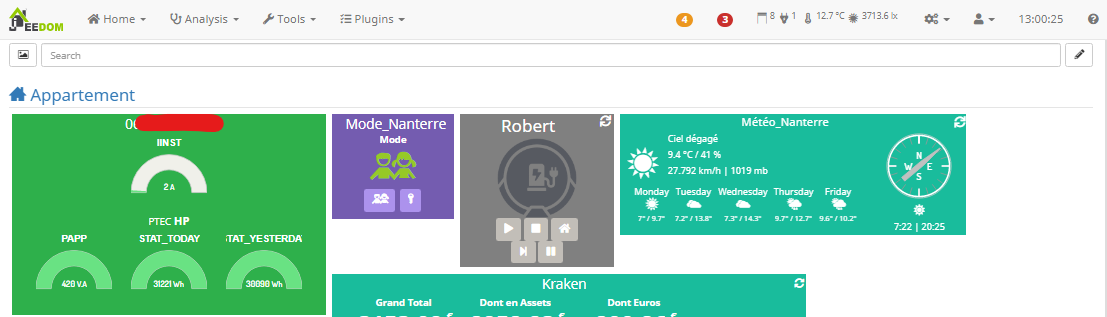
I obtain this simple but efficient widget.
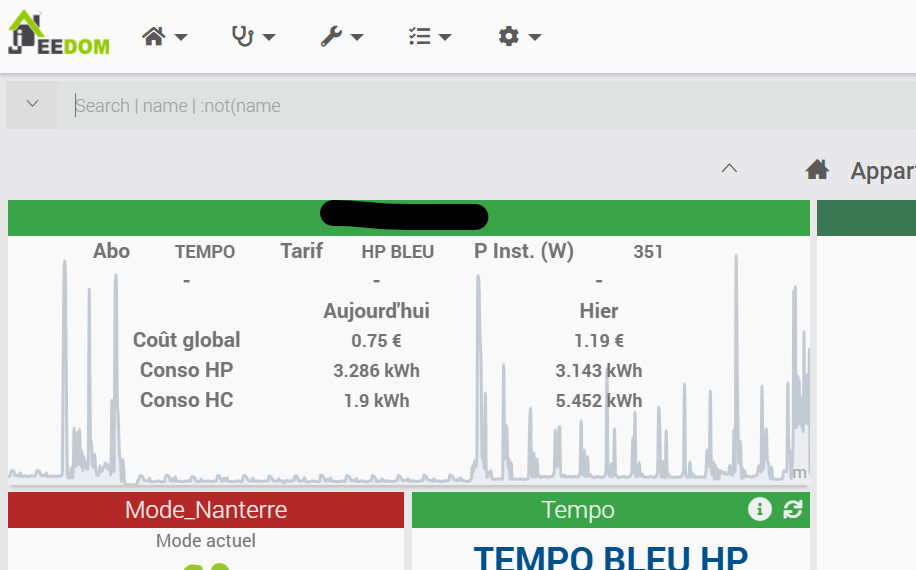
A few explanations about this widget:
- First line displays the type of my subscription (here: TEMPO from EDF (Electricité de France)), actual daily rate (here: HP BLEU), instant power delivered (here: 351 VA that I uncorrectly convert in Watts)
- Second line is only cosmetic: i couldn’t use <BR> HTML tags to add an empty line, so i added three “-“
- The third line explains the meaning of the two columns in the table below: today’s values and yesterday’s values.
- Lines 4, 5, and 6 are used for cumulative costs and consumption for today and yesterday during peak and off-peak hours.
Note that for commands that we chose to be historized, we can click on is value, and it will open an historical window.

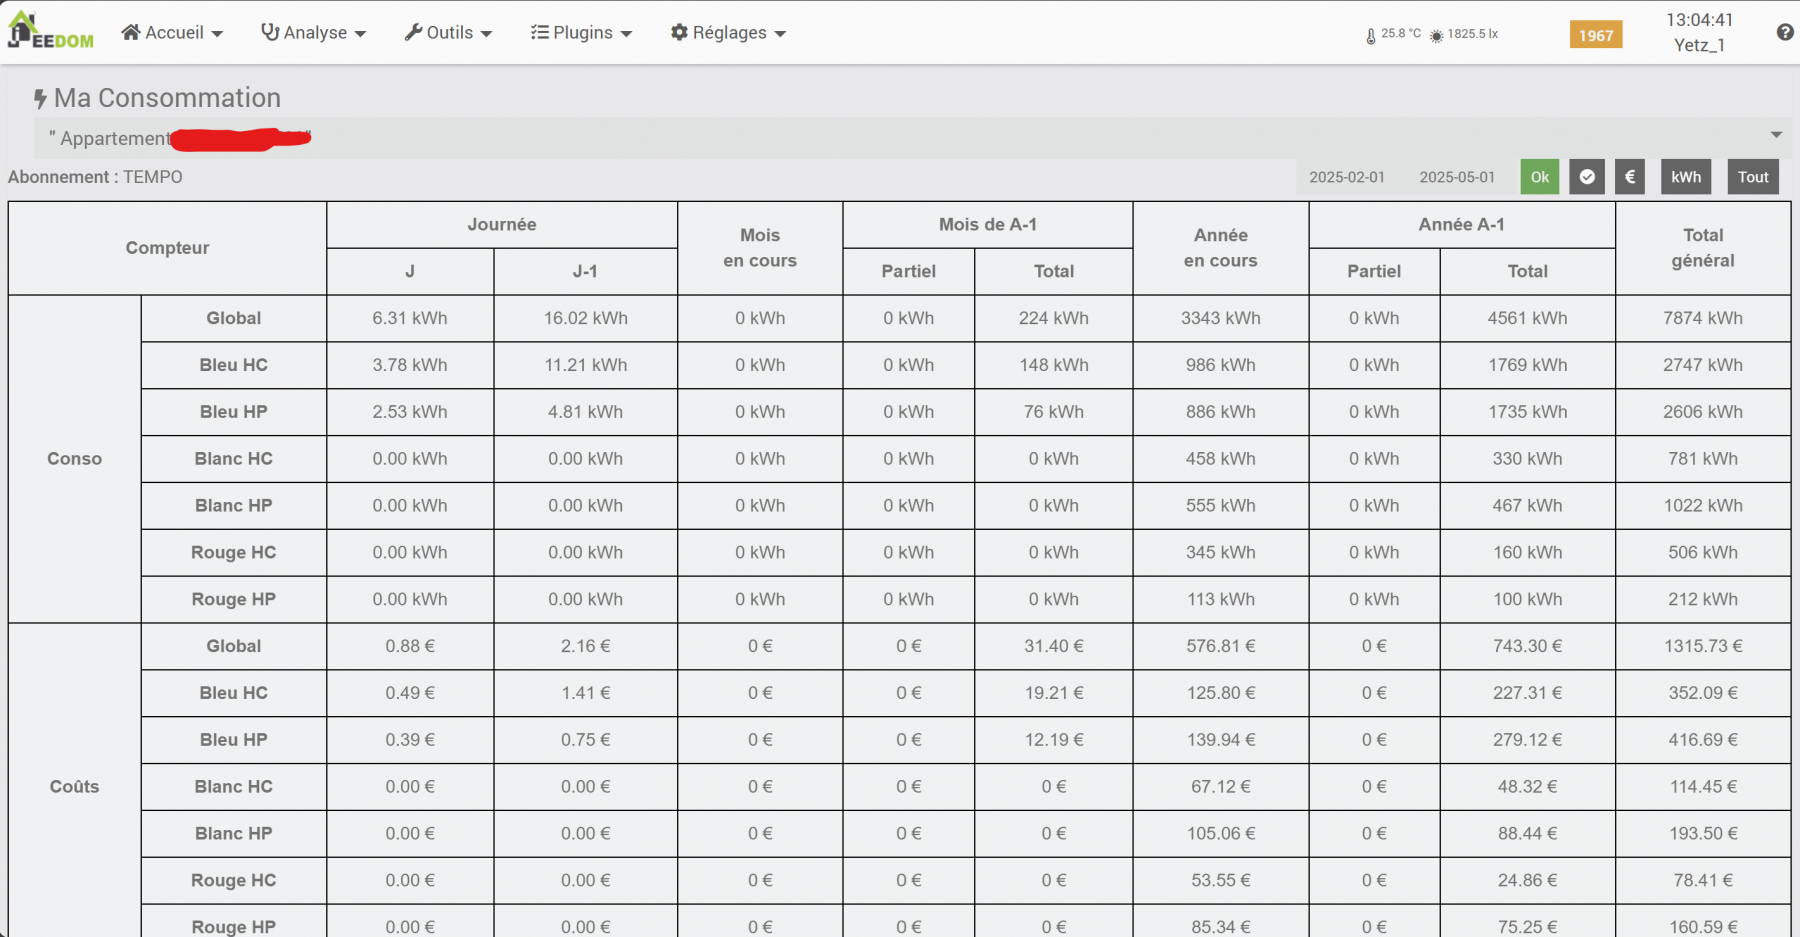
Teleinfo plugin own dashboard
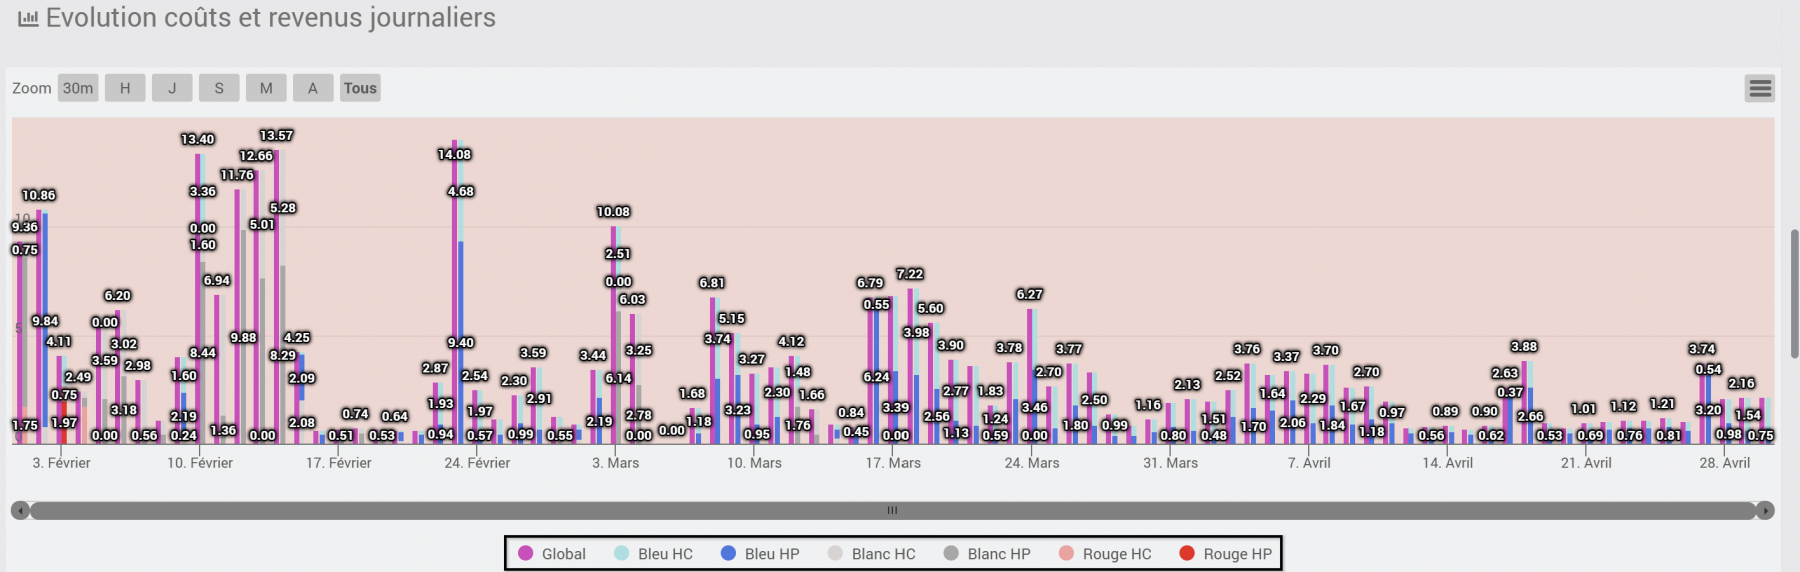
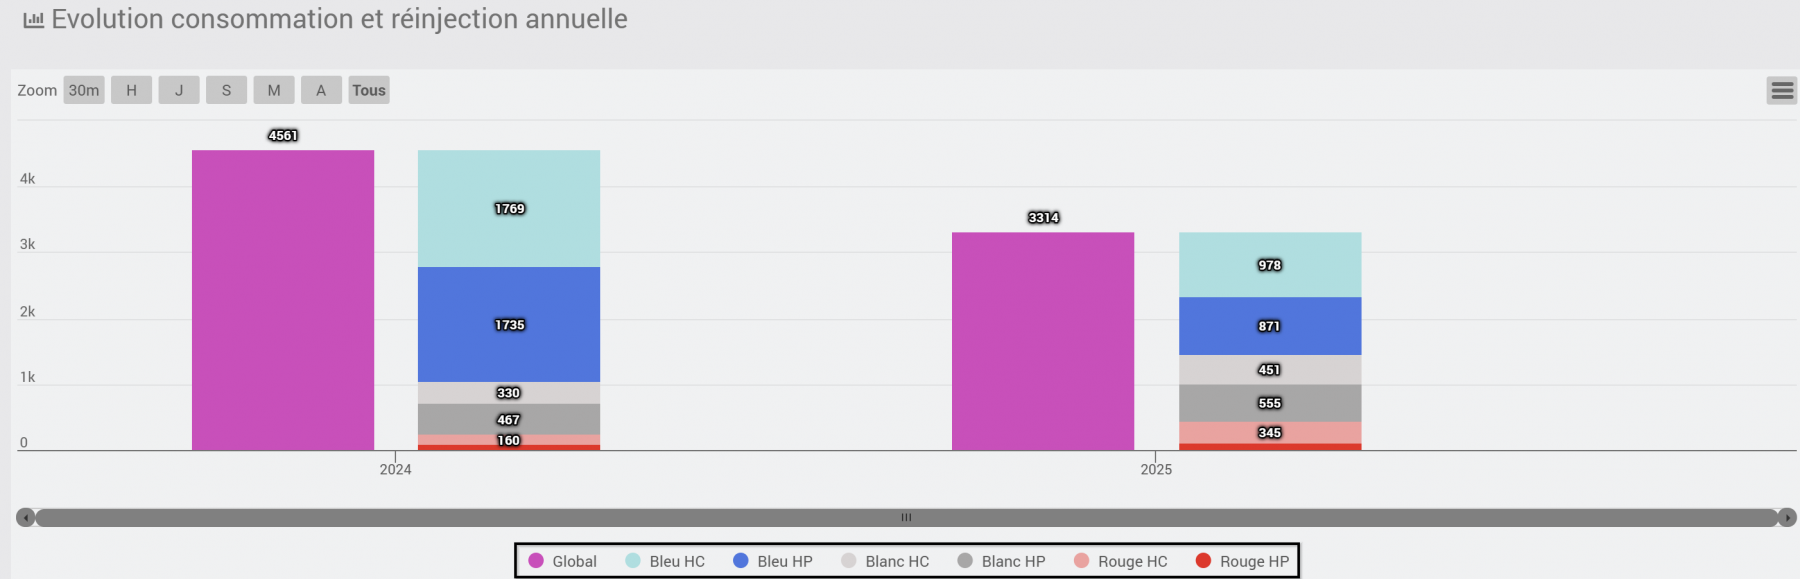
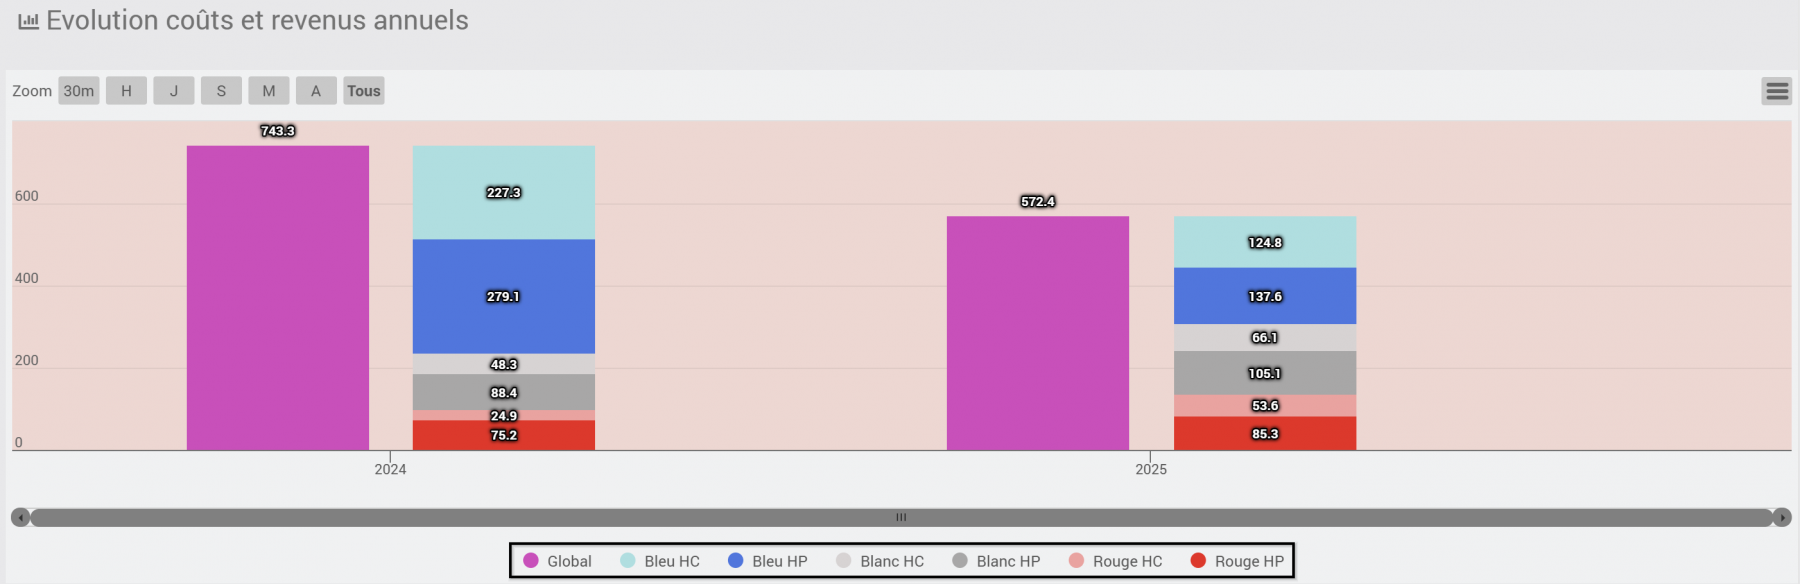
However, the most essential information is available directly from the Teleinfo plugin’s dashboard.
Various types of statistics will appear here, depending on the type of electricity subscription you have with your provider.
It is important to mention that I am only an electricity “consumer,” not a producer. However, in France, if you produce electricity (for example, with solar panels), you can feed (and resell) your production into the main grid and thus receive compensation. If I were a producer and chose to sell my electricity, these values would also appear in the following statistics, as the production data would also be sent via the USB modem from the Linky meter.
Below is an example of the detailed dashboard statistics produced by the Teleinfo plugin.


Conclusion & Wrap-up
Using the USB over IP technique, you can monitor your home’s power consumption in real time, even when your meter and Jeedom controller are far apart. This approach is powerful because it is flexible and modular: all you need is a small Raspberry Pi, the Teleinfo output from your existing electricity meter, a compatible modem, and a simple configuration. It is important to note that this solution works not only for Teleinfo use cases, but also for any USB device you want to share on your local network (such as Z-Wave keys or USB sensors).
This DIY setup enables you to:
- Keep all your electrical usage data centralized in Jeedom
- Compare and optimize consumption month-to-month or year-to-year
- Set up alerts or automations for unexpected spikes or unusual patterns
- Expand your home automation network easily—without running extra cables!
If you are interested in other home automation projects, you might enjoy reading:
- Intelligent watering system using Jeedom and Raspberry Pi Zero W antennas
- Quick tutorial: installing Debian/Raspbian on a Raspberry Pi Zero
For more about the Teleinfo plugin, see the official documentation, or check Enedis’s Teleinfo protocol doc (PDF, FR).
Have you implemented this solution, or adapted another protocol to Jeedom? Do you monitor your energy using a different method? Feel free to share your tips, questions, or feedback in the comments below!
Thank you!