Spring has arrived, making it the perfect moment to check whether my watering system survived the winter – and to reactivate it. In this article, I’ll explain in detail how I enhanced my existing setup with external Bluetooth antennas. We’ll improve our Jeedom test installation for automatic watering by adding (and cloning) new Bluetooth repeaters (the “antennas”) to expand the range for receiving moisture sensor data.
These repeaters are inexpensive Raspberry Pi Zero W units. The idea is to deploy them outside, near the moisture sensors. Using Bluetooth, they collect data from sensors that are out of range from the main (indoor) Jeedom Bluetooth controller and then relay that data back to Jeedom via my home Wi-Fi network.
Once Raspbian is installed on Raspberry’s ZeroW, the additional software part mainly consists in using Jeedom’s BLEA plugin embedded functionalities to automatically deploy on the ZeroW’s what’s needed to make them become BLEA Antenna, and we will also improve a little bit the system so that we check if wifi is ok to eventually relaunch it in case of a loss of connection.
At the end, the system will be composed by a main Jeedom Controller, with wifi but without Bluetooth, located indoor, and 4 external jeedom antennas, with bluetooth (to reach the moisture sensors) and wifi (to feed Jeedom’s controller with sensors data). I present below the previous diagram I created in the tutorial Part I, the added parts are in red.
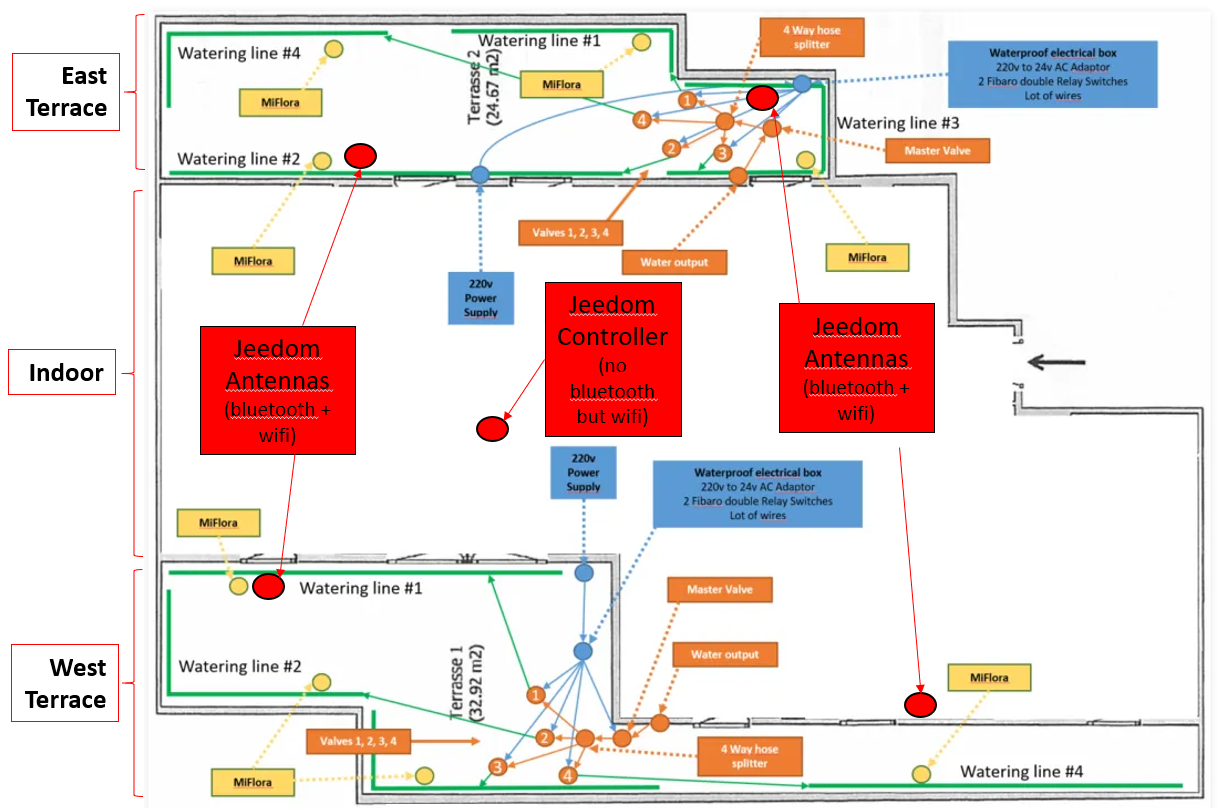
For this tutorial I will use 4 Raspberry Zero W, to demonstrate the ability to relay information from a place where the central Jeedom controller can not reach a moisture sensor, and to demonstrate the connexions between the antennas.
Please note that, as we are going to clone a pre-configured “master SD card” onto three SD cards, I strongly recommend that you either use exactly the same SD card models in your Raspberry Pi to avoid any problems related to slight differences in size between the cards, or create your source Raspbian image on an SD card that is smaller than the one you will actually use for your antennas ! If your master SD card is 8Gb and you clone it on 16Gb SD cards, after cloning you will still be able to extend the Linux partition size on each cloned Raspberry using raspi-config tools, as shown later in this tutorial.
Preparing a “Master” Pi Zero W Image
Configuring a dedicated user
I assume here:
- You have Raspian installed and working on one of your Raspberry Zero W devices (we will clone this Raspberry later to the 3 other ones). FYI I re-checked my previous tutorial about installing Raspbian on a Pi Zero W, with the latest Raspian version at the moment (2021-01-11-raspios-buster-armhf-lite.img), and this tutorial is all based on this version on the 4 Pi Zero W.
- You are root on the Raspberry Pi Zero, or you know how to use sudo as we configured it in the installation tutorial.
Now we add a new user which will be dedicated to the “pluginblea” jeedom’s plugin (also called Bluetooth Advertisement or BLEA). This user will be used by the Jeedom controller to connect through ssh/scp to the raspberry/antenna to copy files, and run a small pluginblea instance (a set of python scripts).
adduser pluginblea
visudo
Then add at the end of the file:
pluginblea ALL=(ALL) NOPASSWD: ALLThen type CTRL-X then CTRL-Y (or CTRL-k then X with joe if you changed the default editor as I did in my Raspbian installation tutorial).
Making the blea daemon start automatically
(This part is greatly inspired by this post and my suggestion and this update).
I will create an init.d script now, so that it will be onboarded in the SD Card clone we will perform later to easily deploy a new antenna. But it will not work yet as we didn’t create yet the antenna from Jeedom.
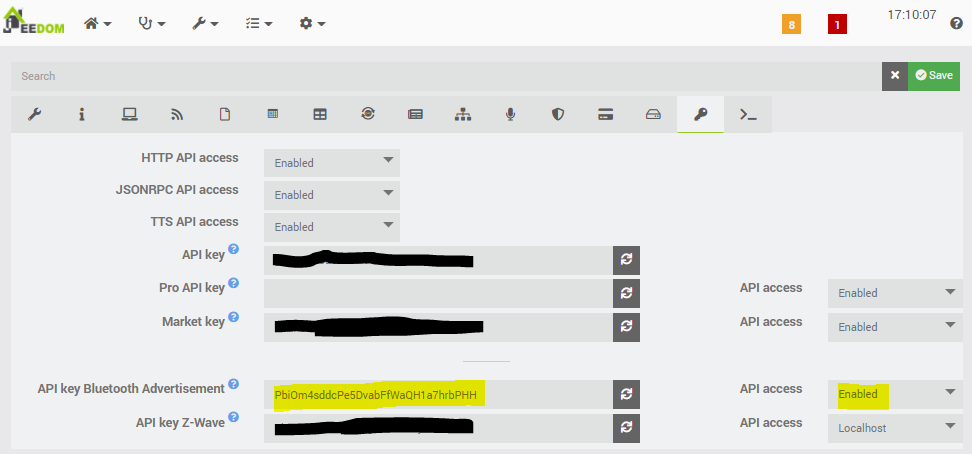
First we need to know your Jeedom’s controller IP, and the BLEA API Key. The BLEA API Key can be found in Jeedom Settings>System>Setup>API tab>API key Bluetooth Advertisement. Don’t forget to check on the dropdown list on the right that it’s enabled.
Now insert those lines in /etc/init.d/blearpistart, and dont forget to edit the line 22 to insert your jeedom controller’s IP, and BLEA API key.
joe /etc/init.d/blearpistart#!/bin/sh
#/etc/init.d/blearpistart
### BEGIN INIT INFO
# Provides: Jeedom BLEA Plugin
# Required-Start: $remote_fs $syslog
# Required-Stop: $remote_fs $syslog
# Default-Start: 2 3 4 5
# Default-Stop: 0 1 6
# Short-Description: Simple script to start a program at boot
# Description: A simple script similar to one from www.stuffaboutcode.com which will start / stop a program a boot / shutdown.
### END INIT INFO
# If you want a command to always run, put it here
touch /tmp/blea && chmod 666 /tmp/blea
# Carry out specific functions when asked to by the system
case $1 in
start)
echo "Starting BLEA"
# run application you want to start
/usr/bin/python /home/pluginblea/blead/resources/blead/blead.py --loglevel error --device hci0 --socketport 55008 --sockethost "" --callback http://<IP>:80/plugins/blea/core/php/jeeBlea.php --apikey <APIKEY>
stop)
echo "Stopping BLEA"\n
# kill application you want to stop
sudo kill `ps -ef | grep blea | grep -v grep | awk '{print $2}'`
;;
*)
echo "Usage: /etc/init.d/blearpistart {start|stop}"
exit 1
;;
esac
exit 0Note that:
- You need to allow Jeedom to be reached by HTTP on your local network / VLAN
- You need to enable the API to be reachable from anywhere
Now make this script executable:
chmod 755 /etc/init.d/blearpistartNow we will create the service file used by SYSTEMCTL.
joe /etc/systemd/system/blearpistart.serviceInsert those lines:
[Unit]
Description=BlEA service
After=hciuart.service dhcpcd.service bluetooth.service
[Service]
Type=oneshot
ExecStart=/etc/init.d/blearpistart start
[Install]
WantedBy=multi-user.target
Now we activate the service:
systemctl enable blearpistart.serviceThe output should be as following if no error:
Synchronizing state of blearpistart.service with SysV service script with /lib/systemd/systemd-sysv-install.
Executing: /lib/systemd/systemd-sysv-install enable blearpistart
Created symlink /etc/systemd/system/multi-user.target.wants/blearpistart.service → /etc/systemd/system/blearpistart.service.
Note that depending on your Raspbian version, you may instead need to use:
update-rc.d blearpistart defaultsMonitoring Jeedom Connectivity
(I documented this on this post in Jeedom’s forum).
On the Raspberry Zero, and even if we disabled the power management on the wlan0 interface by using “wireless power off” in the network interfaces file, you may still experiment some disconnections, especially if your Raspberry Pis are not well receiving the wifi signal. So I added a small script which will be used to regularly stop the blea daemon, ping our main server, and if we detect it is not reachable, we reboot the Pi, or else we relaunch the blea daemon. This script is based on another one found on Internet, you need to change “IP_FOR_TEST” by the IP of the Jeedoms controller you want to ping.
Yes it can probably be optimized as stoping the daemon and eventually rebooting it is a little bit overkill !! But it works, my four antennas are stable over time.
sudo su -
mkdir /opt/check_lan
joe /opt/check_lan.sh
Now add those lines in /opt/check_lan.sh and don’t forget to change line 5 to put your Jeedom’s controller’s IP.
#!/bin/sh

# cron script for checking wlan connectivity
# change  to whatever IP you want to check.
IP_FOR_TEST="IP_TO_TEST"
PING_COUNT=1

PING="/bin/ping"
IFUP="/sbin/ifup"
IFDOWN="/sbin/ifdown --force"

INTERFACE="wlan0"

FFLAG="/opt/check_lan/stuck.fflg"
logger -t check_lan "Stopping BLEA antenna"
systemctl stop blearpistart.service
logger -t check_lan "Testing if $INTERFACE can ping $IP_FOR_TEST"
# ping test
$PING -c $PING_COUNT $IP_FOR_TEST > /dev/null 2> /dev/null
if [ $? -ge 1 ]
then
logger -t check_lan "$INTERFACE seems to be down, trying to bring it up..."
if [ -e $FFLAG ]
then
logger -t check_lan "$INTERFACE is still down, REBOOT to recover ..."
rm -f $FFLAG 2>/dev/null
reboot
else
touch $FFLAG
logger -t check_lan $($IFDOWN $INTERFACE)
sleep 10
logger -t check_lan $($IFUP $INTERFACE)
logger -t check_lan "Starting BLEA antenna"
systemctl start blearpistart.service &
fi
else
logger -t check_lan "$INTERFACE is up"
rm -f $FFLAG 2>/dev/null
logger -t check_lan "Starting BLEA antenna"
systemctl start blearpistart.service &
fi
Now you will want to make sure this script will run every 15mn (you may change that) by using crontab:
crontab -eadd this line:
*/15 * * * * root /opt/check_lan.shFYI, the logger command used in this script will log the output in /var/log/syslog. You may want to monitor it sometimes by using tail -f /var/log/syslog | grep check_lan /var/log/syslog
Backup & Clone your Raspberry SD Card as a template !
Backup
We can now back up the contents of the SD card, as we now have something resembling a “standard antenna installation,” which you can easily replicate on other Raspberry Pi devices before adding it to Jeedom.
First, you should change the name of your raspberry by using ‘raspi-config’, then “System Options”, “Hostname’, and name it as you want. Personally, I named them relatively to their location. (eg. EAST1, EAST2, WEST1, WEST2).
Also, properly stop your raspberry with “shutdown now” instead of removing the USB power cable.
sudo su -
/sbin/shutdown now
Now we will use the “HDD Raw Copy Tool” freeware tool, on a Windows computer. Insert the raspberry’s SD Card in your computer (again, it will probably complain about a drive which should be formatted, cancel it). Launch HDD Raw Copy Tool, then choose you card reader as SOURCE and click CONTINUE.
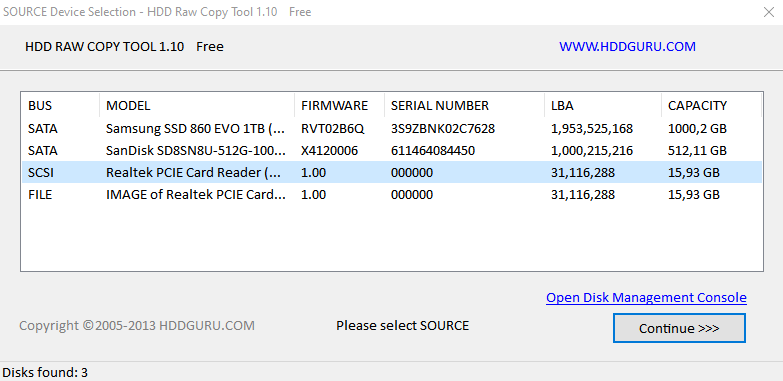
On the next screen, choose a location to store the image file which will be created, and click CONTINUE.
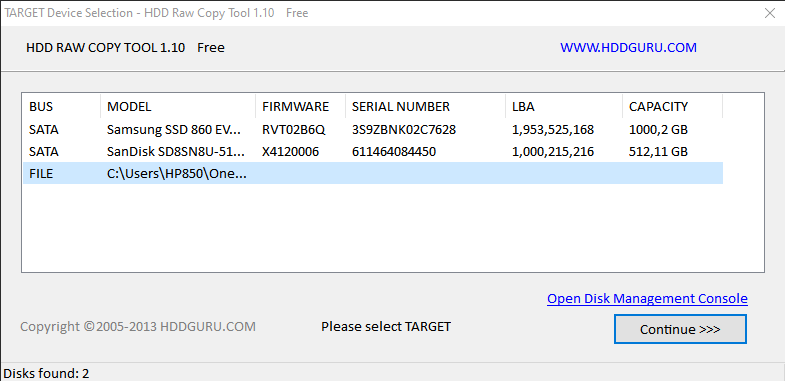
On the next screen, double check the settings, and click START … Go get a coffee …
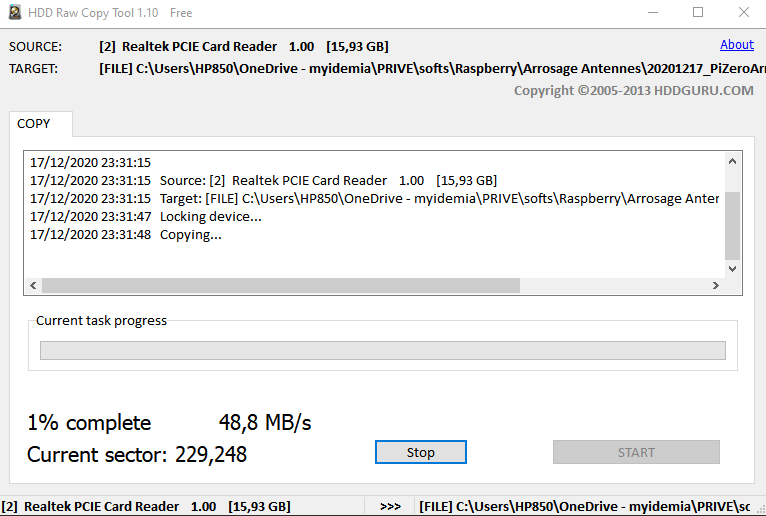
When you see “Task complete” on the log window, you can remove your source SD Card from your computer, and now you have a perfect clone of your pre-configured raspberry, ready to be copied on other PI Zero W and then to be configured as Jeedom’s BLEA antennas.
Cloning
Those operations are to be done on each SD Card you want to use on your production Raspberry Pis.
Insert a target SD Card in your computer, and use the same HDD Raw Copy tool we just used. This time we will write the image on other SD cards, by selecting as SOURCE the image file, then as destination the SD Card, and writing it. This operation will be quite long, depending on your image and target sizes.
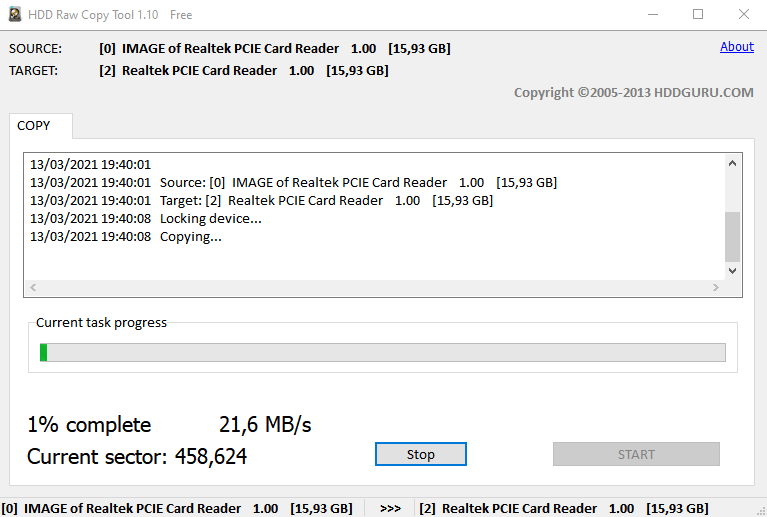
Once the image has been written, the SD card can be inserted into another Raspberry Pi, which can then be turned on. Once again, we will need to find its IP address from our router or DHCP server. It should start up correctly and connect to our Wi-Fi network. We will only change its hostname so that it is different from that of our master Raspberry, using raspi-config. This is also when we can increase the partition size, again using raspi-config, if the master image is smaller than the target SD card.
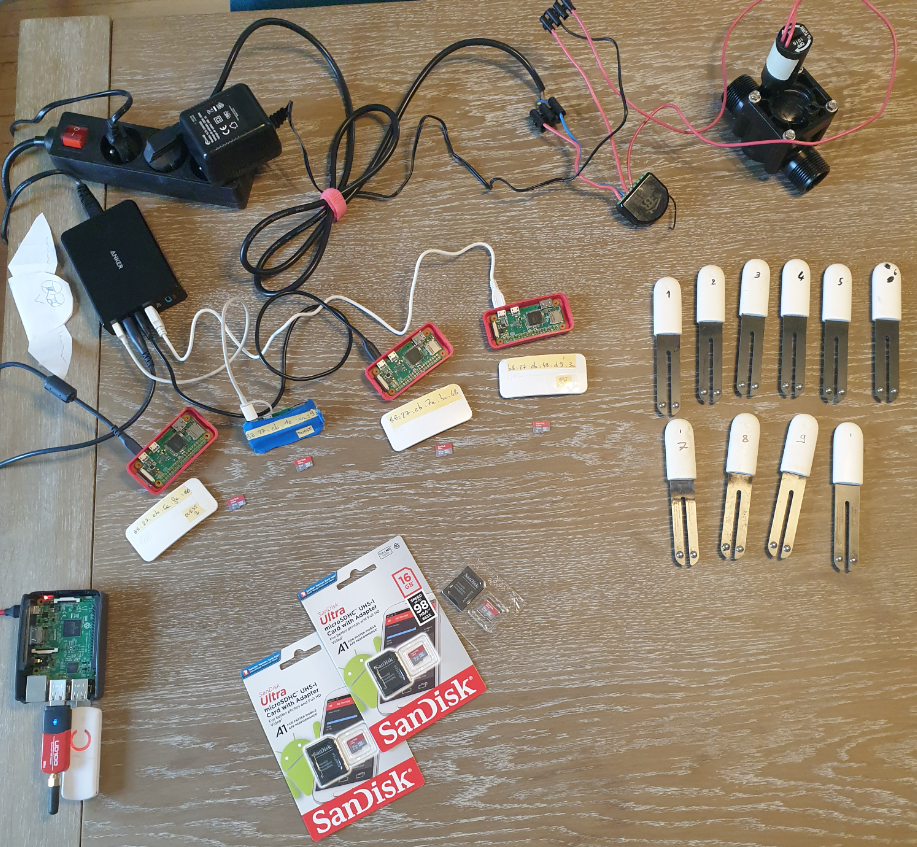
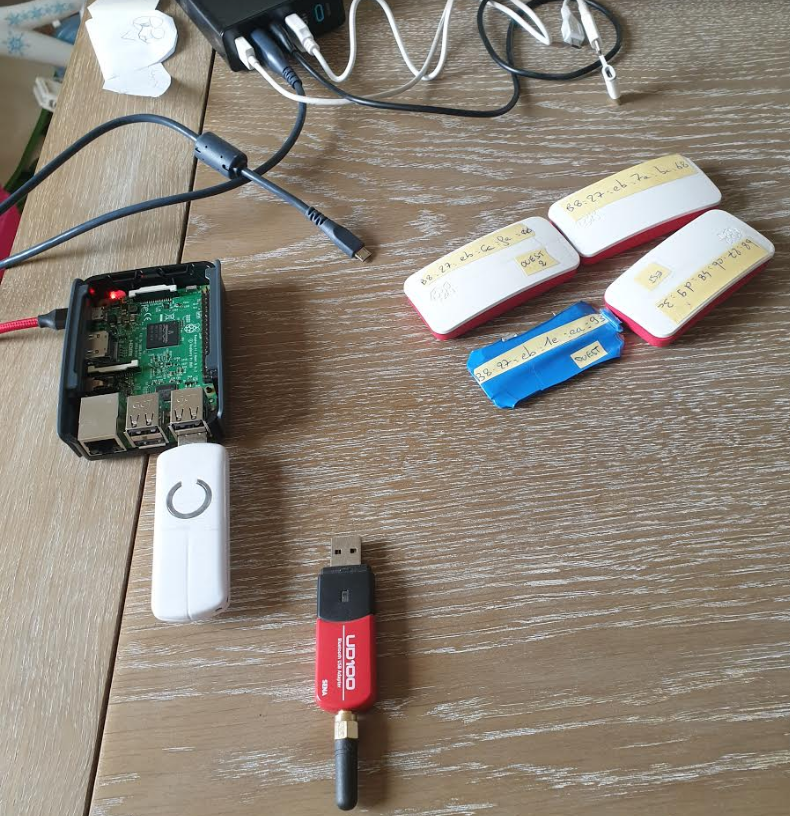
I suggest you write down each raspberry’s MAC address & IP address. In my case i even wrote their MAC Address on their case (see photos at the beginning of the article)..
At the end of this step, you should have 4 antennas running raspbian and reachable on your wifi network.
Create the antennas in Jeedom
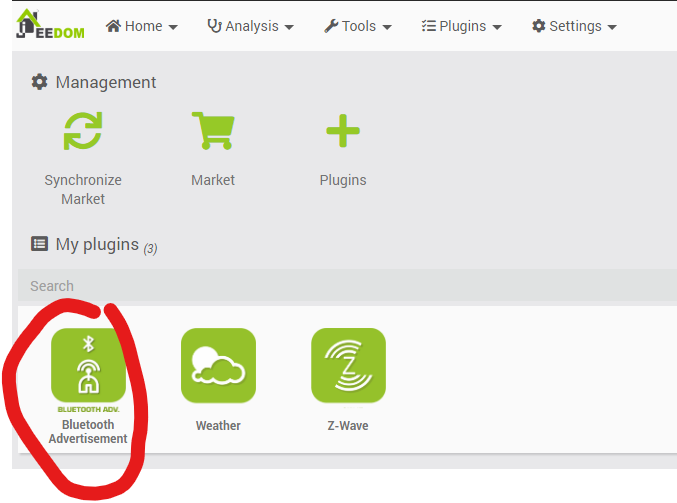
First, in Jeedom, we will create our Antennas, inside the BLEA plugin.

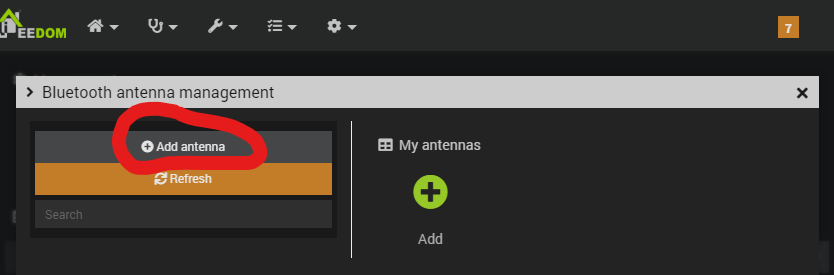
On the screen which will appear, we will have to enter the antenna’s name, IP, Port, ssh’s login & password (the user we created earlier, dedicated to jeedom), and the device associated to the bluetooth interface of the antenna (hci0 in our case).

I recommend that you immediately Save the antenna, then use the “Send files” button so that the Jeedom controller automatically sends the files required for its operation to our antenna. Once this operation is complete, we will use the “Launch dependencies” button so that our antenna automatically “compiles” or downloads the required files locally.
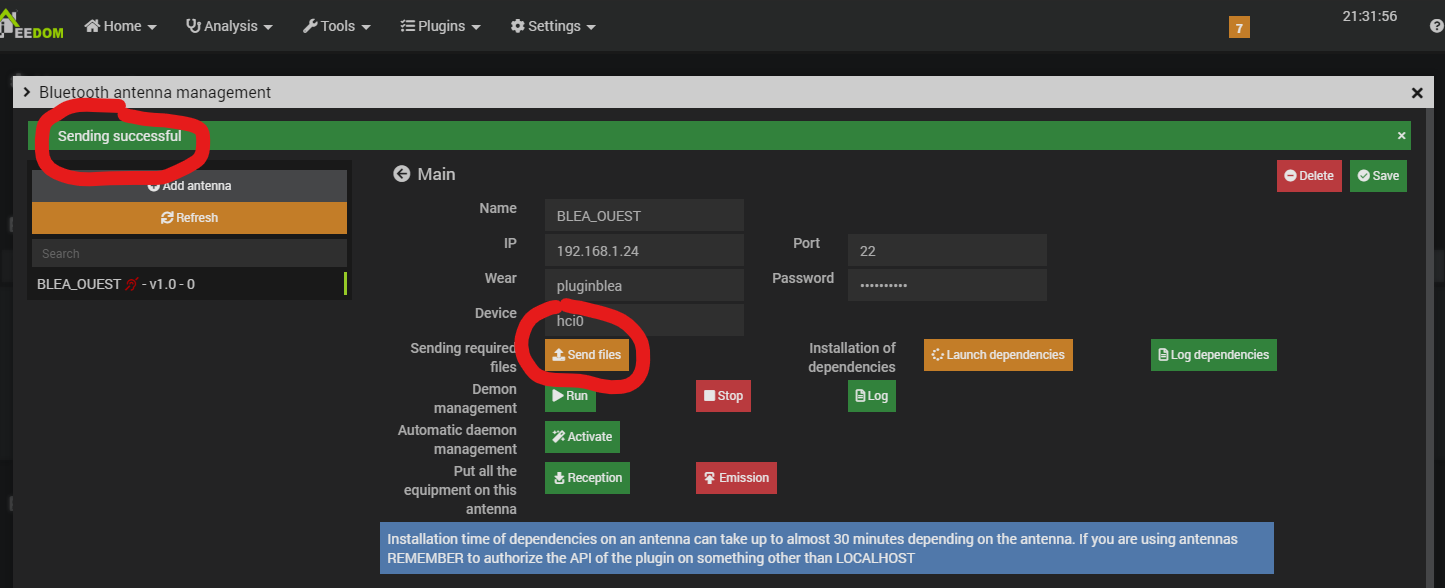
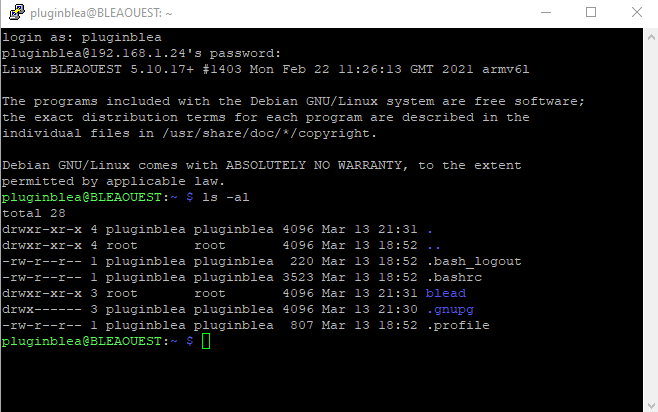
Despite the information message explaining the files were successfully sent, you can also verify this manually by connecting to this antenna with SSH and validate that there is a newly created blead directory in the pluginblea home directory.
Now we compile the dependencies.
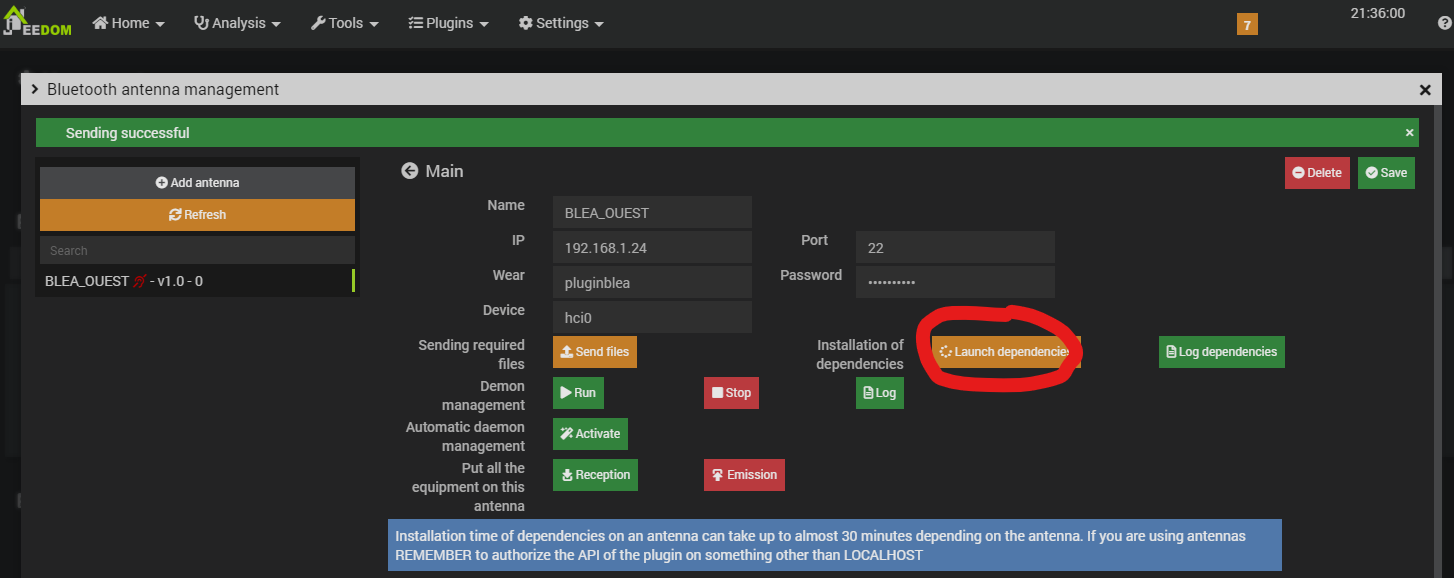
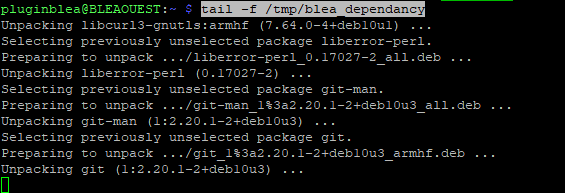
This operation will actually take a long time (on a Raspberry Pi Zero, at least). You can manually check the log file by using the green button dedicated to that in Jeedom’s UI, but you can also monitor /tmp/blea_dependencies on your antenna.
Go have a few coffees … It will require ~30mn for dependencies to be installed. But, you can also parallelize tasks, and create your other antennas right now, push the files, and launch the dependencies; it won’t stop the one already building. That’s what I did with my 4 Raspberry Pi’s, and you can see on the left that we can see the 4 antennas, but they have a red status while the dependencies are being compiled, because the blea plugin daemon is not yet running locally on each of them.
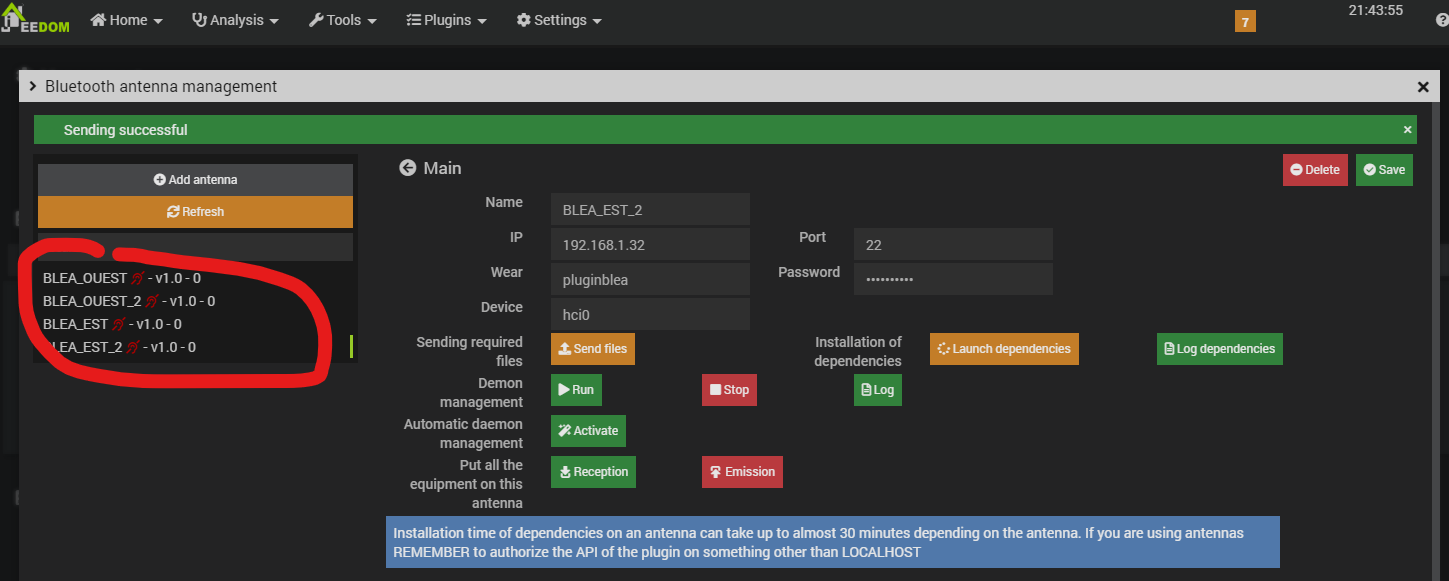
When the dependencies are successfully compiled (which is my case with this raspbian version), you can turn on automatic daemon management in your antennas, and launch them by using the green “Run” button.

Note on the previous screenshot that I already launched an antenna, and it is now appearing with a green status in the list. After I launched the 4 antennas, they are all seen by Jeedom as running.
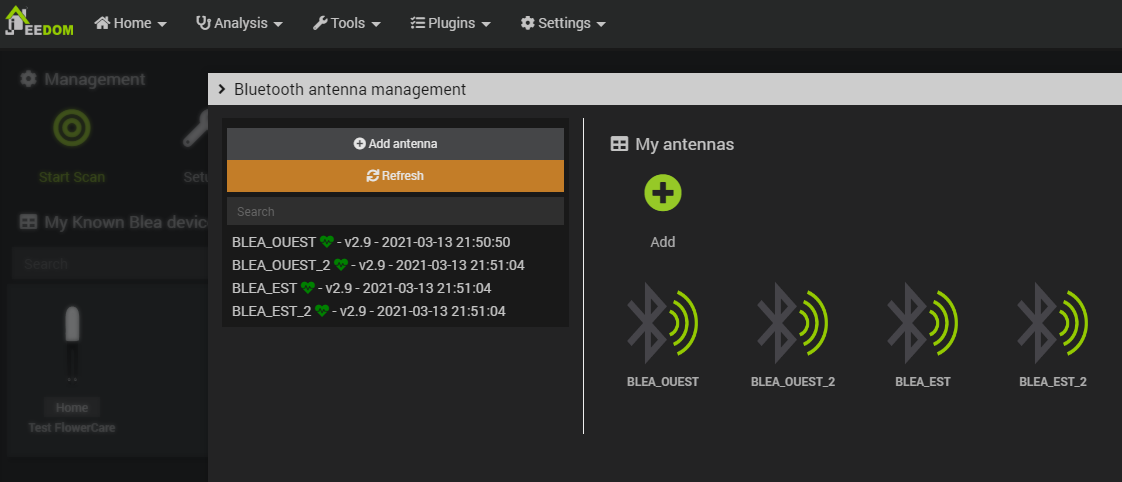
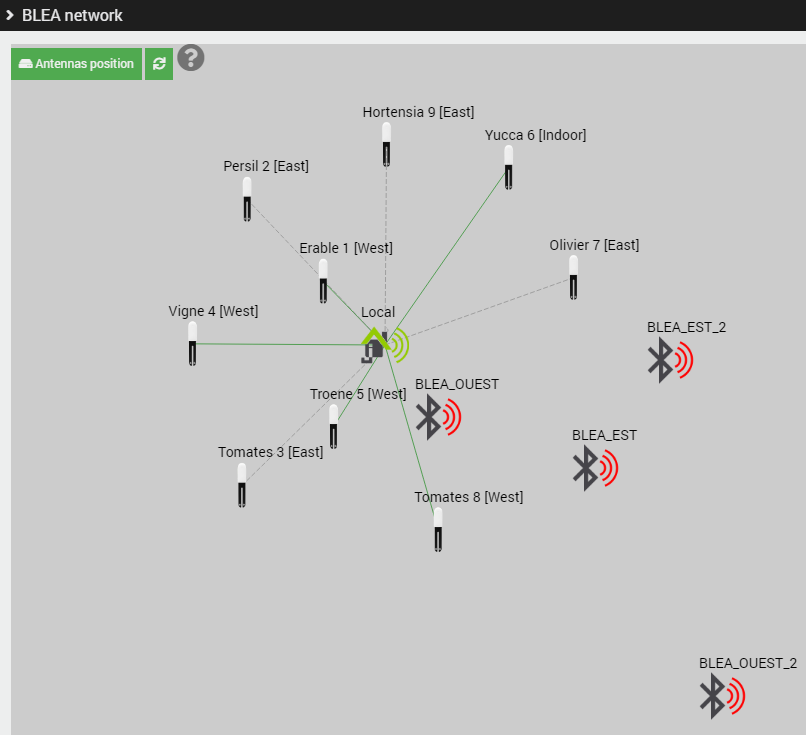
You can now visualize your network, as well as the devices detected and linked to your antennas. We only have one device for now.
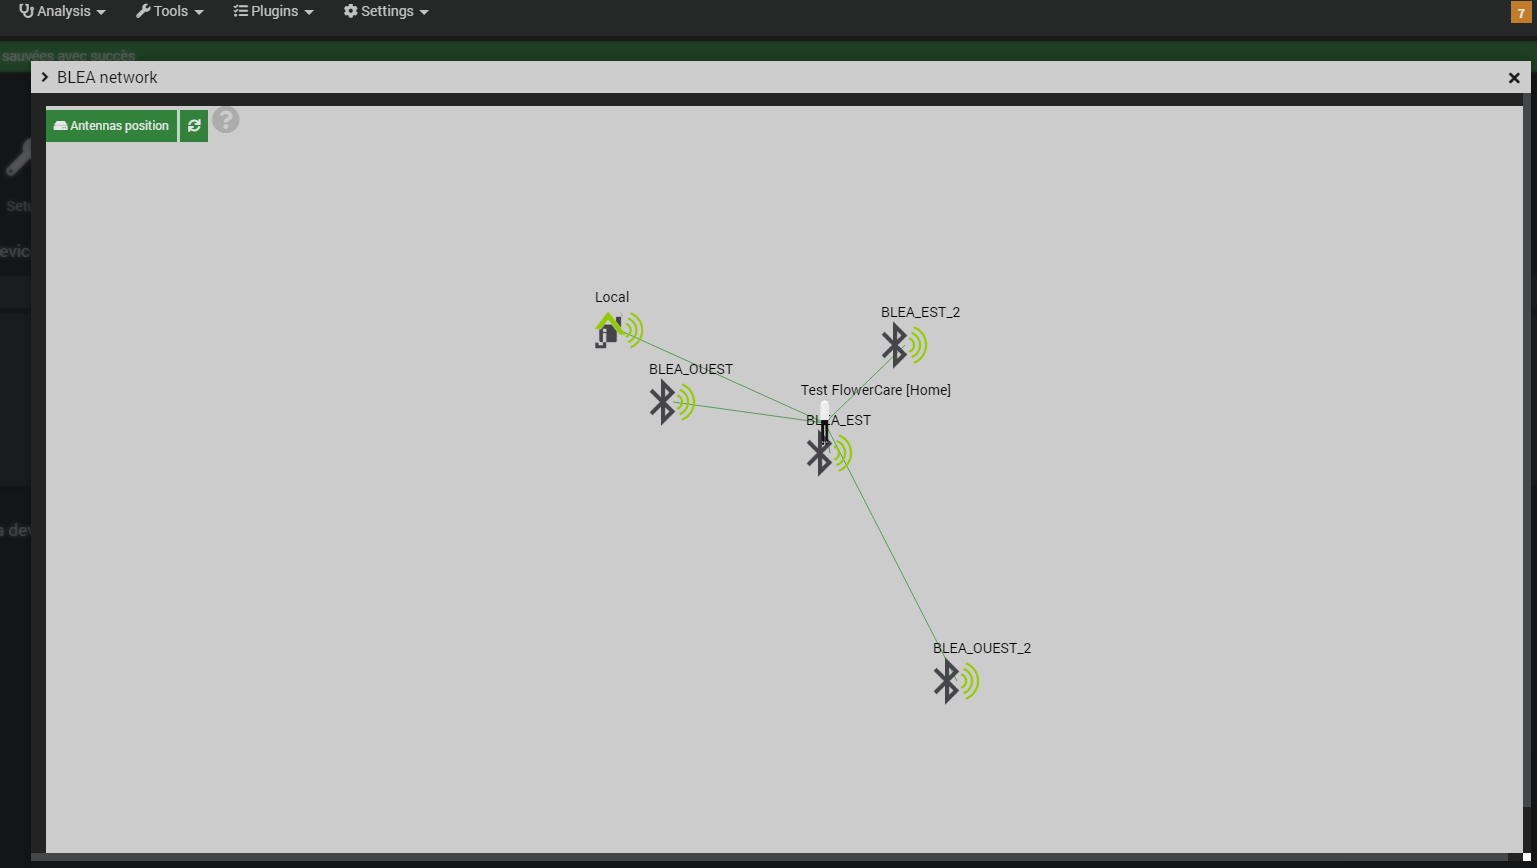
We see the main “Local” controller, as it is still equipped with its external Bluetooth USB key from the previous tutorial, in addition to the 4 antennas we have just deployed. For now, we only have one Flowercare represented, as this is the one we used in the previous tutorial on a “simple” BLEA controller. An interesting feature here is that Jeedom will try to guess (or more accurately, deduce) the approximate position of each sensor, based on where you have moved your antennas in this view and the RSSI signal (see below).
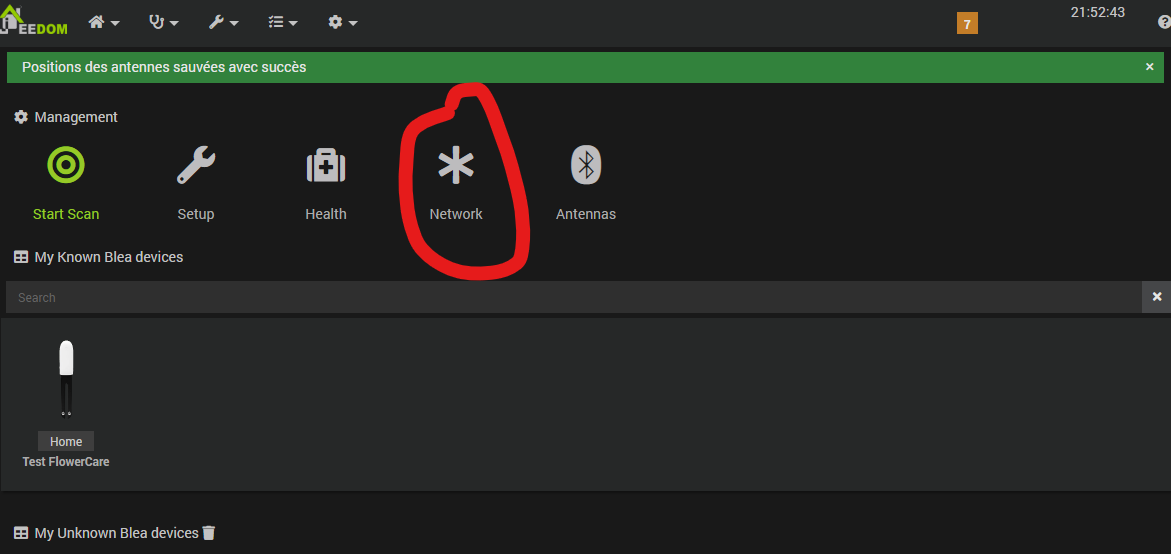
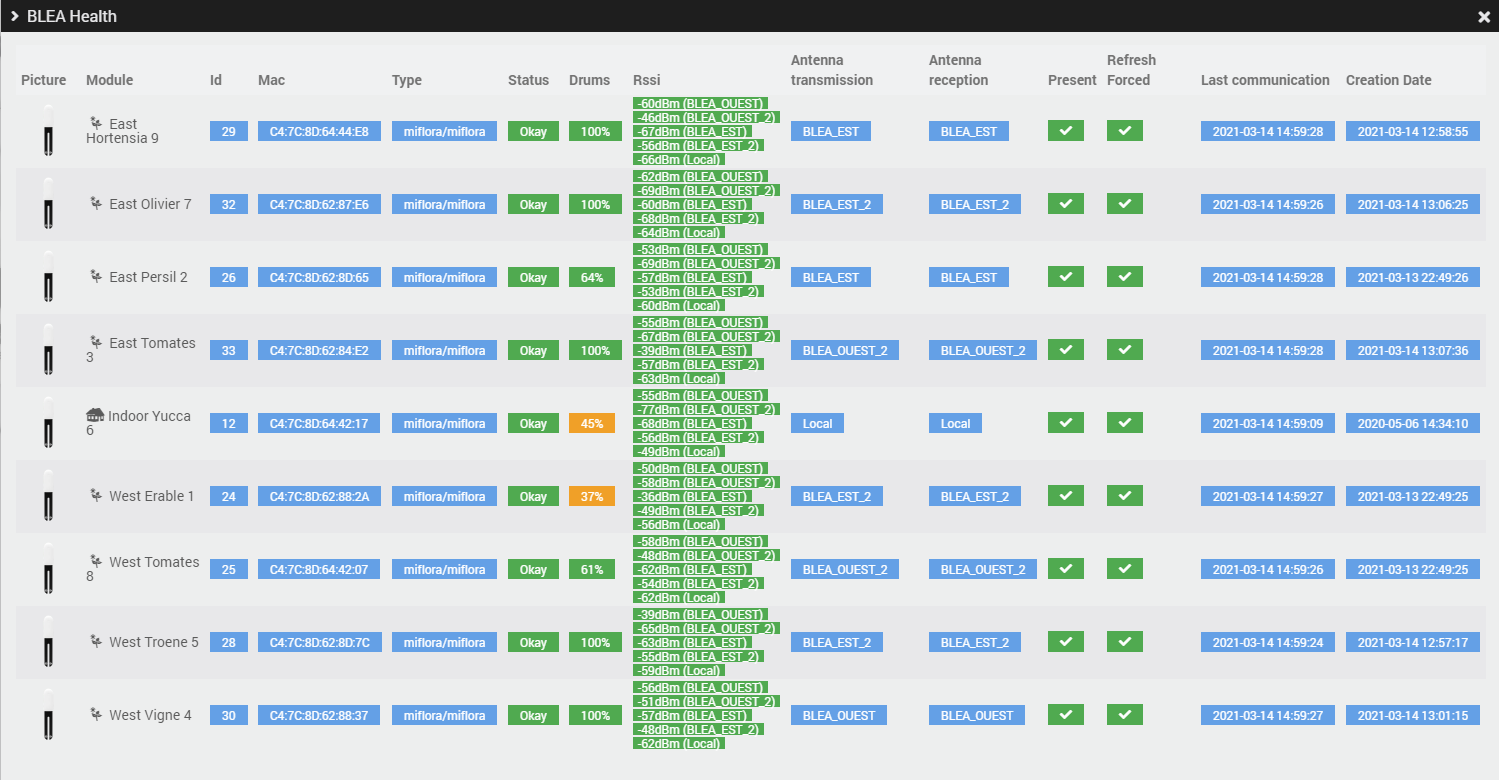
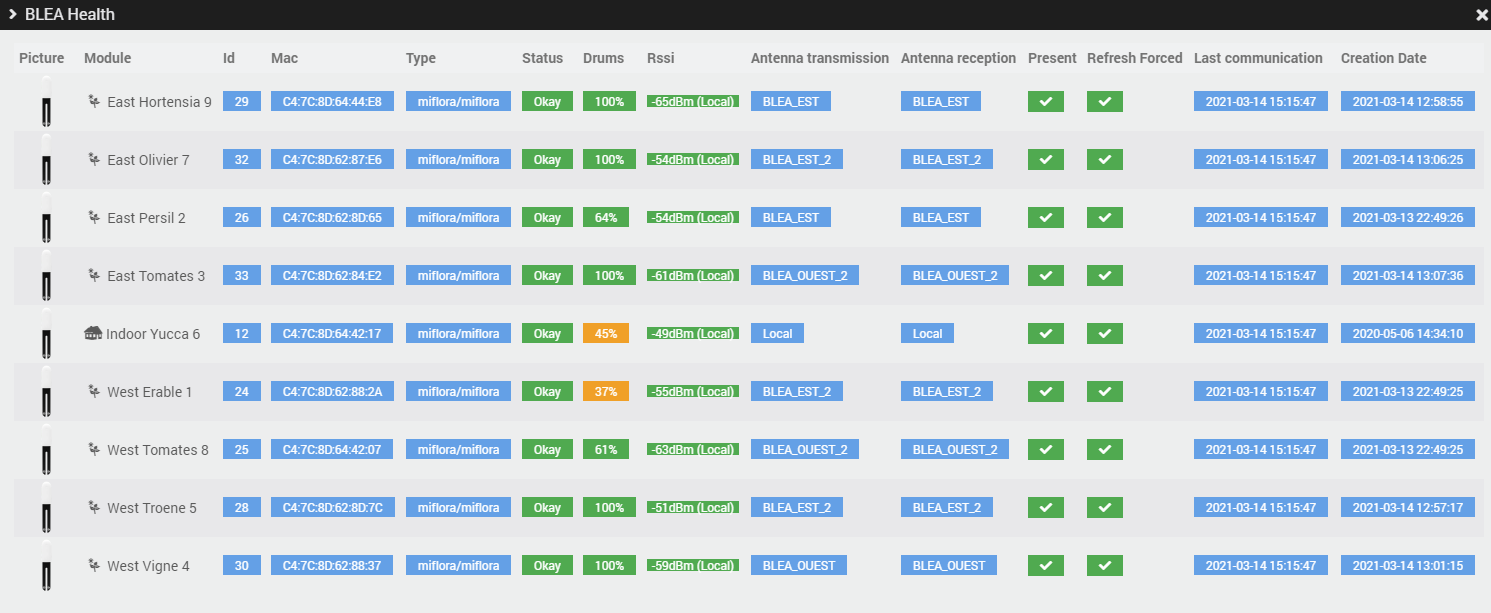
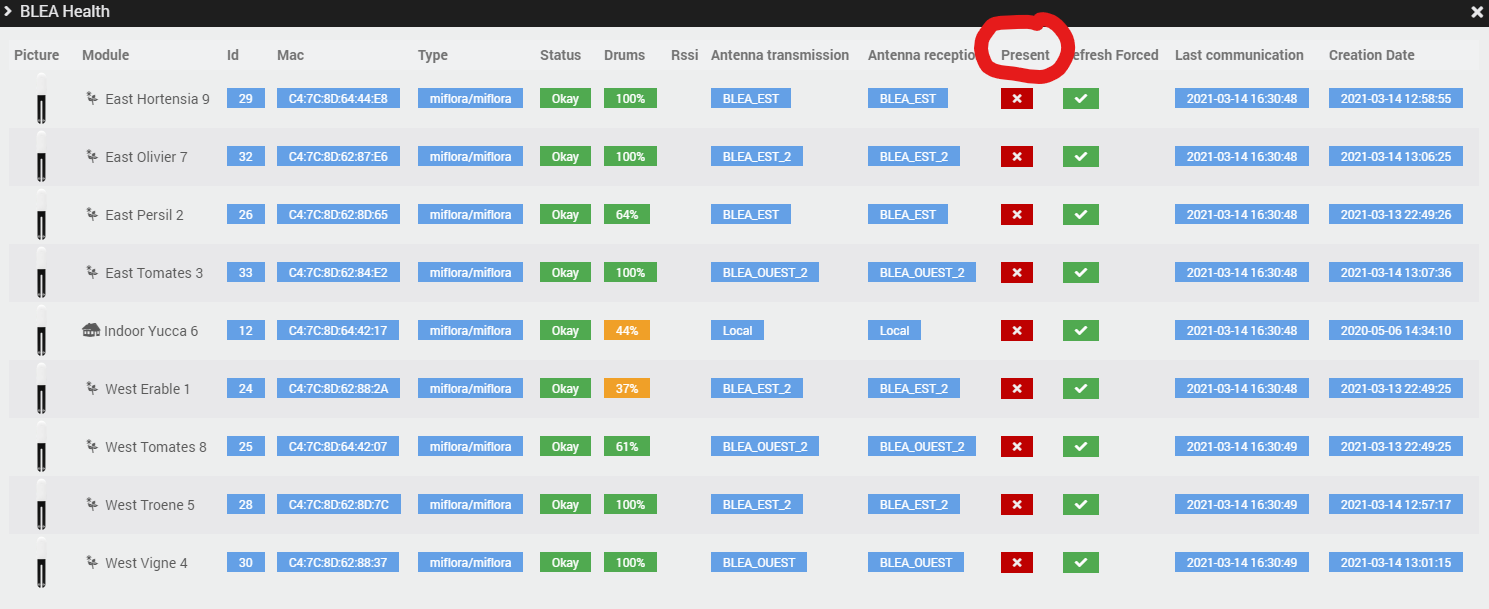
Another interesting view, is the “Health” view of the BLEA plugin.
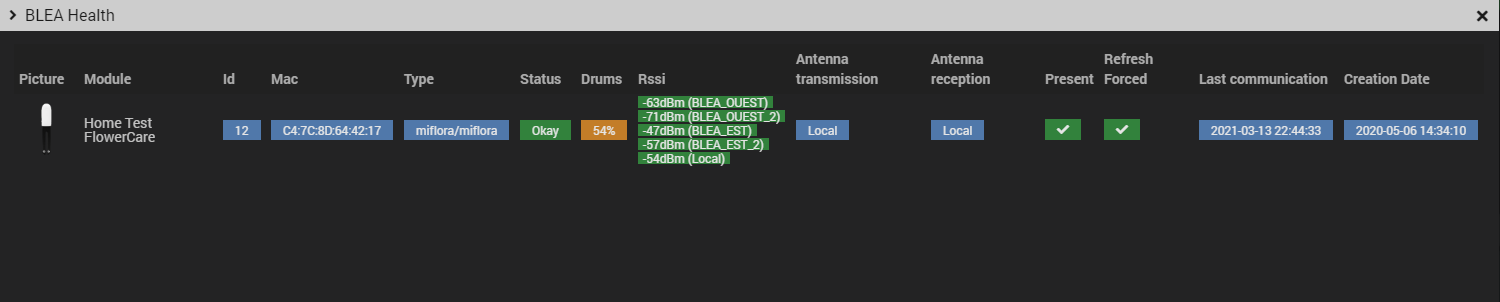
It will display the MAC address, type, status, and battery level for each of your Bluetooth devices, as well as the RSSI per antenna or controller. The lower the RSSI, the better the signal. Also note that in the Transmission and Reception columns for the antenna, in this case, the Flowercare we detected seems “paired” with the main controller, but we will change that later.
Adding all our moisture sensors
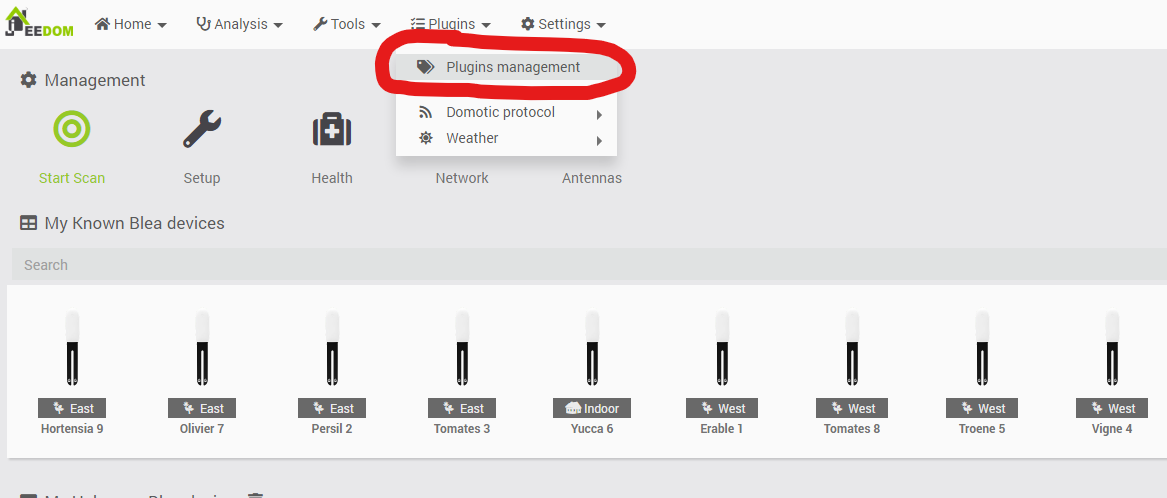
This is very simple to have our other devices detected. We will use the “Scan” function of the BLEA plugin, and tell Jeedom we are only looking for Miflora’s equipments.
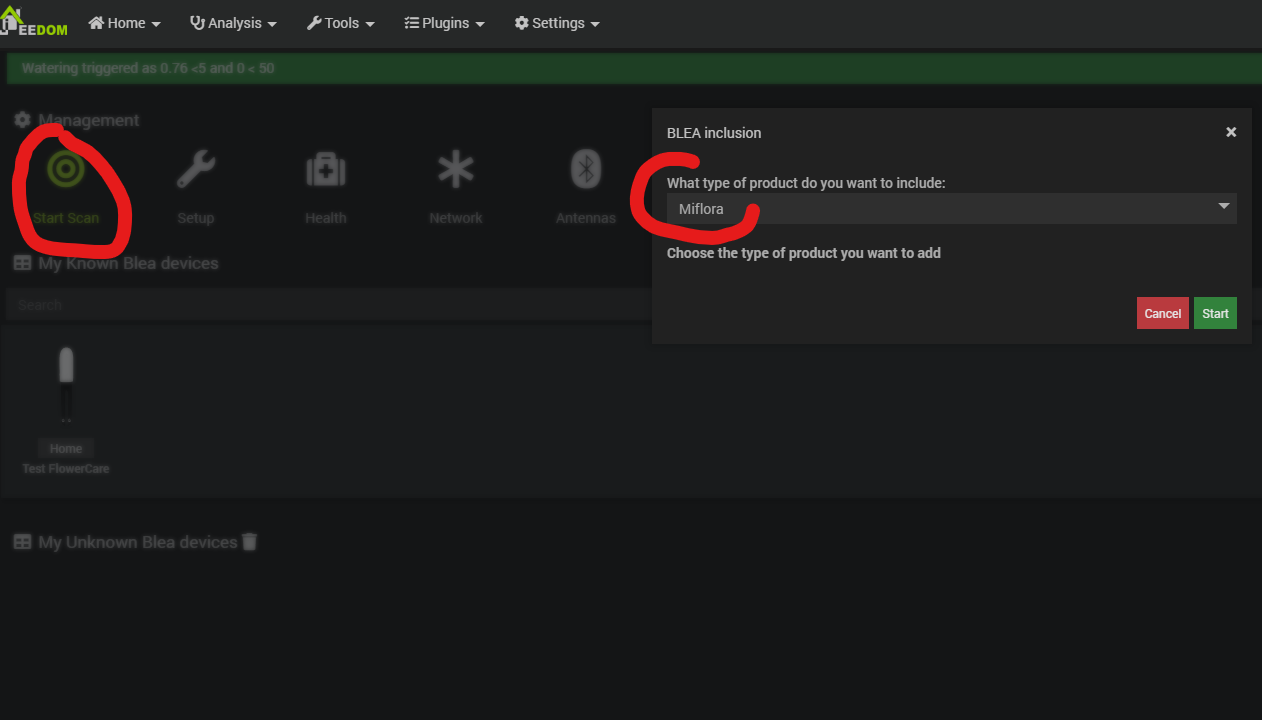
When Jeedom finds a device of the selected type that it does not yet recognize, a screen will appear asking you for information about that device. I strongly recommend that you give your Flowercares descriptive names! For example, the name of the plant, where it will be placed, etc. Personally, after a while, I wrote a unique number on each one with a permanent marker, which allows me to easily identify them, and I also entered this number in the equipment name in Jeedom. Later, in your automation scripts, you will need these explicit names to check values and perform the right actions without ambiguity.
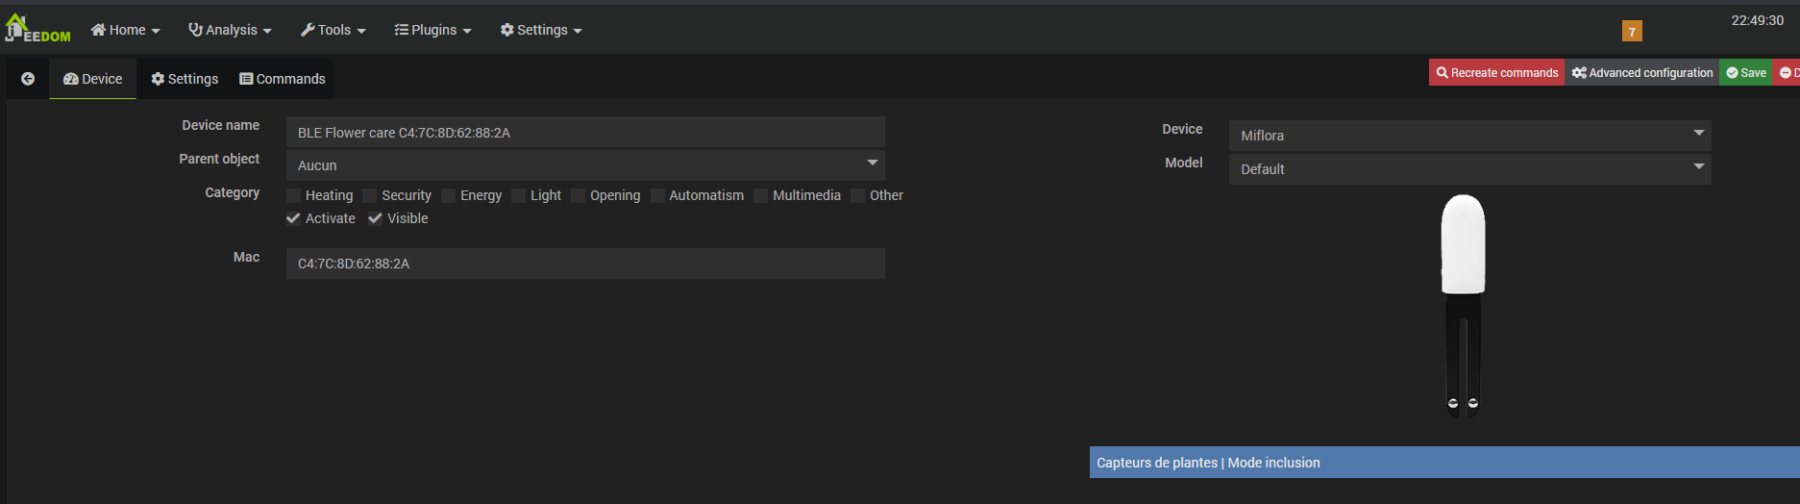
So we assign this first one a name (and the number I wrote on each sensor so i will easily identify them when they will be outside), its parent object so it will be displayed in Jeedom’s dashboard, a function category, and then we will go to check its settings.
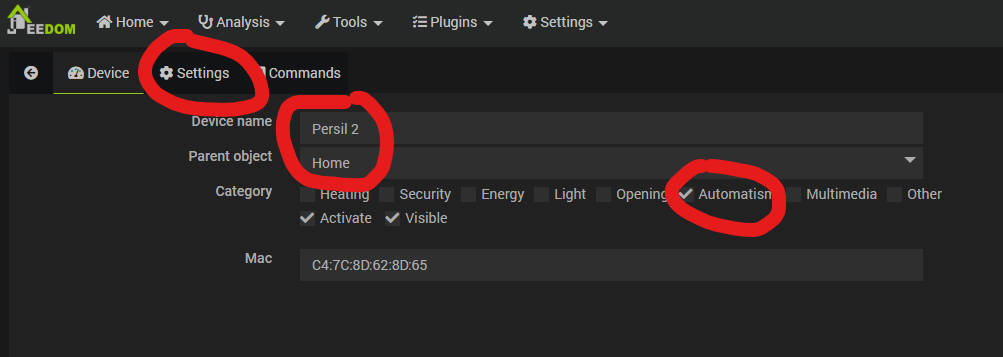
In the settings we can see it is stick to a specific antenna, but we can change it.
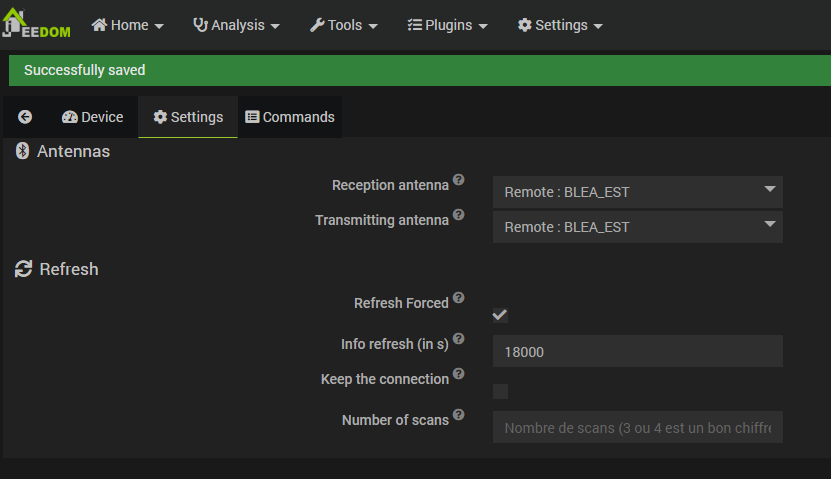
It is not a problem to change the reception and transmission setting to “All”: every antenna will be able to receive and transmit data to this equipment. It may be useful if you move your sensors often, or during your final outdoor setup, to ensure a better fault tolerance (in case an antenna is not working). For now we don’t change it, as we will check later in the Health & network views, if it changes something to the links between the components.

Now we have to do the same detection/naming stuff until all our sensors are added. In my case since those sensors are now used for 3 years and were totally inactive during winter, i had to change a few batteries before they all get “seen” , and I found one is now totally unable to be detected, I had to use my test sensor as a spare.
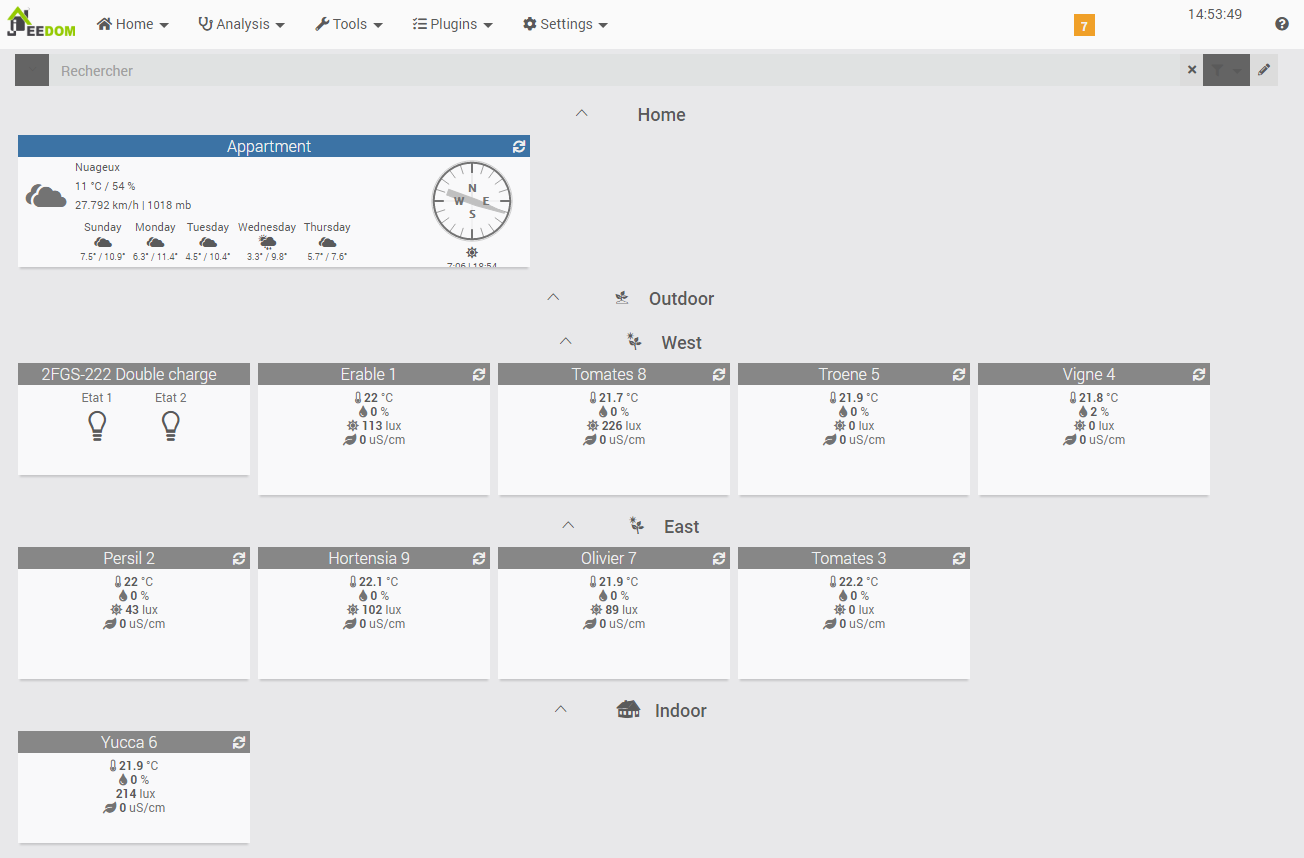
The final organization I used in Jeedom for this tutorial is as following. I created some objects in my “Home” root object, to distinguish Indoor from Outdoor equipments. Then, inside Outdoor, I defined one object per terrace I have, one East, one West. Each sensor is assigned to its target destination.
Added value of external antennas
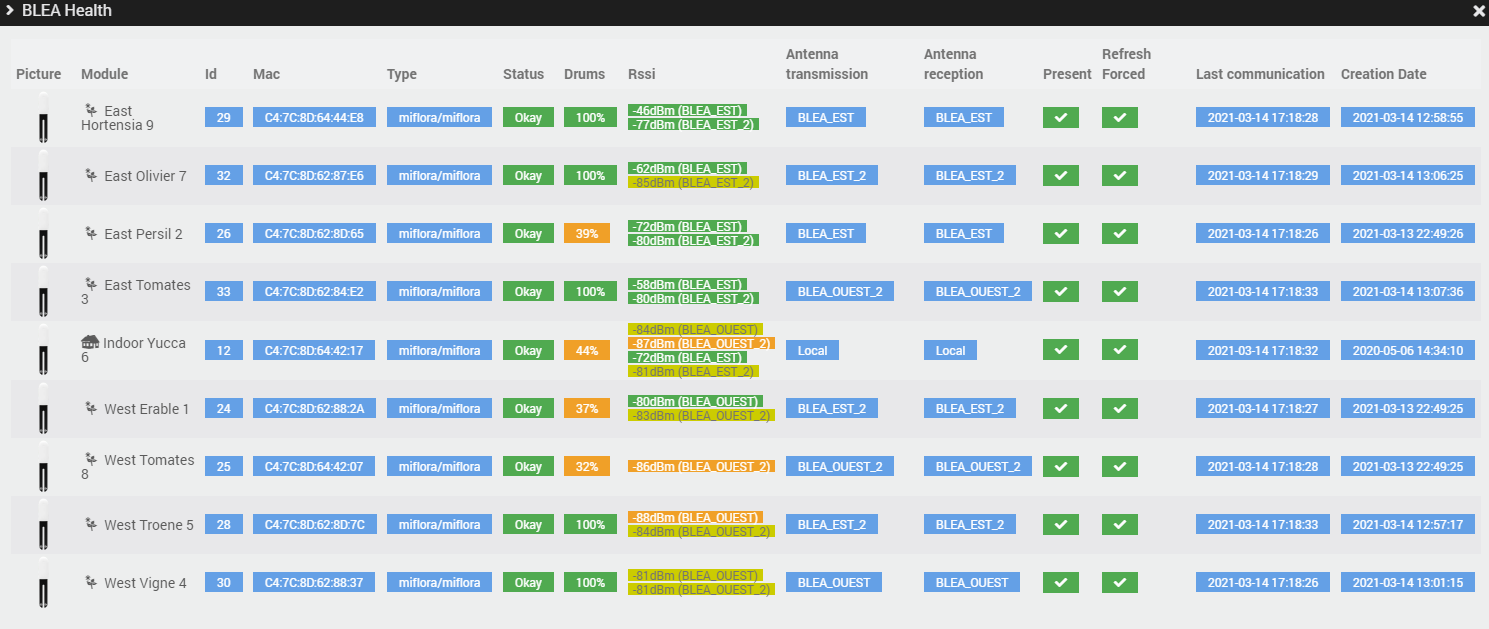
We will test if our antennas are really giving us an extended range. First, i will show the Health & Network views from the BLEA Plugin, with all the equipments and antennas still on my desk. It means they are all really close from each others.
With each sensor, we can see that there is an Rssi value for each antenna. This means that each sensor is able to reach each antenna. Green indicates very good signal quality.
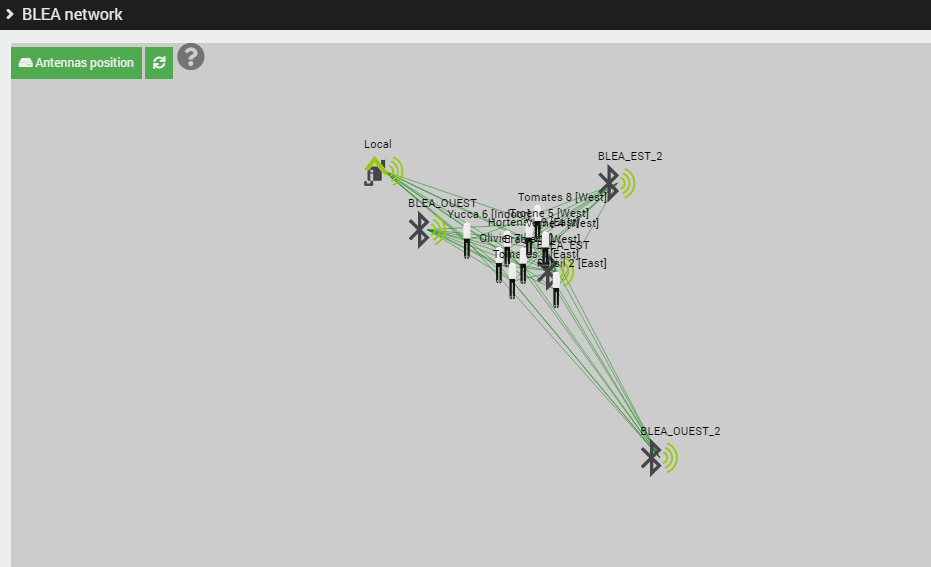
We can still see with which antenna every sensor is bound. Now, i will shutdown all antennas.
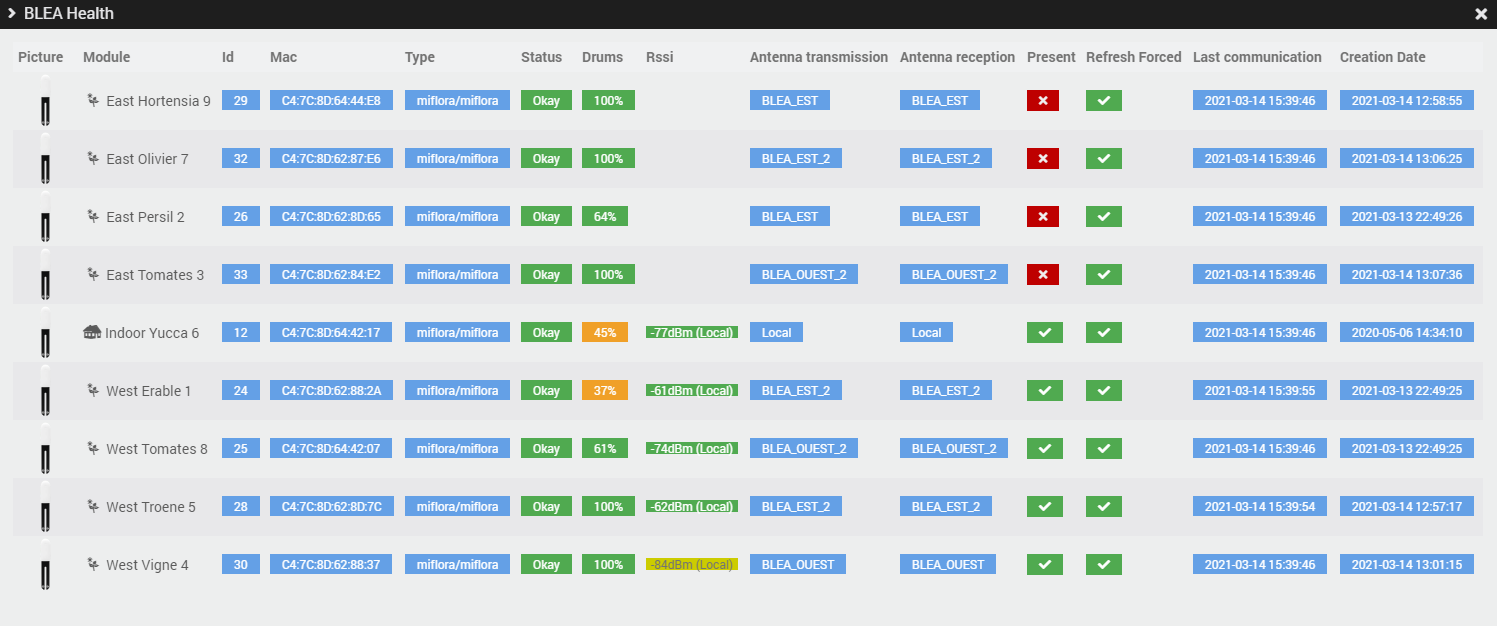
We can now see that the Rssi signal changed for each sensor: they are only able to reach the Local antenna, the one directly installed on Jeedom’s controller.
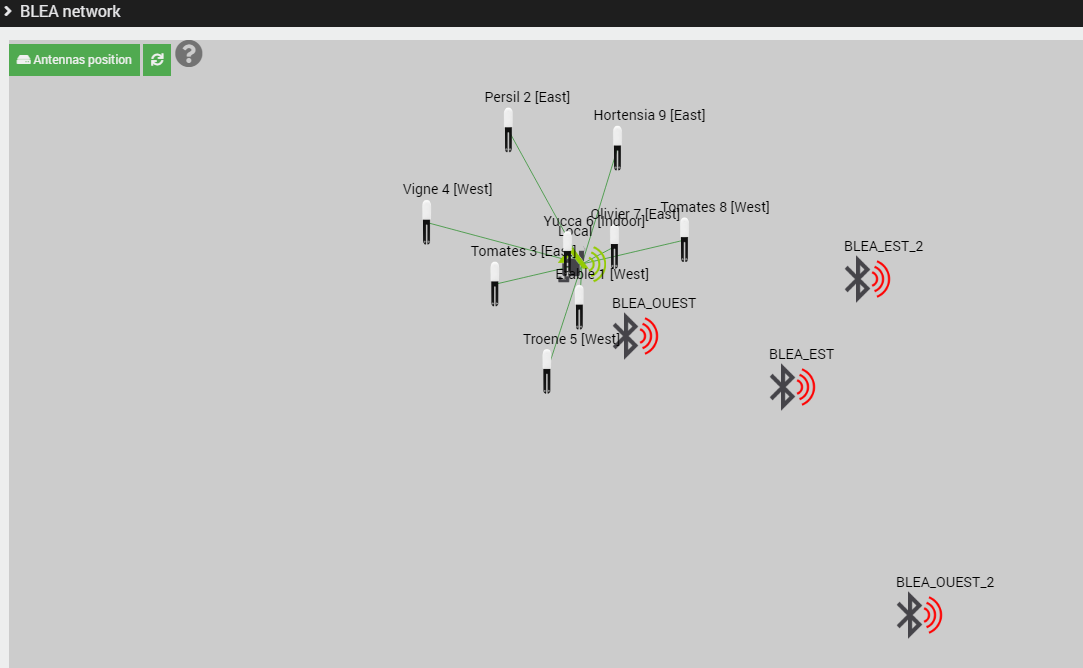
As we can see in the Health view, all the sensors are now only detected by the Local antenna, which is the bluetooth usb stick plugged on my Jeedom controller, from last tutorial. Only the RSSI from this antenna is displayed for each equipment. Also, in the Network view, we can see all antennas are down/red, and the links between sensors and antennas are now only pointing to the local controller. In the BLEA documentation and this excellent Sarakha’s article (french) we can read that whatever the antenna configured for reception or transmission in the sensor’s configuration, as soon a sensor is seen by any bluetooth antenna, the device is considered as present and usable.
Now I will move my sensors in various places of my terraces, where they could really be located, still with only my main jeedom controller active, no antennas.
We can see that only a few sensors now have a link with Jeedom.
It becomes interesting: clearly all sensors moved on the East terrace are out of range. The main controller can still see the West sensors though, as my desk is closed from this terrace. Now, because the Intel NUC on which I run my production Jeedom won’t have this external bluetooth dongle i’m using on my testbed, i’ll tell the BLEA plugin to NOT use any local bluetooth controller. Therefore, we will ONLY rely on external antennas, which are still powered off right now.
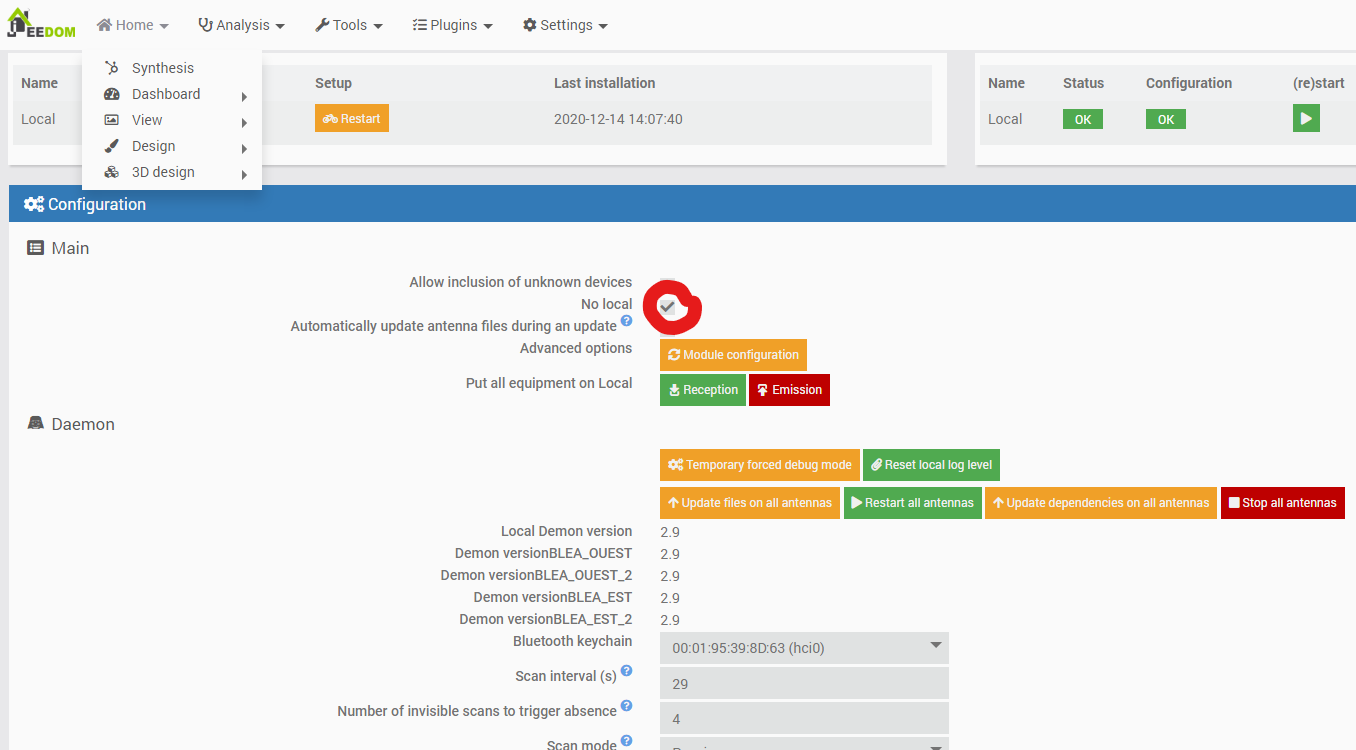
I checked the option “No local”, and saved the configuration. To truly test this configuration, i will even shutdown the Jeedom Controller, and remove the bluetooth usb stick.
After booting it again without local bluetooth, here are the Health & Network views.
Now, clearly none sensor is detected, which is perfectly normal ! I will then move my antennas (with their USB power supply) to each “corner” of my apartment, then turn them on. Then on the Network view, i’ll move them approximately to where they physically really are from each others. I just wait a few minutes after each antenna is back online in Jeedom, for the network to “stabilize” itself.
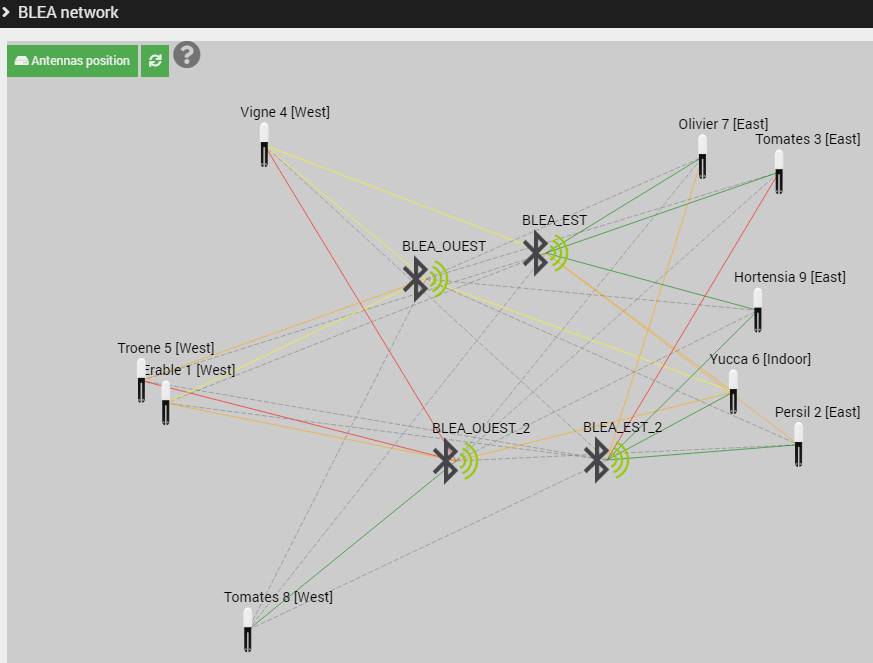
Conclusion: all antennas are clearly in place and functioning as genuine relays to the Jeedom controller. We can see in the Health view that we even have a certain amount of redundancy if one of the antennas installed on a terrace were to fail, as most sensors have a fairly good Rssi with at least one antenna. The network view is almost accurate, with the sensors displayed almost perfectly on the map.
I recommend ensuring that each sensor can use “all” antennas and not connecting them to a single antenna. When using the BLEA plugin and antennas in a sprinkler system context, it is not necessary to limit the Bluetooth transmitters/receivers for each piece of equipment, as the aim is to maximize redundancy and network meshing.
Enhancements
Dashboarding
We can see on the standard Jeedom dashboard that our sensors are actively providing the expected data. Now that we have many active sensors, even at a distance, we can also control many more water valves (or other elements) with exactly the same system we deployed in the previous guide.
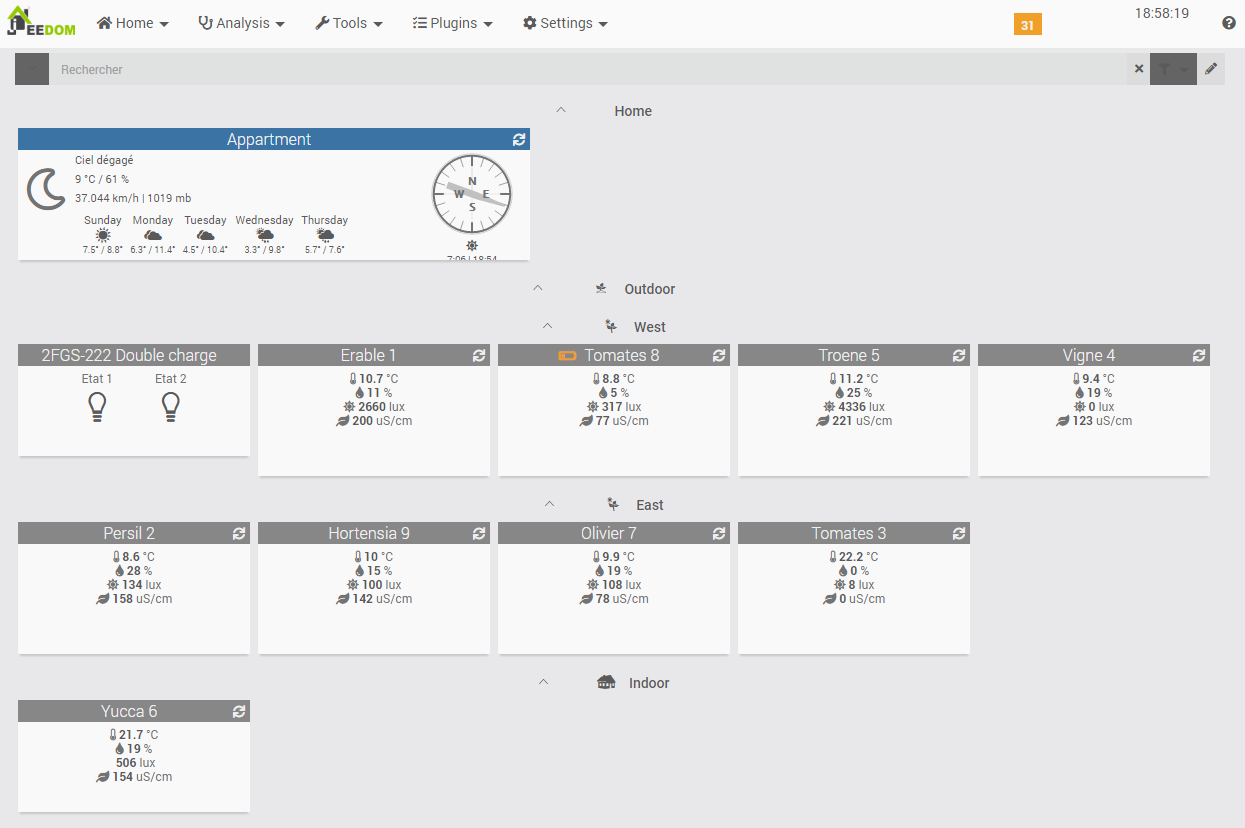
You can also “play” with Jeedom’s features (especially Views) and create a nice dashboard specifically for your watering system.
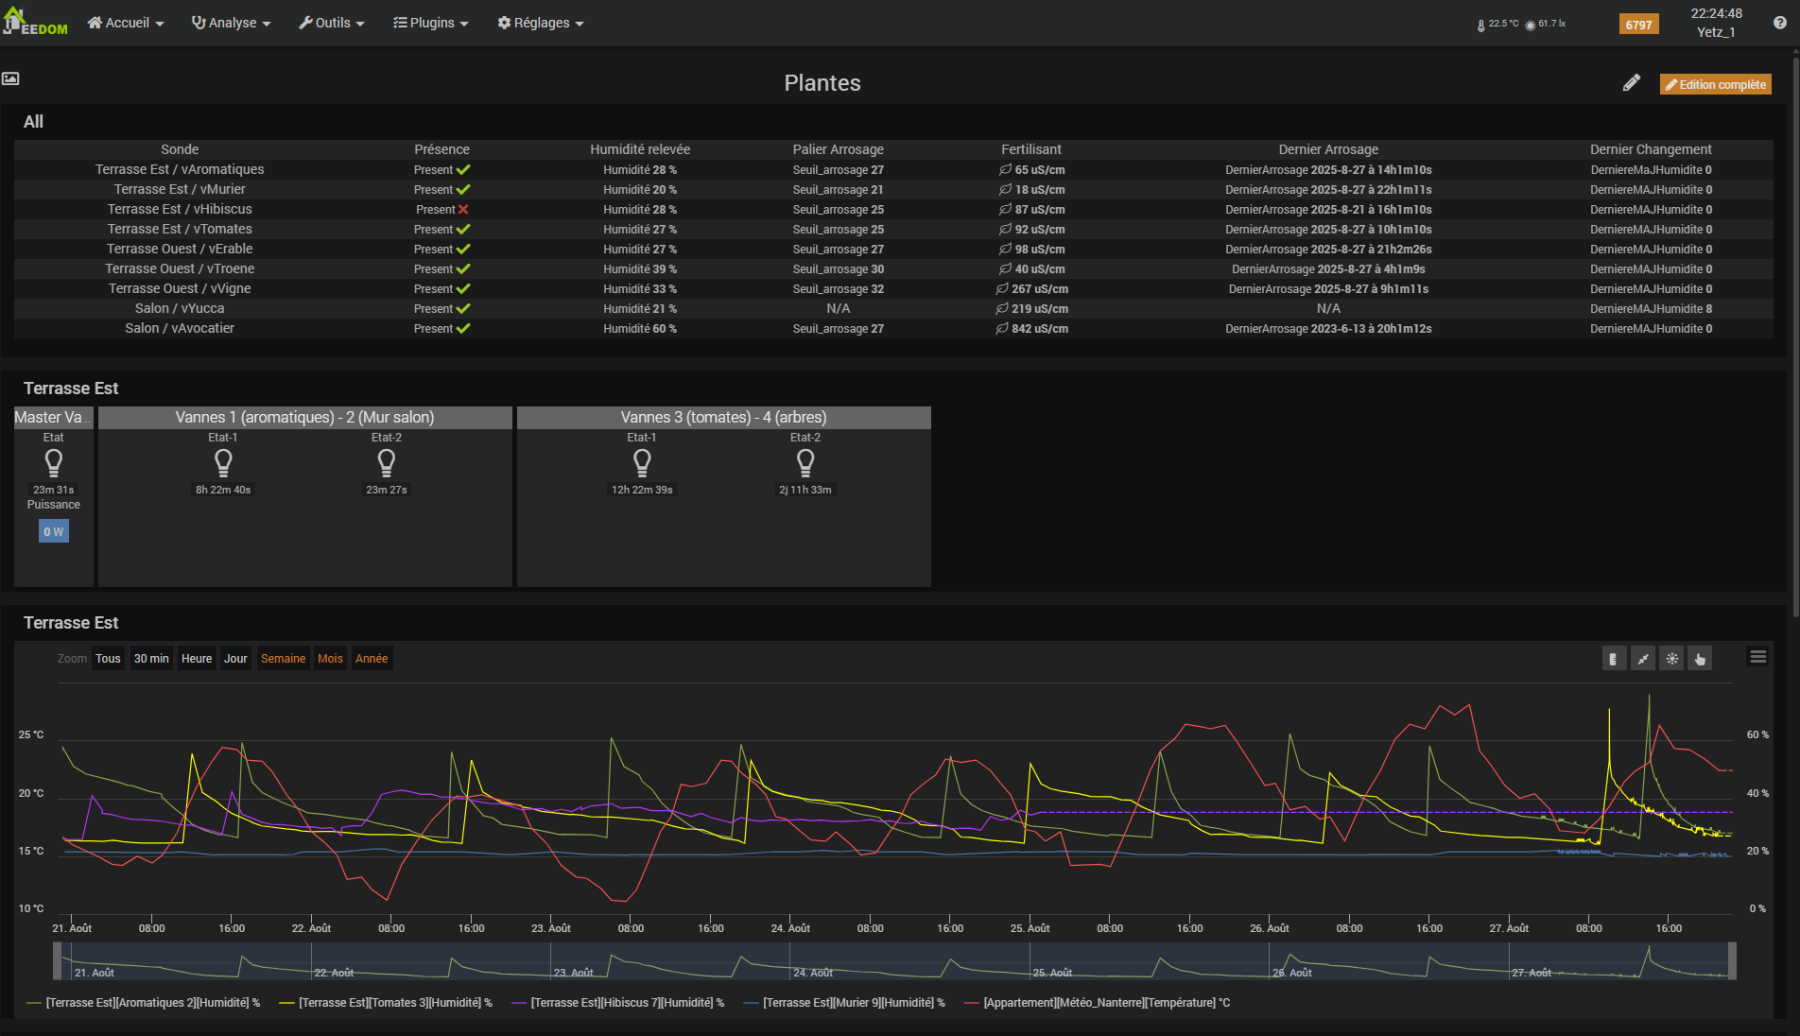

Here we can see that I can accurately monitor all humidity variations over time for each sensor. I can manually control the water valves. I also slightly modified my scenarios and used variables and virtual equipment to calculate new data. Then I use them to display humidity levels, but also the threshold for each watering line, the last time a valve was turned on, and the last time the sensor updated the humidity data.
Monitoring
We already setup some kind of monitoring script on each antenna, so that they will reboot in case they can not ping the Jeedom controller. But this is technical monitoring, not functional to make sure there is no water leak somewhere with a valve staying opened, or a part of your garden not being watered because a sensor is not working well.
So, inside Jeedom, some good practices would be:
- To monitor and send an alert if any Antenna is down for too long;
- To monitor and alert if a sensor has not provided new data for too long;
- Monitor sensor batteries and send alerts (but in hindsight, I don’t think we can rely on the battery charge level reported in Jeedom for these sensors);
- To monitor and alert if a water valve is opened for too long (avoid flooding and water consumption).
This requires a little bit of coding inside scenarios, and it will be a perfect target for a next tutorial about monitoring plugins or scenarios ! Incoming.
Alerting
Another interesting feature is the ability to add notifications to be sent by email, Pushover, or any other service, in order to inform you in various ways that the system has decided NOT to activate watering due to the weather forecast, or that it has decided to activate it because a humidity threshold has been exceeded. This will also be an ideal topic for a future tutorial on the notification system I developed in Jeedom using both scenarios and integrated PHP. This system can notify you or others by email, Pushover, voice message, SMS, etc.
Troubleshooting
If you have problems with dependencies after cloning your antenna template, try to remove/reinstall all the python PIP & bluepy stuff:
sudo pip3 uninstall bluepy
sudo apt remove python-pip python3-pip
sudo apt autoremove
sudo apt-get reinstall build-essential libssl-dev libffi-dev python-dev
sudo apt-get reinstall python-pip
sudo apt-get reinstall python3-pip
sudo pip3 install bluepy
sudo setcap cap_net_raw+e /usr/local/lib/python3.7/dist-packages/bluepy/bluepy-helper
sudo setcap cap_net_admin+eip /usr/local/lib/python3.7/dist-packages/bluepy/bluepy-helper
sudo /sbin/reboot
It will:
- Uninstall the Python 3 package
bluepy(a library for Bluetooth communication), - Remove both the Python 2 and Python 3 package managers (
pipandpip3) from the system, - Clean up and remove packages that were installed as dependencies but are no longer required,
- Reinstall essential development tools (
build-essential) and libraries needed for compiling and building Python packages (libssl-dev,libffi-dev,python-dev), - Reinstall the Python 2 package manager,
- Reinstall the Python 3 package manager,
- Install the
bluepypackage for Python 3, - Grant the
cap_net_rawcapability to thebluepy-helperbinary, allowing it to use raw network sockets (needed for Bluetooth operations), - Grant the
cap_net_admincapability to the same binary, allowing it to perform advanced network administration tasks, - Restart the system.
Wrap-up & Related Resources
By using Raspberry Pi Zero W units as BLEA antennas, I significantly improved the data reliability and range of my Jeedom-controlled watering system. This modular approach lets you add more sensors or antennas as needed and ensures coverage for even large outdoor spaces.
For further reading on automatic watering with Jeedom, see:
- Automatic programmable outdoor watering system with Jeedom
- Quick tutorial: installing Debian raspbian on a Raspberry Pi (Zero)
For BLEA plugin details, see:
Ideas for next steps: Set up alerts in case of sensor failure or valve problems, or integrate triggers based on weather conditions or sensor readings themselves for even smarter irrigation.