Note (18/02/2019): a simpler deployment process is under active redaction.
We tried Gekkoga’s backtesting and noticed it is a CPU drainer. I never used Amazon EC2 and its ability to quickly deploy servers, but I was curious to test, as it could make a perfect fit for our needs: on-demand renting of high capacity servers, by using Amazon’s “Spot instance” feature. Beware, on EC2 only the smallest VM can be used for free (almost). The servers I would like to use are not free.
Our first step is to manage the automatic deployment of all packages we need to make Gekko & Gekkoga run and automatically start with the Strat we want to test. I want a one command process. We will test this on a small VM -the t2.micro- and using the standard AMI (Amazon Machine Image, the OS) “Amazon Linux 2”.
Once this step is complete, we will make a new AMI based on the one we deployed, including custom software and part of its configuration.
Next we will try to automate in a simple batch file the request, ordering, and execution of a new instance based on our customized AMI, with Gekkoga automatic launching & results gathering. This batch file would be used from my own personal/home gekko server that I use to modify and quickly test new Strats.
Launching a new free Amazon EC2 t2.micro test VM
I won’t explain everything here. First you need to create an account and yes you will need to enter some credit cards info, as most of the services can be used for free at the beginning, but some of them will charge a few cents when used (eg. map an Elastic IP on a VM and release it, when it not in used, you are charged, it’s cheap, but you will be charged; also you are allowed your free small VM only a few hours, so you need to stop it as soon as you can to make it available only whern you need it, this is “on-demand” Amazon’s policy, like it or don’t use it:) ).
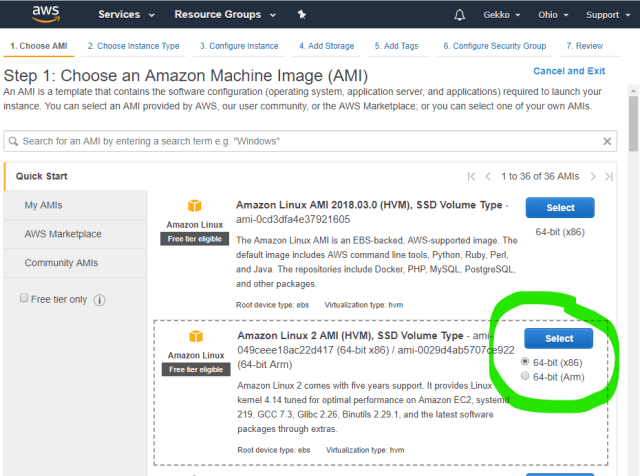
Then we choose the AMI and then the smallest VM available, as it is allowed in the “free” Amazon package.

At the bottom of the page, click “Next: configure instance details”. On the following page, you can use all default values, but check:
- The Purchasing option: you can ask for a Spot Instance, this is Amazon’s market place to request your VM to run on a fixed price you will provide, assuming Amazon’s got free ressources and will allow your VM to run at that price (neds to be superior to the demand)
- The Advanced Details at the bottom.


The User data field is a place where we can use a shell script which be executed at boot by the VM. As sometimes the VM can be started when Amazons detect they should be (eg. Spot instances), this is a very nice place to use to automatically make your instance download some specific configuration stuff when it boots, for example our Gekko’s strats and conf files to use for automagcally launch our backtests. We will try this later (I did not try it yet myself at the moment I’m writing this but this is well documented by Amazon).
NExt we want to configure the storage, as Amazon allow us to use 30Gb on the free VMs instead of the default 8gb.

Next, I will add a tag explaining the purpose of this VM and storage (not sure about its exact future utility yet but whatever …).

Next, we configure a security group. As I already played a little bit with another VM I created a customized Security Group which allows ports 22 (SSH), 80 (HTTP) and 443 (HTTPS). I choose it but you will be able to do that later and map your own security group to your VM.


Next screen is a global review before VM creation and launching by Amazon. I won’t copy/paste it, but click on Launch at the bottom.
Next is a CRITICAL STEP. Amazon will create you some SSH keys that you need to store and to use to connect on the VM through SSH. Do not loose them. You will be able to use the exact same key for other VMs you would want to create, so one key can match all your VMs.
As I already generated one for my other VM (called gekko), I reuse it.

And next is a simple status page explaining the instance is launching and linking to a few documentation pages, that you should of course read.

Now when we click on “View instance” we are redirected on EC2 console (you will use it a lot) and we can see that our new instance is launched, and its name is the tag we defined earlier during setup (you also see my other VM, stopped).

Next we will connect to the VM shell by SSH. On my laptop running W10 I’ll use putty. I assume you downloaded your private key. With putty the PEM file needs to be converted using PuttyGen to generate a .ppk file it will be able to use.
You’ll also need to grab the public IPv4 address from EC2 console, by clicking on your instance and copying the appropriate field.

Now in Gekko you just have to save a session with your private .ppk key configured and ec2-user@<public IPv4 hostname grabbed from the console> as host. Keep in mind that this hostname and associated IP could change. If you can’t connect anymore to your VM, the first thing to do is to check your EC2 console to check its hostname.


We launch the session. Putty will ask you if you want to trust the host, click Yes.

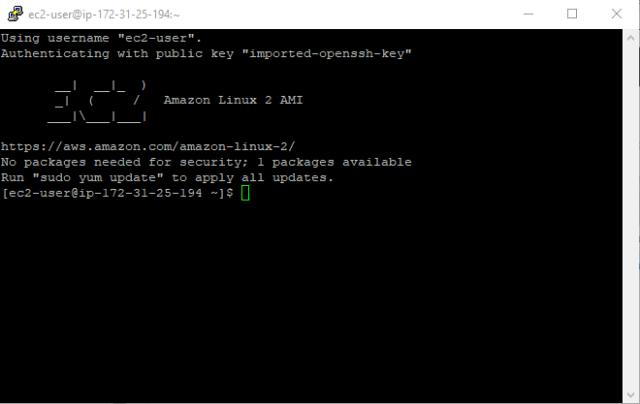
Woohoo ! we are connected ! This was fast and simple.
Updating the VM & deploying our software
OK so now we need to deploy all the basic things we saw in previous posts, but also more things like Nginx to protect the access to Gekko’s UI, and later we will have to implement a way for the VM to automagically download updated Strats to run it. First let’s make sure we can run a simple backtest with Gekko.
The goal is to deploy all what we need to launch a functionnal Gekkoga VM, and then we will create a customized AMI to be reused on a better VM specialized in CPU computations. Note that EC2 can also supply VMs with specific hardware like GPU”s if you need to run software able to offload the computation on GPU cards, this is not our case here unfortunately but it might somedays as I would like to start to experiment AI.
I won’t explain everything below, this can be put in a shell script, and you can use the links to my blog to download a few standard things not compromising security, but there are some private parts that you will need to tweak by yourself, especially the ssh connection to my home servers of course.
All the steps below do not require manual operations but some are customized for my own need, read the comments.
First we update the VM and deploy generic stuff.
Next we deploy NGinx which will act as a Reverse Proxy to authenticate requests made to Gekko’s UI.
Now we need to define some very customized stuff, I won’t explain all as this article is not a complete how-to, you need sysadmin knowledges.
- Create a user/passwd to be used by Nginx reverse proxy
- To automate downloading of stuff from our home server using scp or the launch of actions on our home server through ssh (to automatically make a tarball of our gekko’s strats for exemple before downloading them) we will need to import our home server & user SSH key /home/ec2-user/.ssh/ and don’t forget to change its permissions with chmod 600
This is an example of what you could do once your reference server’s ssh key was successfully imported on your EC2 instance:
Now we just need to launch ngix .. and eventually save pm2 sessions so that it will be relaunched at boot.
Testing the VM
If everything was OK -And yes I know a lot of parts could have been wrong for you, but for me at the moment I was testing it it was OK- you should be able to launch your favorite web browser and target https://<Your VM FQDN> and see a login prompt. You need to enter the login/password you defined in /etc/nginx/.htpasswd

You should now see this …

My test dataset was correctly downloaded, it is well detected by Gekko. I will just give it a little update by asking gekko to download data from the 2019-01-07 22:30 to now and then upload it back on my reference server at home.


Next, let’s give a try to the strats we downloaded from our reference server at home …


All is running well …
We now have a good base to clone the AMI and make it a template for higer-end VMs. We will need to make it:
- Able to download uptodate data from markets
- Able to download up to date strats from our reference server@home
- Launch one particular Gekkoga startup script
- Make it upload or send the data somewhere
Please remember to stop your VM either from command line or from Amazon EC2 console so that it won’t drain all your “free” uptime credits !
Playing with AWS CLI
Now we want to control the launch and stop of our VM remotely, from a remote server or workstation, and we would like it to automatically execute a script at boot, using user-data, to download fresh data from our reference server. As you can see by clicking on previous links, this is pretty well documented by Amazon.
First, we need to install AWS CLI (Amazon Command Line Interface). On my server I had to install pip for Python.
Now we can install AWS CLI using pip, as explained in Amazon’s documentation. The –user will install it in your $HOME.
We add the local AWS binary directory to our user PATH so that we can launch it without having to use its full path. I’m using a Debian so i’ll add it in .profile
Now, we need to create some IAM Admin User & Groups from our EC2 console, to be able to use AWS CLI. Please follow Amazon’s documentation “Creating an Administrator IAM User and Group (Console)“. Basically you will create a Groupe, a Security Policy, and an Administrator user. At the end, you must obtain and use an Access Key ID and a Secret Access Key for your Administrator user. If you loose it, you won’t be able to retrieve those keys, but you will be able to create new ones for this user (and propagate the change on every system using them). So keep them safe.

Then we will use those keys on our VM, and on our home/reference server from which we want to control our instances. You can specify the region that Amazon attributed to you also if you want (hint: do not use the letter at the end of the region, eg. if your VM is running in us-east-2c, enter ‘us-east-2’).


Let’s test it with a few examples I got in the docs:
- Fetch a JSON list of all our instances, with a few key/value requested:

- Stopping an instance

- Starting an instance

- Ask the public IP of our running VM (we need to know its InstanceID):

To send remote commands to be executed on a specific VM, you will need to create a new IAM role in your EC2 Console, and make your VM use it, so that your remote calls will be authorized.

Give your VM an IAM role with the Administrator Group you defined before, and in which there is also the Administrator user we are using the keys on AWS CLI. Now we should be able to access the VM and send it informations and request data.
- To make the vm execute ‘ifconfig’:

- To check the output we use the commandID in another request:

- And … -took from the doc, I just added the jq at the end-, If we want to combine both queries:

Making a new AMI from our base VM & instantiate it
Creating a new AMI
First we stop our VM.
Now in EC2 Console we will create a new AMI from our instance.


By default the images you create are private, you can change it if you want and share your AMI to the region you are using in Amazon’s cloud.

Instantiating & executing actions at first boot
We want to tell the new instance of this image to execute a shell script at its very first boot. This could be very useful later. First we will create this script on our local reference server and put a few commands in it, but also activate logging on the VM (outputs will be available both to the /var/log/user-data.log and to /dev/console).
I create a script called 0.user_data.sh in a $HOME/AWS directory on my reference server, and put this inside:
We request the creation & launch of a new instance based on our Image ID. Note that I use the name of the key I defined earlier (gekko), I used the same subnet as my previous VM (don’t really know if that is mandatory, have to test), the security group ID can be checked on EC2 console “Security Groupes” menu, and we also specify what IAM role we want to allow to control the VM with AWS CLI (you created it earlier as it was mandatory for some CLI commands to run).

Our new InstanceId is i-0c6d1148adebf33c3 . From EC2 console I can see it is launched. I want to check if my user-data script was executed.
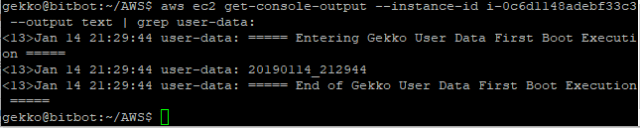
This is quite good ! I also double checked on my reference server if I could see incoming ssh connections by adding an ssh execution + scp downloading request command to the script, and it’s ok: 2 connections as expected (one for the ssh, the other one for the scp).

We have a working “first time script” that the VM will execute upon its instantiation, and that we could customize later on to perform one-shot specific actions. Now, we want our VM to connect to our reference server at each boot, to make it prepare a package, then download it, then untar it, and execute a start.sh script that may be embedded inside.
Automatically download an updated Gekko customized package & deploy it, at each boot
First, on our EC2 reference VM (the one from which we created a new AMI so yes either we will have to later on create a new AMI, or you can perform this step while you are still preparing the first AMI), we will perform this:
Then we will edit /etc/rc.local (which is a symlink to /etc/rc.d/rc.local) and add this:
Note that I also added a line to restart Nginx as I noticed that I had to relaunch it manually before I could access Gekko’s UI. I didn’t investigate further to understand why, maybe later.
On our reference server:
- We also have to create the same directories
- And to create the $HOME/AWS/1.make_package.sh shell script, this is the script called by our EC2 instance at each boot:
- And to create a $HOME/AWS/3.package_start.sh shell script, this is the script which will be embedded in the package built by 1.make_package.sh and that the EC2 instance will execute locally after downloading & unpacking of the package.
Note that we could improve it, as it is the only of our script which will not produce a log file prefixed with the same timestamp as the others. IT takes the local hour of execution, instead of receiving the timestamp as a parameter, as 1.make_package.sh.
We reboot our EC2 reference instance:
After a few seconds, we check the rc.local log on our EC2 instance for the downloading of our reference package from our reference server. In rc.local, we redirected the logs to $HOME/AWS/logs/<date>_package.log :


Seems all good. Now still on our EC2 VM, we check the 3.package_start.sh logfile :

Seems also good, no error. Of course we will have to tweak this batch file later so that the files we want to include in the downloaded package will be deployed at the right place before launching Gekko or other actions.
Now on our reference server at home:


Seems also good, no error. Same thing here, our 1.make_package.sh script on our reference server will need to be tweaked so that we include all the files we need in the package which will be created locally, then downloaded by the EC2 instance at next boot, including the other
3.package_start.sh which will be executed by the EC2 instance.
Now, before we make a new version of our reference AMI (it won’t be the last one :)), I will :
- Make some cleaning in AWS/logs, AWS/logs/old, AWS/package and AWS/package/old dirs, but also in gekko/history, gekko/strategies and gekko/gekkoga/config and /gekko/gekkoga/results, as I made a lot of tests for the various shell scripts you found above and also because I plan to deploy through my reference server only what is necessary to Gekko to perform a backtest. It includes: the history database, its conf file, the strategy and indicators it needs, any other thing needed, same for Gekkoga. But now it’s up to you to decide what you want to do on your reference AMI !
- Add a shellscipt to automatically update the Dynamic DNS handling my Gekko’s EC2 FQDN. As it is 99% personal, I won’t detail it here. What it does is checking the external IP of the machine, check if it is different than the latest knew one, if yes update the A record of the FQDN on the DNS server.
To create a new AMI from your reference VM, you know the procedure, we already did it above, as well as for instantiating it through your AWS CLI installed somewhere.
Next step will be to try to launch a Gekkoga backtesting session by instantiating our AMI on a much better VM in terms of CPU and memory.
But be warned, this will be charged by Amazon !
This will be next article’s topic.
1 thought on “How to create an Amazon EC2 “small” VM and automate Gekko’s deployment”