In previous tutorials, we covered how to install Gekko, use its core features, and build your first custom strategy. In this article, we’ll focus on optimizing your strategies through automatic parameter backtesting with Gekkoga.
Benefits of Automated Backtesting
Every strategy—whether it’s your own custom code or one you found online boasting excellent backtest results—must be tuned for your specific market, currency, and asset. This means finding the right parameters for your unique situation. And you will need a lot of backtesting, then news tests on the live market with simulated orders (paperTrader mode), before being launched “live”.
Keep in mind: even if you discover perfect parameters for backtesting (those offering the highest profit and Sharpe ratio), this doesn’t guarantee similar live results—real market trends and volumes can’t be predicted in advance. If only it were that easy! The tools described here have a fundamental limitation: they can help you find the best parameters for your strategy using past data, but this does not guarantee future performance (see overfitting or curvefitting).
So, first of all, we need to define a good backtest strategy, whatever the way (automated or not) we will find and test parameters. IMO a good testing strategy -this is what is done in AI learning & testing phases- is to split your backtest dataset in several parts: one long dataset to make a general backtest and reach good profit & sharpe; then test it on smaller datasets, of course still from the same market/currency/asset, but with different kind of trends. This way you will be able to:
- Understand how well will perform the strategy with parameters X or Y on this or that kind of trend,
- See how the optimal parameters vary between different market conditions.
With those kind of results and knowledge, we could imagine implement a strategy which would dynamically change and auto-adapt its parameters (or even the indicators used) to the current trend, if it’s a long term one.
In any case, each “good” test should require a stronger -manual- analysis from you: you will need to study the trades: when were they made ? are they accurate or not ? Were the larges losses controlled by a stop-loss implementation or not ? If you change a little bit one parameter, won’t it make your strategy a little bit less profitable on your past dataset, but also less risky and more profitable for the future ? The main key is probably to control large market losses. Then to add some bonuses to the Strat.
Let’s come back to this chapter: I wanted to double my theoretical studies on various indicators -to better understand them and eventually find an appropriate way to mix them- with technical tools to improve the backtesting phase. When I test a strategy, I need to test it a lot of time; therefore I naturally searched for tools which would allow me to automate that, and I found -among others- Gekkoga which is a Genetic Algorithm (GA) trainer. It automates the search for optimal parameters for a trading strategy, but only on a single dataset, which is a good start..
How does Gekkoga Work ?
GekkoGA’s underlying engine is genetic-js, a JavaScript genetic algorithm engine/library. It is a flexible, modular GA framework for Node.js, supporting custom fitness functions, various selection/crossover/mutation schemes, elitism, and more.
How is genetic-js used in Gekkoga?
Gekkoga “wraps” genetic-js and make calls to Gekko’s API to launch backtests, providing:
- Problem encoding: Each individual/solution in the population is a set of Gekko strategy parameters, encoded as a chromosome.
- Fitness function: The fitness of each individual is computed by running a backtest in Gekko and scoring the result (typically based on performance, risk, drawdown, etc.).
- Operators:
- Selection: Determines which individuals (parameter sets) breed the next generation, usually based on fitness ranking.
- Crossover: Combines two parent solutions to create a child solution (mixing parameters).
- Mutation: Randomly modifies some parameters in a solution to maintain diversity and explore the search space.
As we will discuss in a next article, with Genetic Algorithms, the population management is the key: controlling the number of individuals, rate of introduction of variation, and rate of generational replacement (who said it’s the same with societies ?).
Parameters
By default, we will be able to easily tune parameters such as:
populationAmt(population size),variation(proportion of new random individuals per generation),mutateElements(maximum number of parameters mutated per individual).
We will also need to research whether we can tweak:
- The Selection method (e.g., tournament, elitism)
- The Fitness function, which is by default based on profit, drawdown, or a combined score
General algorithm
Its very general algorithm is:
- Step 1: Parameter Generation
Gekkoga starts by generating a population of random sets of parameters for your chosen Gekko strategy (for example: MACD short/long/signal, thresholds, stoploss, etc.). - Step 2: Backtesting
For each parameter set in the population, Gekkoga uses Gekko’s API to run a backtest on your selected dataset. It records performance metrics like profit and Sharpe ratio. - Step 3: Epochs and Selection
After all backtests in the current population are complete (this is called an epoch), Gekkoga selects the top-performing parameter sets. These are considered the “winners” of the generation. - Step 4: Evolution — Crossover and Mutation
The winners are then used to produce a new generation of parameter sets by combining (crossover) and randomly altering some values (mutation). This simulates natural selection and genetic evolution. - Step 5: Iteration
This process—parameter generation, backtesting, selection, and evolution—repeats for many epochs. Over time, parameter sets generally improve and converge toward optimal values for your dataset. - Stopping & Results
You can stop the optimization whenever you wish, or let it run until improvement stalls (personally I always have to interrupt Gekkoga manually). Gekkoga exports the best results found as JSON for further analysis.
In short, Gekkoga fully automates the “trial-and-error” process of tuning Gekko strategies, using evolutionary techniques to optimize parameters with minimal human intervention. For advanced details and configuration, see the Gekkoga GitHub project.
Step 1: Gekkoga Installation
Let’s dive into the installation—it’s straightforward, but requires a fully functional Gekko setup. Do not try to use Gekkoga if you don’t already have a working Gekko installation and don’t yet master its use, otherwise, troubleshooting will be a nightmare (speaking from experience). We will install Gekkoga inside Gekko’s homedir (in this guide, i cloned my regular “gekko” installdir in a second “gekkoga” directory).
cd <gekko_installdir>
git clone https://github.com/gekkowarez/gekkoga.git
cd gekkoga
Now we need to deploy a fix made to make Gekkoga compatible with latest Gekko v0.6x we installed previously, as some changes were made in its API.
git fetch origin pull/49/head:49
git checkout 49
We manually download a fix in index.js to support nested Gekko’s parameters and fix a bug within mutations
mv index.js index.js.orig
curl -L -O https://raw.githubusercontent.com/gekkowarez/gekkoga/stable/index.js
We manually download a fix in package.json to support nested config-parameters
mv package.json package.json.orig
curl -L -O https://raw.githubusercontent.com/gekkowarez/gekkoga/stable/package.json
Then we install it. Once again, beware: don’t run ‘npm audit fix’ as suggested at the end of the npm install command below; it would break things.
npm install
Note: Gekkoga will need either a “full” Gekko’s to be launched or “just” it’s UI part (use the PM2 startup script start_ui.sh we created in Gekko’s installation post), or the API server which is found in <gekko_installdir>/web, and it will make an intensive use of it. This is why in Gekko’s installation post, I recommended to raise the stock timeouts in <gekko_installdir>/web/vue/dist/UIconfig.js and in
<gekko_installdir>/web/vue/public/UIconfig.js to 600000.
Step 2: Gekkoga Configuration
Create a specific config file
Gekkoga’s configuration file is located in <gekko_installdir>/config/. We will copy the original one to a new one dedicated to backtest our previously customized strategy (MyMACD) and symlink it with the name of the config file we defined in the start.sh script. It will make our life easier later when we will have new strategies to backtest: we will just need to copy in gekkoga/config one config file with the filename containing the name of the strat used, and update the symbolic link config/config-backtester.js to point on this specific config.file.
cp <gekko_installdir>/gekkoga/config/sample-config.js <gekko_installdir>/gekkoga/config/config-MyMACD-backtester.js
ln -s
<gekko_installdir>/gekkoga/config/config-MyMACD-backtester.js
<gekko_installdir>/gekkoga/config/config-backtester.js
Edit the config file to reflect Gekko’s basic parameters
Now we will edit <gekko_installdir>/gekkoga/config/config-MyMACD-backtester.js. It is not complicated BUT we will need to define EXACTLY the same parameters as in your gekko config file or toml file. Otherwise Gekkoga will start, but with no trades if anything is wrong. Beware of the typos, beware of the types of data you will use and their type (integer vs float) & eventual decimals.
Remember: Consistency between config files is crucial for successful runs with Gekkoga.
Hint: try to use as much integers as possible in your strategy parameters, and avoid floats when you can. This is why in our customized MACD Strat, I defined the stoploss percentage as an integer, and then in MyMACD.js when we need to use it, we divide it by 100. If we used a float to allow very accurate stoploss, it would have force us to tell Gekkoga to generate randomized floats, and even if we can try to fix the number of decimals used, the number of possible combinations and subsequent backtests to perform would be exponential. Also, the .toFixed(2) we will sometimes used in Gekkoga conf file is an artefact: the library used to generate the random numbers will actually generate floats with a much higher precision than 2 decimals, and next it will artificially truncate or round it to 2 digits. It means that Gekkoga will indeed perform a lot of backtests with the same float rounded to 2 digits, because the floats it actually generated in backend were indeed not equals (e.g., 2.00004 and 2.00577 will both be rounded to 2.00 but considered as two different individuals).
Tip: Avoid the use of floats for parameters where possible, as too many decimal places will exponentially increase the number of backtest combinations.
First we change the config section, once again we want it to reflect EXACTLY our gekko config file. Same parameters, same values.
const config = {
  stratName: 'MyMACD',
  gekkoConfig: {
    watch: {
      exchange: 'kraken',
      currency: 'EUR',
      asset: 'ETH'
    },
We use the scan functionnality to automatically use the full range of the dataset to use; and for now we want to test Gekkoga on the whole dataset. Later on when we know Gekkoka works, you will be able to change that in order to to reduce the dataset and reflect the testing strategy I explained before (test against specific segments/trends).
daterange: 'scan',

/*
 daterange: {
 from: '2018-01-01 00:00',
 to: '2018-02-01 00:00'
 },
*/
Now we update our balance and fees with which the tests will start to emulate the trades. Remember my old tip ? Even if i’m not sure Gekko is actually using it whern it simulates trades, I recommand to increase the slippage, to better reflect what happens on live market: when you place an order, it takes time to be executed, and during this time, the value of the asset you are trading will slip.
Tip: It is a decimal value: for a slippage rate of 5% you must write 0.05, and for a rate of 0.1% you must write 0.001.
simulationBalance: {
 'asset': 0,
 'currency': 100 //note that I changed this since initial confs in other posts
 },

slippage: 0.05,
feeTaker: 0.16,
feeMaker: 0.26,
feeUsing: 'taker', // maker || taker
The apiURL should be OK if you followed my previous guides.
apiUrl: 'http://localhost:3000',
Adjust Gekkoga’s Parallel Queries to your CPU
We won’t change -for now- the standard populationAmt, variation, mutateElements, minSharpe or mainObjective.
parallelqueries needs, however, to be updated to reflect your CPU configuration, as it is the number of parallel backtests Gekkoga will be able to launch. The more CPU you use, the better it is. But you definitely want to align this on your real number of available CPU. If you have 4 CPU or vCPUs, use 3 or -maximum- 4. With 4, your whole CPU capacity will be filled by Gekkoga, it could make your computer almost unusable for other tasks while Gekkoga is running (and your CPU fan will start to make noise). If you have a dedicated Gekoga computer this is fine, if you don’t, this may be a problem so consider a lower value. It’s up to you.
In my case,
- On my regular laptop, I have 1 CPU with 2 cores, but 4 cores are seen by the OS thanks to hyper threading, so I’ll use 3 as I want one CPU available for other tasks;
- At the time I’m writing this article, I tried to run Gekkoga on an Amazon EC2 t2.micro (one vCPU) with this setting to 1, I lost control on the VM and had to restart it;
- For this test I will launch it on my Intel NUC inside a VM powered with 2 vCPU, but I’ll keep the setting to 1 to not stress it too much as a NUC is not designed for intensive CPU computations (I’m afraid the fan won’t cool enough the case & CPU).
parallelqueries: 1,
Configure Gekkoga’s email notifications
If you want emails notifications you can enable the associated section:
// optionally recieve and archive new all time high every new all time high
  notifications: {
    email: {
      enabled: false,
      receiver: 'xxx.yyy@gmail.com',
      senderservice: 'gmail',
      sender: 'xxx.yyy@gmail.com',
      senderpass: '<passkey you have to configure on gmail>',
    },
  },
Configure ranges of values to be tested
Now we enter the interesting part. We will explain Gekkoga all the parameters we need our strategy to be filled with, and their values. If you enter a fixed value, Gekkoga will use this value all the time, in every backtest. It won’t change it. But we can also define:
- Some ranges of specific values, by using arrays, eg. [5,10,15,30,60,120,240]
- Its randomized choices will be limited to 5 or 10 or 15 or 30 or 60 or 120 or 240
- Useful for example to backtest against different candles sizes …
- Randomized values, by using functions as randomExt.integer(max, min) or randomExt.float(max, min).toFixed(2)
- It will pick a random integer between min & max, or a random float between min.00 & max.00
Reminder: did you notice the .toFixed(2) for floats ranges ? It forces the randomized float to be rounded to 2 decimals and this is the rounded value which will be used in Gekko’s backtest. But keep in mind that the float will still be generated with a higher number of digits, and 2.0003 or 2.0004 will in both cases be rounded to 2.00. It will lead to duplicate backtests. This is why I recommanded you to use as much integers as possible instead of floats.
First, the candleValues. I’m not really confident about short candles, but as the tool will test it for us, why would we not give it a try ?.
candleValues: [5,15,30,60,120,240,480,600,720],
Now the specific strategy parameters … Now, the specific strategic parameters… Note my optimization: I commented out the floating ranges for the upper and lower thresholds and replaced them with integers that I divide by 100.
  getProperties: () => ({

    historySize: randomExt.integer(50, 1),

    short: randomExt.integer(30,5),
    long: randomExt.integer(100,15),
    signal: randomExt.integer(20,6),

    thresholds: {
      //up: randomExt.float(20,0).toFixed(2),
      //down: randomExt.float(0,-20).toFixed(2),
      up: randomExt.integer(400,1)/100,
      down: randomExt.integer(1,-400)/100,
      persistence: randomExt.integer(9,0),
      stoploss: randomExt.integer(50,0),
    },

    candleSize: randomExt.pick(config.candleValues)
  })
Step 3: Tests & backtests
Before launching Gekkoga, remember you need to have a running instance of Gekko in the background, even if it does absolutely nothing (for now). The goal is to have Gekko’s API ready to receive Gekkoga’s calls, to launch backtests. In my case, i created a simple script in Gekko’s homedir, which will start an instance of gekko called “gekko_ui”. See my previous article.
Once you have your gekko instance running, let’s give Gekkoga a try …. we will need to carefully check the console information.
gekko@bitbot:~/gekkoga/gekkoga$ node run.js -c config/config-MyMACD-backtester.js

 No previous run data, starting from scratch!
 Starting GA with epoch populations of 20, running 1 units at a time! node run -c config/config-MyMACD-backtester.js
Woohoo ! It started. Now I stop it (CTRL-C) and will create a nice PM2 startup script as I want to easily make it run in the background and easily get information on it.
echo #!/bin/bash > start.sh
echo "rm logs/*" >> start.sh
echo "pm2 start run.js --name gekkogaMyMACD --log-date-format=\"YYYY-MM-DD HH:mm Z\" -e logs/err.log -o logs/out.log -- -c config/config-MyMACD-backtester.js max_old_space_size=8192 >> start.sh

chmod 755 start.sh
We restart it using this script …
./start.sh
pm2 ls

Let’s check its logs …

It’s running in the background, good. Now let’s have a look at Gekko’s UI logs as it is supposed to receive API calls from Gekkoga:
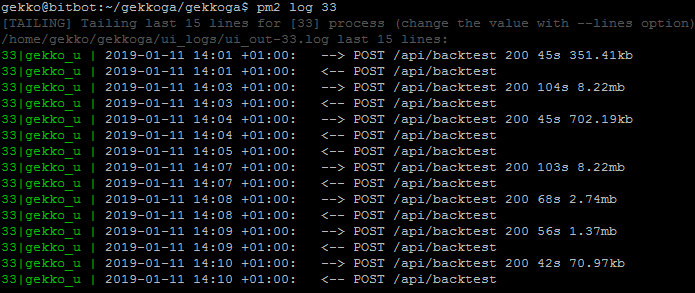
We can see some calls to the backtest API, perfect. Now let’s check other informations, while we are waiting for some first results:
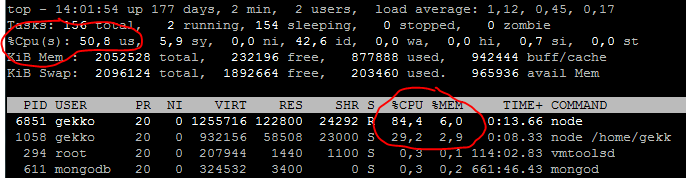
Conclusion: Gekkoga is pushing hard on one of the 2 vCPU this virtual machine is using, this is conform to what we defined in conf. Memory consumption is low.
And finally, 21 minutes later, the first epoch completed:

You can find an explanation of an epoch here. What we see here is the winner of this epoch, and Gekkoga keeps running to compute more and compare them. It logs the best combination found in <gekkoga_installdir>/results in a JSON format, so to display it we will use the jq utility (run ‘apt-get install jq‘ as root if you don’t have it yet):
cat results/config-MyMACD-backtester-EUR_ETH.json | jq

So we see here that the winner for now used a long value of 65, a short value of 29, a signal value of 9, 5mn candlesize (which strongly hurts my feelings 🙂 Most probably it is overfitting), 15 candles history size, an up threshold of 2.44, a down threshold of -2.13, a stoploss of 16% and a persistence of 0. Our Gekkoga config file using only integers is well formated !
Now, the sharpe is very high (wghich may be strange, see the chapter below), but in terms of estimated profits, on this whole dataset we actually performed better (1101%) than the market (817%), with 68 trades.
Now the problem is that it will take a very very .. very … long time to run. For now, I don’t have much more to say, we have to wait. At the same time we can continue to work on improving our knowledge about indicators and how they work, and imagine improvements to our strategy.
The only way to optimize the runtime seems to be to run Gekkoga & Gekko on more CPUs and adapt the parallelqueries setting. I’ve never done that before but it gave me the idea to try to make it run on an Amazon EC2 machine. This will be detailed in another article.
A word about the Sharpe ratio
What is the Sharpe Ratio ?
Sharpe is an economist. His ratio measures the performance of an investment strategy adjusted for risk. It answers the question “How much excess return do you obtain (compared to a risk-free rate) for each unit of risk taken?“. A higher ratio implies a higher investment return compared to the amount of risk of the investment.(source).
Classic formula: Sharpe = (Portfolio Return – Risk-free Rate) / Volatility
Portfolio Return: return of the strategy (usually annualized)Risk-free Rate: risk-free rate (typically short-term government bonds)Volatility: volatility (standard deviation) of the strategy’s returns
→ The higher the Sharpe, the more effective your strategy is in generating return per unit of risk.
It is an essential metric to compare strategies, as it takes into account both performance and volatility.
The Sharpe Ratio in Gekko Implementation
In Gekko, the Sharpe ratio is calculated inside the performanceAnalyzer plugin. The exact logic (code in plugins/performanceAnalyzer/performanceAnalyzer.js) is:
const sharpe = (relativeYearlyProfit - perfConfig.riskFreeReturn)
  / statslite.stdev(this.roundTrips.map(r => r.profit))
  / Math.sqrt(this.trades / (this.trades - 2));
Meaning:
- relativeYearlyProfit: your annualized strategy return after backtest
- perfConfig.riskFreeReturn: the risk-free rate set in configuration
- statslite.stdev(this.roundTrips.map(r => r.profit)): standard deviation of profits per roundtrip (i.e. complete buy+sell trades)
- Math.sqrt(this.trades / (this.trades – 2)): Bessel’s correction (for small sample sizes)
The value used for perfConfig.riskFreeReturn in Gekko comes directly from your configuration file (sample-config.js). You’ll find it in the configuration section, typically as follows:
config.performanceAnalyzer = {
  enabled: true,
  riskFreeReturn: 5
}- riskFreeReturn is the annual risk-free rate (in percent) that you set in the Gekko config. If you set
riskFreeReturn: 5, the bot will use the value 5 (meaning 5% per year) in the Sharpe ratio calculation.
The Sharpe ratio in Gekko is a yearly Sharpe ratio computed from actual “roundtrips” completed by the strategy during the backtest, just like financial literature recommends. This allows you to directly compare the “risk-adjusted returns” of your Gekko strategies, not just their raw profits.
Note (very important): an extremely high Sharpe (>2-3) in backtest can be a sign of overfitting or unrealistic data—always double-check on out-of-sample or live data (paper Trading).
Conclusion & Next Steps
Automating your Gekko strategy backtesting with Gekkoga is a huge step toward building more robust, efficient, and profitable trading algorithms. Still, always remember to:
- Review your results for signs of overfitting;
- Test on a variety of datasets and market trends;
- Invest time in learning about the underlying indicators and risk management techniques (including robust stop-losses).
Further Reading:
- How to Customize a Gekko Strategy (Step-by-Step Guide)
- Gekko Trading Bot Installation
- How to Safely Use the Gekko Trading Bot: From Backtest to Real Trading
- Running Gekkoga on Amazon EC2