This tutorial covers monitoring an uninterruptible power supply (UPS) using Jeedom: how to monitor it by connecting it via USB to the home automation hub. My current system uses a Jeedom running on a laptop (on battery power) which is itself powered by an Eaton Ellipse 1200 PRO UPS. You will therefore learn the key steps for managing both the status of the UPS and the monitoring of the laptop battery in Jeedom. Future guides will also show you how to monitor UPS devices remotely.
This tutorial builds on resources like this guide and this one, as well as an excellent article focused on the shutdown process here.
Plug the UPS, install & configure NUT
Checking UPS connection
Connect the UPS to your Jeedom controller using a USB cable. At the same time, monitor /var/log/messages to verify device detection.
jeedom@jeedom-stgreg2:~$ su -
Mot de passe :
root@jeedom-stgreg2:~# tail -f /var/log/messages
Aug 19 21:04:36 jeedom-stgreg2 kernel: [131160.232904] usb 2-3.4: new full-speed USB device number 7 using xhci_hcd
Aug 19 21:04:37 jeedom-stgreg2 kernel: [131161.016186] usb 2-3.4: New USB device found, idVendor=0463, idProduct=ffff, bcdDevice= 1.00
Aug 19 21:04:37 jeedom-stgreg2 kernel: [131161.016189] usb 2-3.4: New USB device strings: Mfr=1, Product=2, SerialNumber=4
Aug 19 21:04:37 jeedom-stgreg2 kernel: [131161.016190] usb 2-3.4: Product: Ellipse PRO
Aug 19 21:04:37 jeedom-stgreg2 kernel: [131161.016191] usb 2-3.4: Manufacturer: EATON
Aug 19 21:04:37 jeedom-stgreg2 kernel: [131161.016192] usb 2-3.4: SerialNumber: xxxxxxxxxxx
Aug 19 21:04:37 jeedom-stgreg2 mtp-probe: checking bus 2, device 7: "/sys/devices/pci0000:00/0000:00:14.0/usb2/2-3/2-3.4"
Aug 19 21:04:37 jeedom-stgreg2 mtp-probe: bus: 2, device: 7 was not an MTP device
Aug 19 21:04:37 jeedom-stgreg2 kernel: [131161.035286] hidraw: raw HID events driver (C) Jiri Kosina
Aug 19 21:04:41 jeedom-stgreg2 kernel: [131164.860060] usbcore: registered new interface driver usbhid
Aug 19 21:04:41 jeedom-stgreg2 kernel: [131164.860063] usbhid: USB HID core driver
Aug 19 21:04:41 jeedom-stgreg2 mtp-probe: checking bus 2, device 7: "/sys/devices/pci0000:00/0000:00:14.0/usb2/2-3/2-3.4"
Aug 19 21:04:41 jeedom-stgreg2 mtp-probe: bus: 2, device: 7 was not an MTP device
Aug 19 21:04:41 jeedom-stgreg2 kernel: [131164.874069] hid-generic 0003:0463:FFFF.0001: hiddev0,hidraw0: USB HID v1.10 Device [EATON Ellipse PRO] on usb-0000:00:14.0-3.4/input0Installing & configuring NUT
Install the NUT package:
root@jeedom-stgreg2:~# apt-get install nutEdit /etc/nut/ups.conf to configure the appropriate driver for your UPS. In my case, the Eaton model is supported by the standard NUT driver. See the NUT compatibility list to check support for your device.
Create a new section in the config file for the UPS, as in this example. Since my UPS is USB-connected, I set the port to auto.
Note: Don’t use spaces in the section name (the term inside the brackets
[ ]).
[Eaton_Ellipse_1200_Pro]
    driver = usbhid-ups
    port = auto
    pollonly
    desc = "Eaton Ellipse 1200 Pro"
Now, ensure that NUT-Server detects your UPS:
root@jeedom-stgreg2:~# upsdrvctl start
Network UPS Tools - UPS driver controller 2.7.4
Network UPS Tools - Generic HID driver 0.41 (2.7.4)
USB communication driver 0.33
Using subdriver: MGE HID 1.39
Let NUT know you are working in standalone mode by setting this in /etc/nut/nut.conf:
MODE=standaloneConfigure /etc/nut/upsd.conf with your server’s IP address so other clients can connect to the NUT server. The MAXAGE parameter helps avoid data being considered stale if updates are infrequent.
MAXAGE 30
LISTEN 127.0.0.1 3493
LISTEN 0.0.0.0 3493
LISTEN ::1 3493
Note: Listening on 127.0.0.1 may seem redundant with 0.0.0.0, and the daemon status may even say it is not listening on 127.0.0.1. However, if you remove the LISTEN 127.0.0.1 line, the daemon complains about the /var/run/nut/upsd.pid file. For now, I keep this line to avoid issues.
Now, create a new user in the upsd.users file—let’s call him ‘admin’ and grant full “master” privileges:
[admin]
        password = YourAdminPassword
        upsmon master
        actions = SET
        instcmds = ALL
Configure /etc/nut/upsmon.conf by adding a MONITOR line for the admin user and set up notification options:
MONITOR Eaton_Ellipse_1200_Pro@localhost 1 admin YourAdminPassword master
MINSUPPLIES 1
POWERDOWNFLAG /etc/nut/killpower
#SHUTDOWNCMD "/sbin/shutdown -P +0"

HOSTSYNC 15
FINALDELAY 30
DEADTIME 15

NOTIFYCMD /sbin/upssched

NOTIFYMSG ONLINE    "UPS %s on line power"
NOTIFYMSG ONBATT    "UPS %s on battery"
NOTIFYMSG LOWBATT   "UPS %s battery is low"
NOTIFYMSG FSD       "UPS %s: forced shutdown in progress"
NOTIFYMSG COMMOK    "Communications with UPS %s established"
NOTIFYMSG COMMBAD   "Communications with UPS %s lost"
NOTIFYMSG SHUTDOWN  "UPS %s is going offline - System will now run on its own batteries !"
NOTIFYMSG REPLBATT  "UPS %s battery needs to be replaced"
NOTIFYMSG NOCOMM    "UPS %s is unavailable"
NOTIFYMSG NOPARENT  "upsmon parent process died - shutdown impossible"

NOTIFYFLAG ONLINE   SYSLOG+WALL+EXEC
NOTIFYFLAG ONBATT   SYSLOG+WALL+EXEC
NOTIFYFLAG LOWBATT  SYSLOG+WALL
NOTIFYFLAG FSD      SYSLOG+WALL+EXEC
NOTIFYFLAG COMMOK   SYSLOG+WALL+EXEC
NOTIFYFLAG COMMBAD  SYSLOG+WALL+EXEC
NOTIFYFLAG SHUTDOWN SYSLOG+WALL+EXEC
NOTIFYFLAG REPLBATT SYSLOG+WALL
NOTIFYFLAG NOCOMM   SYSLOG+WALL+EXEC
NOTIFYFLAG NOPARENT SYSLOG+WALL

RBWARNTIME 43200

NOCOMMWARNTIME 600

FINALDELAY 5
Note that on the first line, we here use the UPS name defined in ups.conf above, AND the user/password defined in upsd.user above too.
Now, here’s the first specific tweak due to the fact that the Jeedom controller runs on a laptop: we do NOT want the system to shut down immediately when upsmon detects the UPS is on low battery. The laptop has its own battery, which can keep it running for some additional hours. That’s why the SHUTDOWNCMD line is commented out in this setup. Normally, this command would tell upsmon to shut down the host (the Jeedom laptop in our case) automatically when the UPS reaches a critical battery level.
Check and fix the permissions on the NUT configuration files to ensure proper access:
root@jeedom-stgreg2:~# chown root:nut /etc/nut/*
root@jeedom-stgreg2:~# chmod 640 /etc/nut/*
Enable the NUT server to start automatically on boot:
root@jeedom-stgreg2:~# systemctl enable nut-server
Synchronizing state of nut-server.service with SysV service script with /lib/systemd/systemd-sysv-install.
Executing: /lib/systemd/systemd-sysv-install enable nut-server
Start the NUT server:
root@jeedom-stgreg2:~# service nut-server startCheck if it started successfully:
root@jeedom-stgreg2:~# service nut-server statusYou should see a “running” status, with your UPS device listed:
● nut-server.service - Network UPS Tools - power devices information server
   Loaded: loaded (/lib/systemd/system/nut-server.service; enabled; vendor preset: enabled)
   Active: active (running) since Sat 2022-09-03 08:15:46 CEST; 3min 6s ago
  Process: 3200 ExecStart=/sbin/upsd (code=exited, status=0/SUCCESS)
 Main PID: 3201 (upsd)
    Tasks: 1 (limit: 4915)
   Memory: 876.0K
   CGroup: /system.slice/nut-server.service
           └─3201 /lib/nut/upsd

sept. 03 08:15:46 jeedom-stgreg2 upsd[3200]: listening on 0.0.0.0 port 3493
sept. 03 08:15:46 jeedom-stgreg2 upsd[3200]: not listening on 127.0.0.1 port 3493
sept. 03 08:15:46 jeedom-stgreg2 upsd[3200]: listening on ::1 port 3493
sept. 03 08:15:46 jeedom-stgreg2 upsd[3200]: listening on 0.0.0.0 port 3493
sept. 03 08:15:46 jeedom-stgreg2 upsd[3200]: not listening on 127.0.0.1 port 3493
sept. 03 08:15:46 jeedom-stgreg2 upsd[3200]: Connected to UPS [Eaton_Ellipse_1200_Pro]: usbhid-ups-Eaton_Ellipse_1200_Pro
sept. 03 08:15:46 jeedom-stgreg2 upsd[3200]: Connected to UPS [Eaton_Ellipse_1200_Pro]: usbhid-ups-Eaton_Ellipse_1200_Pro
sept. 03 08:15:46 jeedom-stgreg2 upsd[3201]: Startup successful
sept. 03 08:15:46 jeedom-stgreg2 systemd[1]: Started Network UPS Tools - power devices information server.
sept. 03 08:15:50 jeedom-stgreg2 upsd[3201]: User admin@::1 logged into UPS [Eaton_Ellipse_1200_Pro]
List recognized UPS devices:
root@jeedom-stgreg2:~# upsc -l
Init SSL without certificate database
Eaton_Ellipse_1200_Pro
Display detailed UPS status:
root@jeedom-stgreg2:~# upsc Eaton_Ellipse_1200_Pro@localhost
Init SSL without certificate database
battery.charge: 100
battery.charge.low: 20
battery.runtime: 2682
battery.type: PbAc
device.mfr: EATON
device.model: Ellipse PRO 1200
device.serial: xxxxxxxxxxxxxxxx
device.type: ups
driver.flag.pollonly: enabled
driver.name: usbhid-ups
driver.parameter.pollfreq: 30
driver.parameter.pollinterval: 2
driver.parameter.port: auto
driver.parameter.synchronous: no
driver.version: 2.7.4
driver.version.data: MGE HID 1.39
driver.version.internal: 0.41
input.frequency: 50.0
input.transfer.high: 285
input.transfer.low: 165
input.voltage: 237.0
input.voltage.extended: no
outlet.1.desc: PowerShare Outlet 1
outlet.1.id: 2
outlet.1.status: on
outlet.1.switchable: no
outlet.2.desc: PowerShare Outlet 2
outlet.2.id: 3
outlet.2.status: on
outlet.2.switchable: no
outlet.desc: Main Outlet
outlet.id: 1
outlet.switchable: no
output.frequency: 50.0
output.frequency.nominal: 50
output.voltage: 242.0
output.voltage.nominal: 230
ups.beeper.status: enabled
ups.delay.shutdown: 20
ups.delay.start: 30
ups.firmware: 01.18.0022
ups.load: 11
ups.mfr: EATON
ups.model: Ellipse PRO 1200
ups.power: 139
ups.power.nominal: 1200
ups.productid: ffff
ups.realpower: 0
ups.serial: xxxxxxxxxxxxxxx
ups.status: OL
ups.timer.shutdown: 0
ups.timer.start: 0
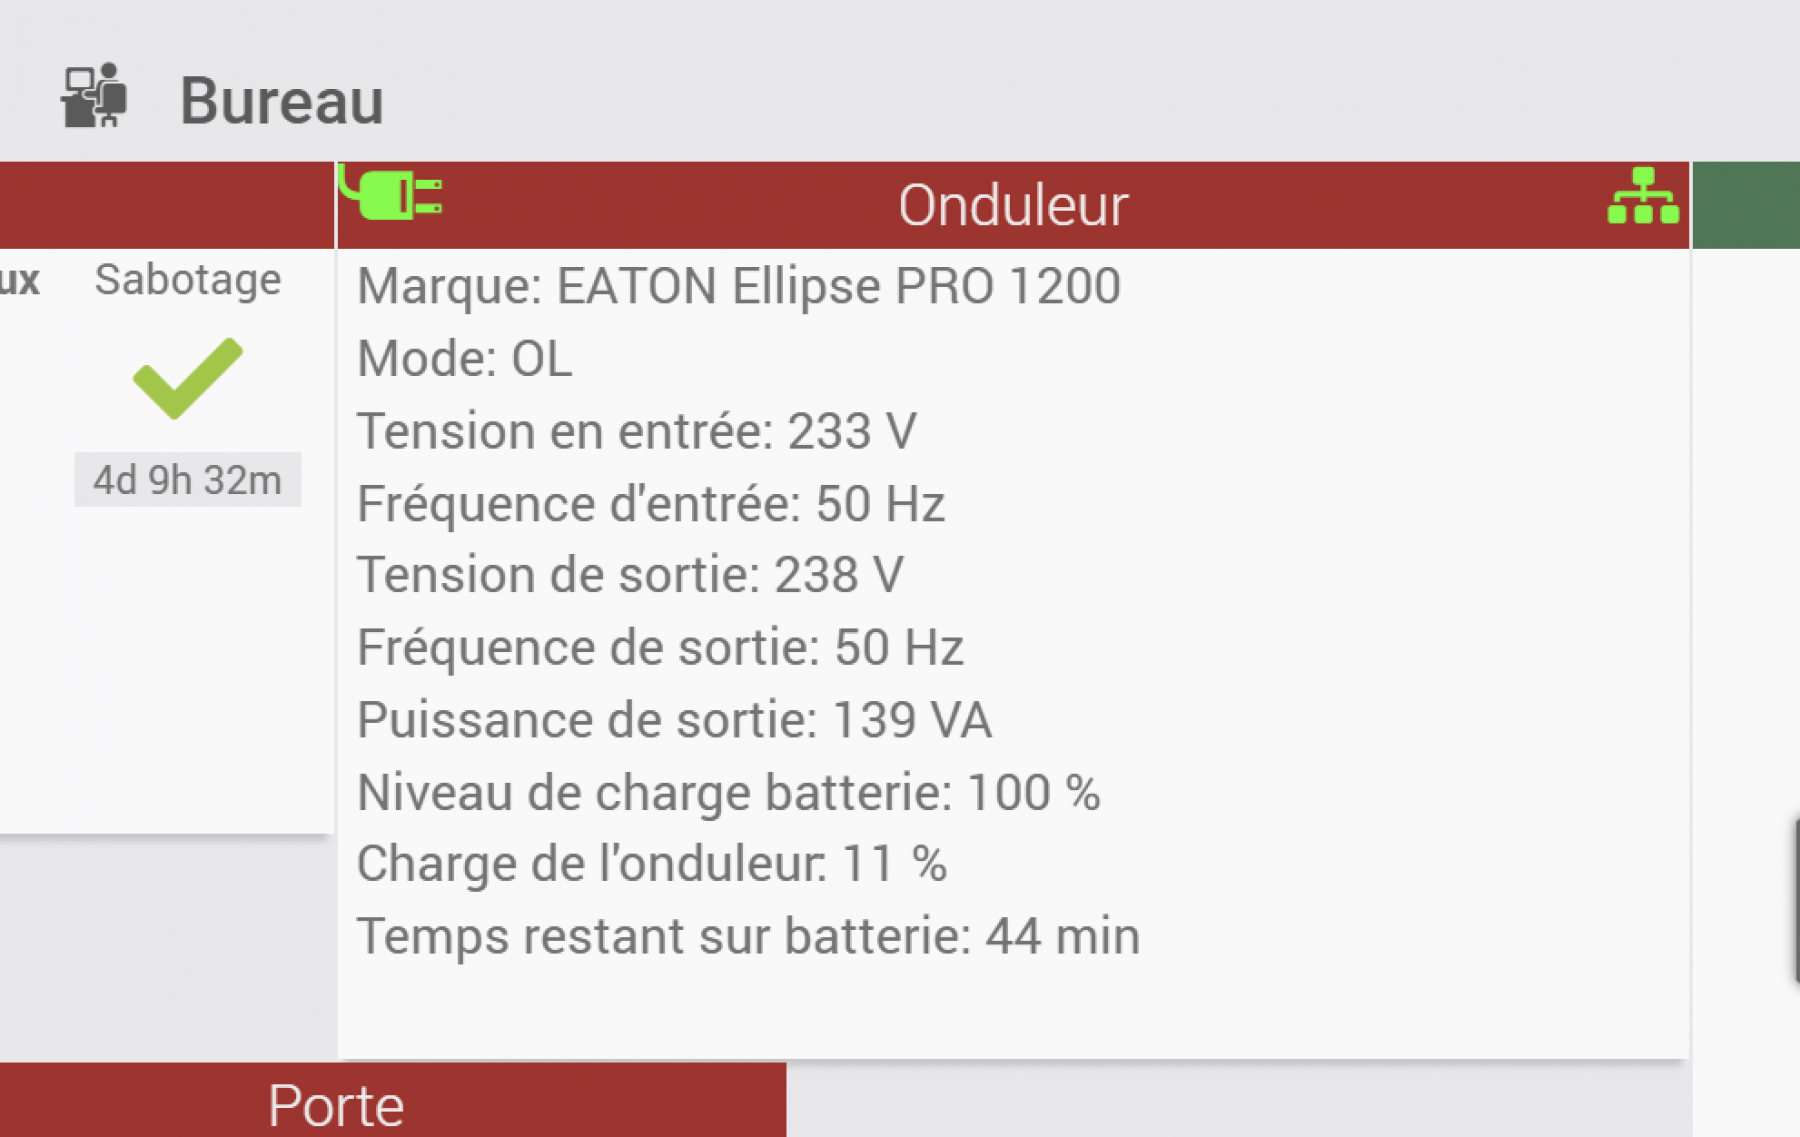
ups.vendorid: 0463You should now see various details about your UPS, including battery level and operational state.
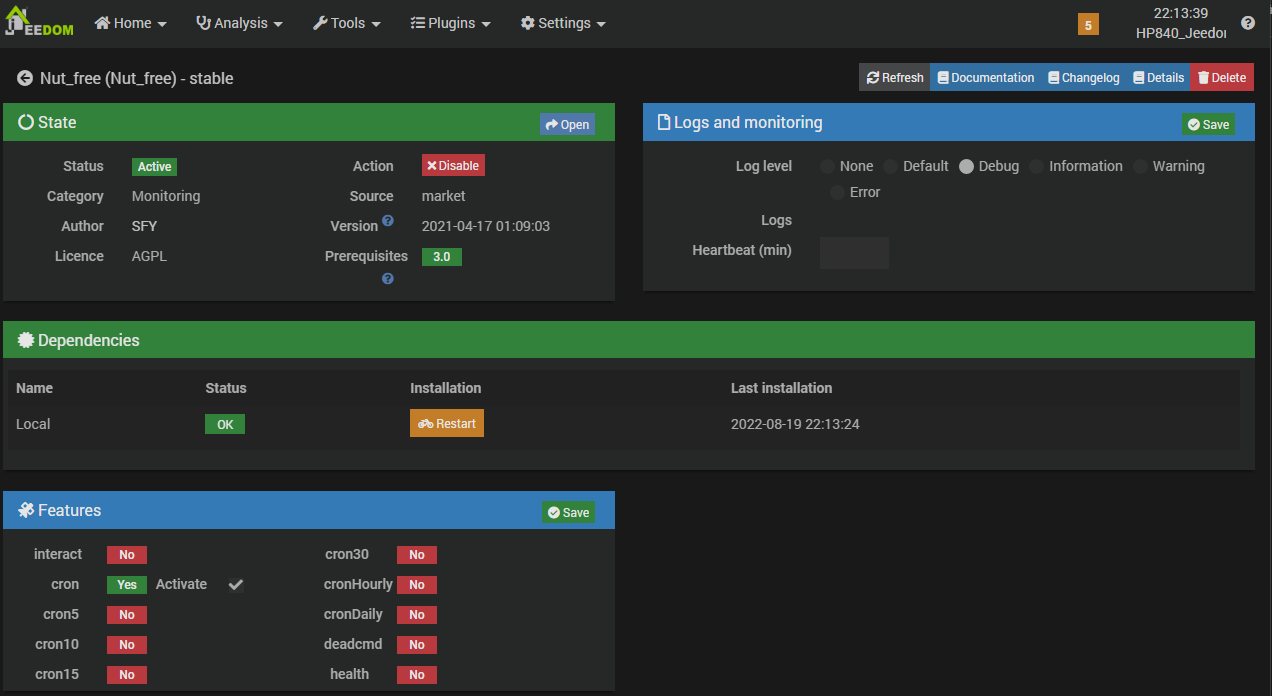
Install the Nut_free plugin in Jeedom
Now, let’s integrate your UPS with Jeedom using the Nut_Free plugin from the Jeedom Market.

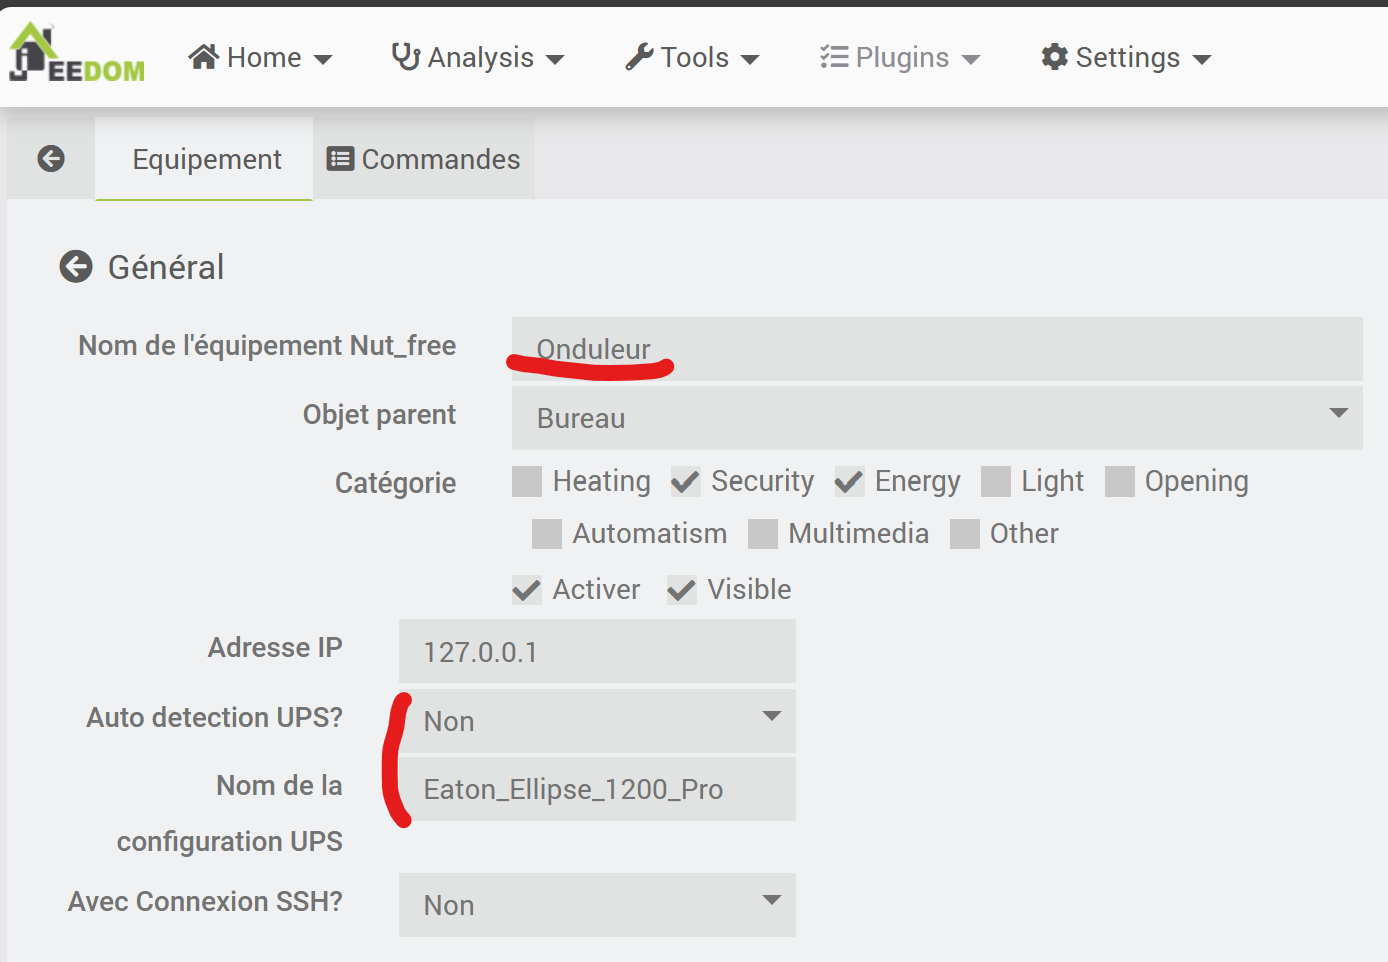
Note: Although autodetection is usually possible, I chose to use a different name for the equipment than the UPS name defined in NUT. As a result, I disabled autodetection and instead specified the UPS configuration name explicitly—matching the name set in
/etc/nut/ups.conf.
When you save this equipment, the plugin uses the same upsc command as earlier to check the UPS status and creates the relevant commands in your Jeedom equipment.
After tweaking which commands to display, here’s how the resulting widget looks on Jeedom’s main dashboard:
Specific Tweaks for Using a Laptop as Jeedom Host
Because my Jeedom controller runs on a laptop, I had to disable or adjust several system behaviors:
- Comment out the SHUTDOWNCMD line in
/etc/nut/upsmon.confas explained earlier - Disable suspend and hibernation modes:
systemctl mask sleep.target suspend.target hibernate.target hybrid-sleep.targetIt’s also necessary to tell logind to ignore suspend, hibernate, and lid-close events. Add these lines to /etc/systemd/logind.conf and restart logind:
HandleSuspendKey=ignore
HandleHibernateKey=ignore
HandleLidSwitch=ignore
HandleLidSwitchExternalPower=ignore
HandleLidSwitchDocked=ignore
systemctl restart systemd-logind- Disable USB autosuspend
Edit the /etc/default/grub file and modify the GRUB_CMDLINE_LINUX_DEFAULT line to add the usbcore.autosuspend=-1 option:
GRUB_CMDLINE_LINUX_DEFAULT="quiet usbcore.autosuspend=-1"Save the file, update grub:
update-grubReboot. After rebooting, check the change (the following should return -1; previously my system returned 2):
cat /sys/module/usbcore/parameters/autosuspendUPS Monitoring & notification
To get notified when the UPS state changes, set up a series of Jeedom scenarios. The simplest way to track UPS status is to use the Nut_free “UPS Mode” command in your UPS equipment. It has two key states: OL (On Line) and OB (On Battery). When the status switches to “On Battery”, you can use additional commands to decide whether you should shut down Jeedom or take other actions—especially if the battery drops below a set threshold.
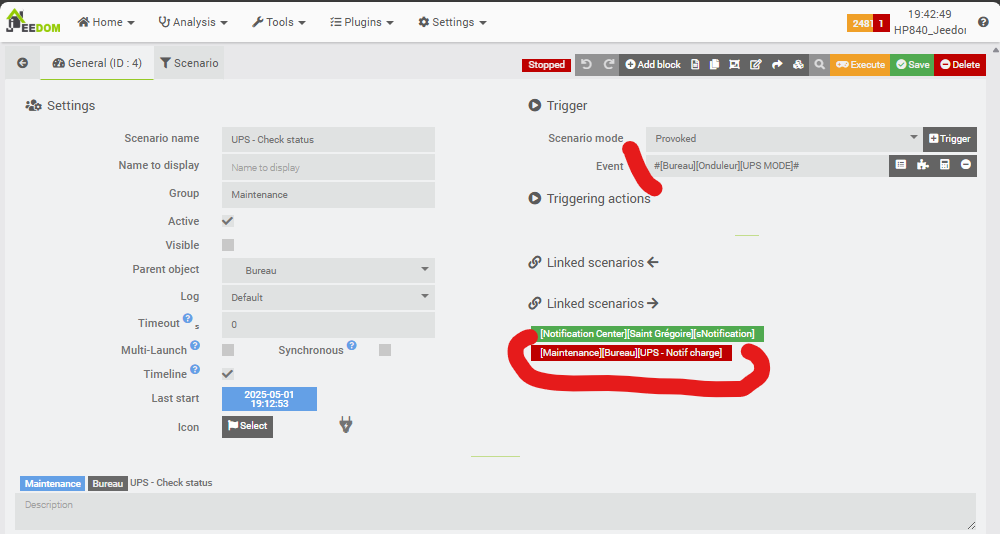
In this first scenario, notice 1/ the trigger (provoked, and binded to the UPS MODE command), and 2/ the fact that Jeedom displays a second scenario linked to this one, called “UPS – Notif charge”. This second scenario is activated and launched only when we need to receive recurrent notifications with battery level.
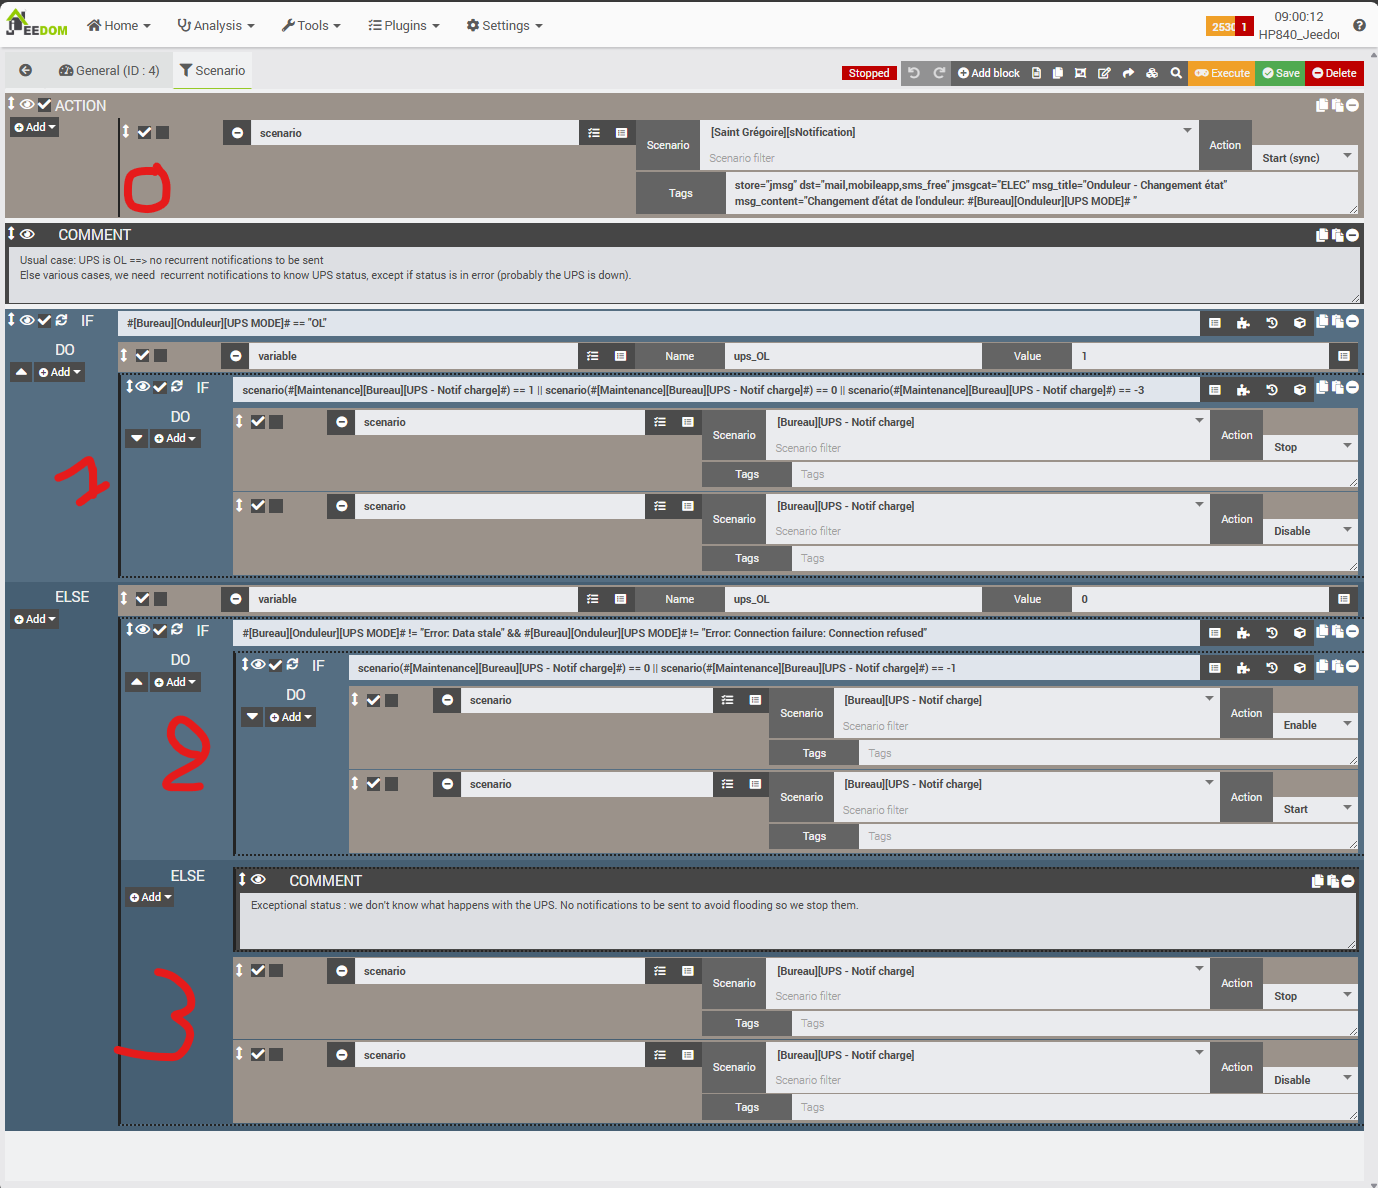
Here’s how the main logic works:
- First (Step 0): Entering this scenario means the UPS state changed (because it is triggered by the UPS Mode command), so an alert is sent. For notifications (email, SMS, etc.) I use a custom scenario I developped called “sNotification,” which sends the message by various channels and explains, in current case, the status change.
- Next (Step 1): Test if the UPS is back online (OL). If true:
- Set a tracking variable to 1 (for use elsewhere, if needed).
- If the notification scenario “UPS – Notif Charge” is enabled, stop and disable it (optionally, you could keep it running for a few minutes to monitor charging).
- If the status is not OL, we set our tracking variable to 0 and we check the UPS isn’t in error (that is, it’s running on battery but still monitorable).
- If OK and “UPS – Notif Charge” is inactive, enable and start it—to receive periodic battery updates.
- If an error occurs (UPS on battery but data can’t be monitored), stop and disable “UPS – Notif Charge” to avoid being flooded with alerts until resolved.
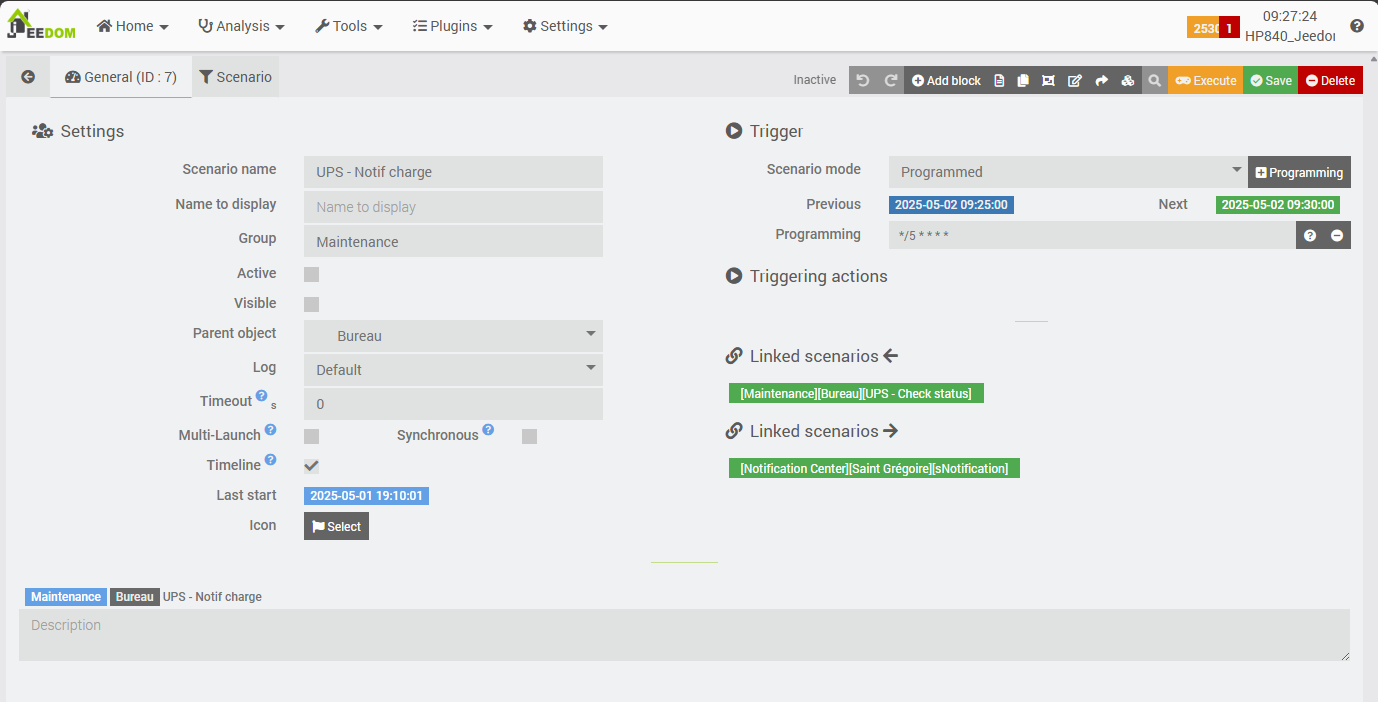
Let’s look at the second scenario. This one does not have its own direct trigger (“Programmed” scenario type): it is activated or disabled by the “UPS – check status” scenario, and, once active, it runs automatically every 5 minutes. (In the screenshot, you can see the “Active” checkbox is not checked.)
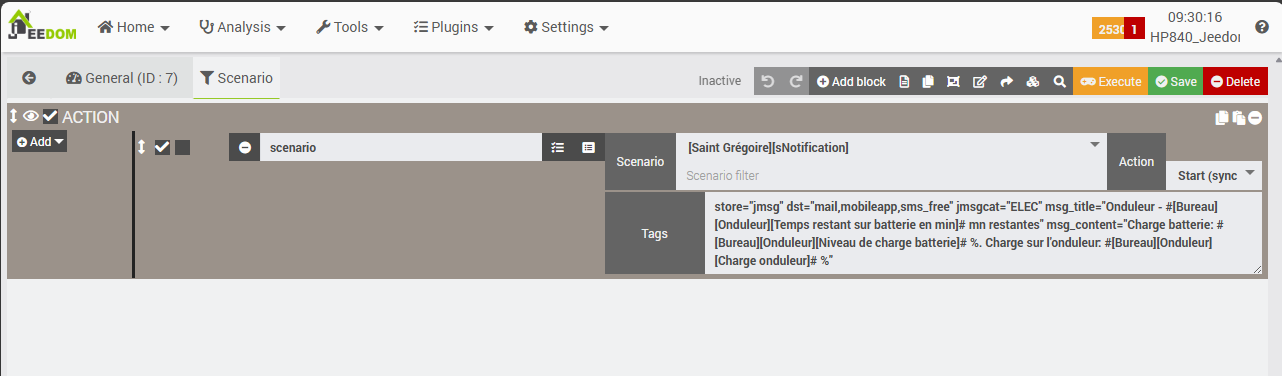
The logic is straightforward: it uses my sNotification scenario to send an alert (via email, SMS, and the Jeedom mobile app) that includes the current UPS charge level and estimated time before shutdown.
With these two scenarios and the UPS configured as described, you now already have a reliable system for monitoring the UPS and sending alerts that is fully automated.. However, since this Jeedom controller runs on a laptop, once the UPS runs out, the laptop will also switch from “Online” to “On Battery” status. So we also need to monitor the laptop’s own battery and state before deciding to safely shut down Jeedom —just in case both batteries reach critical level. The following scenarios cover that.
Laptop’s Battery Monitoring & notifications
For the laptop’s battery, you’ll also want to use multiple scenarios, and create one Virtual component (using the free “Virtual” plugin from Jeedom’s market):
- The Virtual component reflects the laptop battery’s status and centralizes all related information (using “info” commands that can be referenced in other Jeedom scenarios).
- A scenario called “Laptop battery – get data” runs a system command to collect battery info and updates the Virtual component every 5 minutes.
- A scenario called “Laptop battery – Check status” that monitors whether the laptop’s AC power is working or whether it is using its battery, based on the virtual component.
- A final scenario, “Laptop battery – Notif charge”, is triggered on demand by the “Check status” scenario—it sends regular notifications and, this time, will properly shut down Jeedom if both UPS and laptop batteries approach critical level.
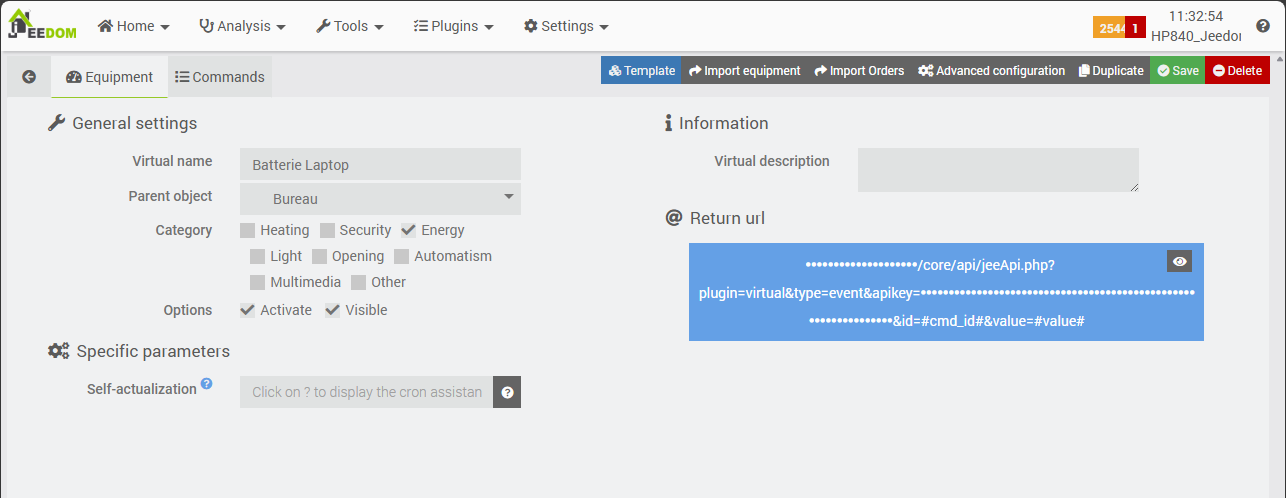
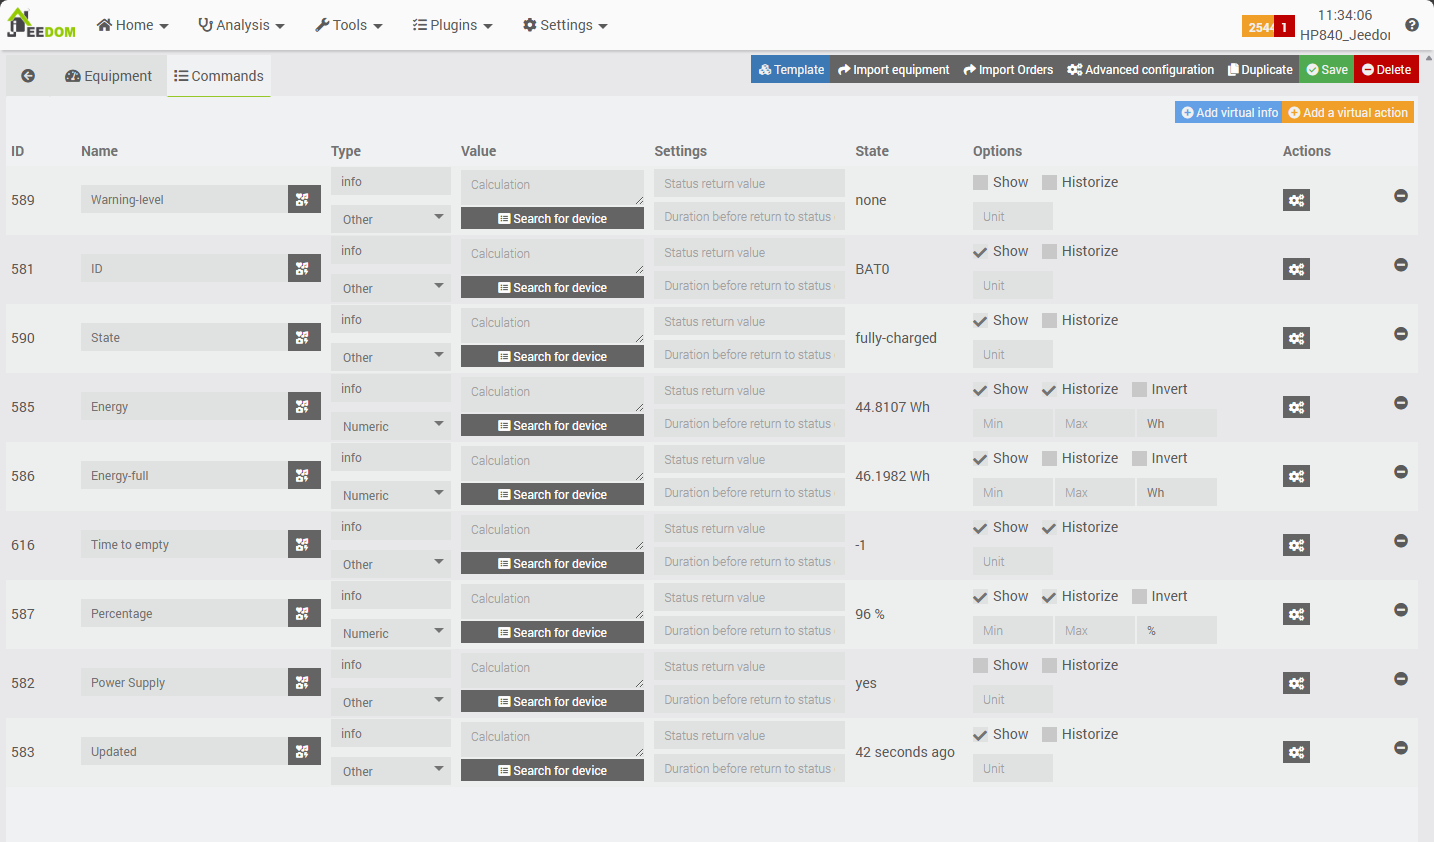
This Virtual component makes it easy to collect and use laptop battery data within Jeedom: all its commands can be reused by other components, scenarios, and automations. To feed it live data, you’ll need a scenario that runs an OS command to get battery stats.
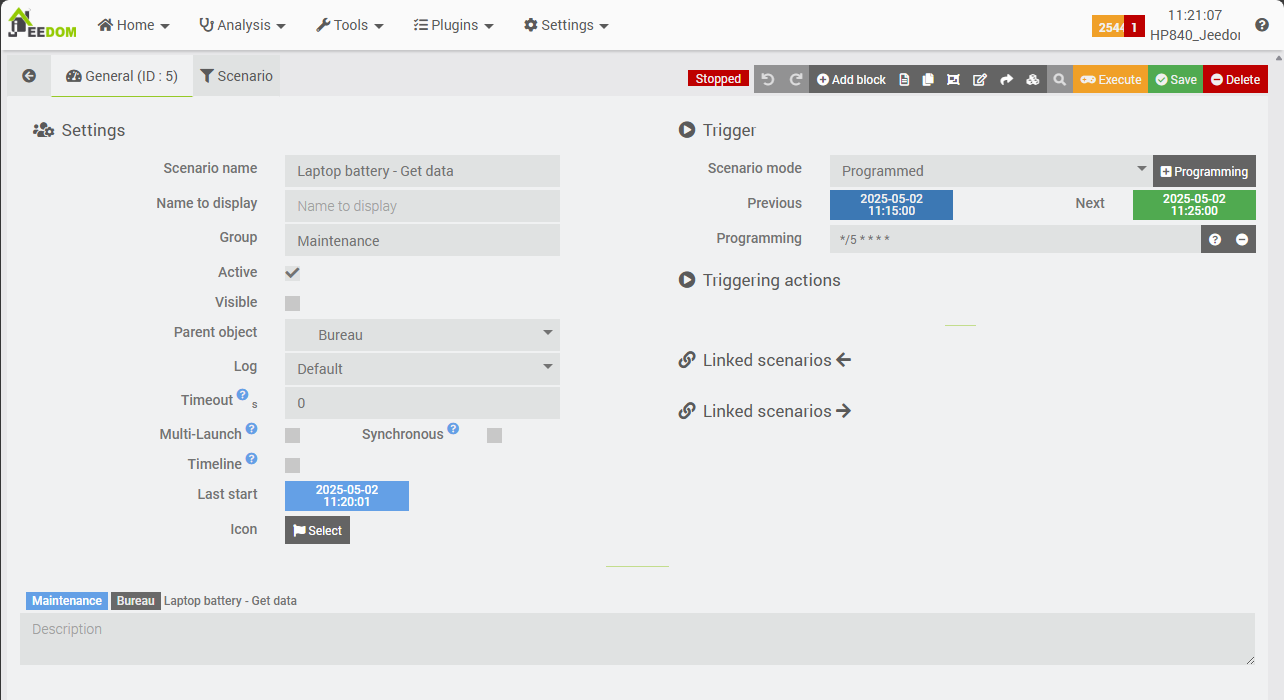
As shown, this scenario isn’t event-triggered (“Programmed” mode); it runs automatically every 5 minutes.
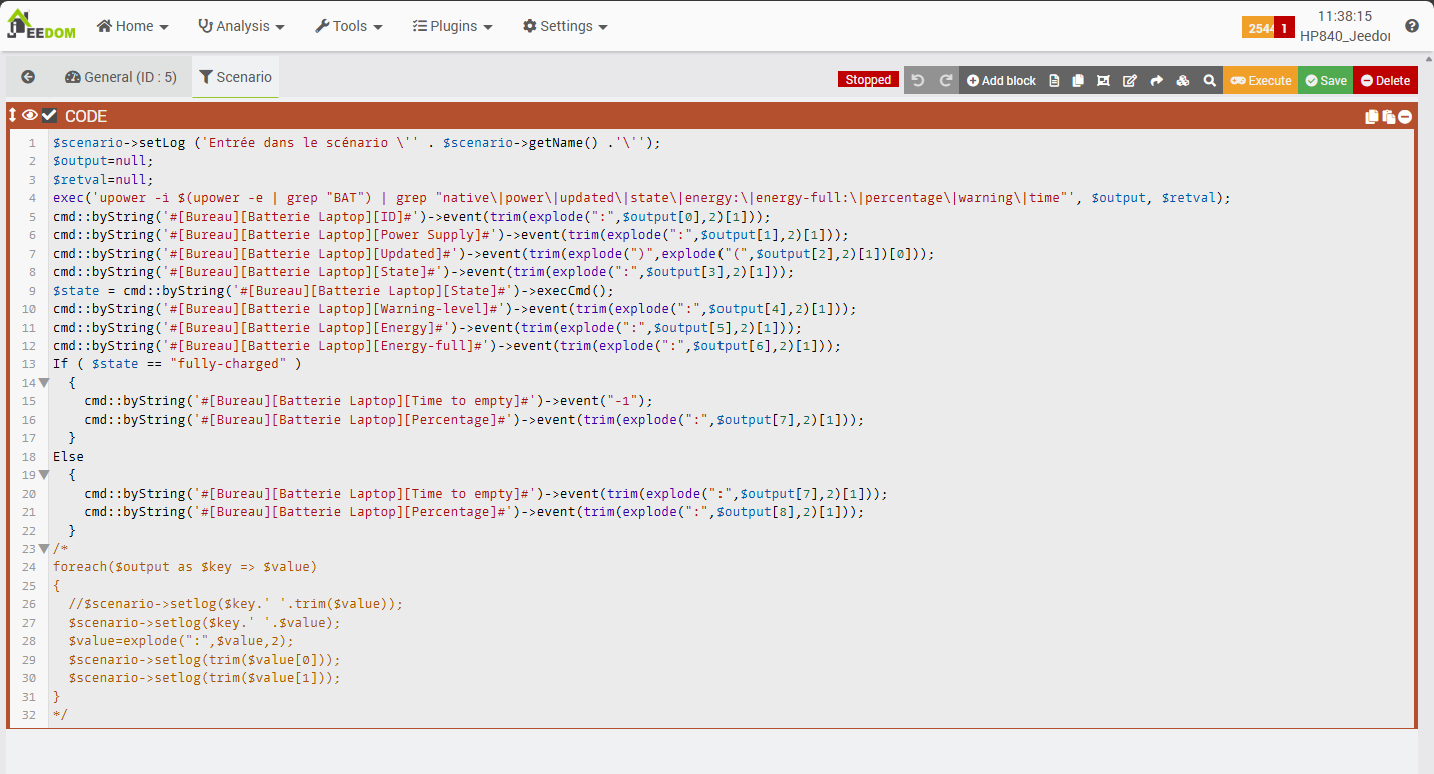
The process is simple: it executes the upower OS command, filters out the required data, and updates each field in the Virtual component with that output. Depending on whether the battery is fully charged, it uses different rows to populate the correct Virtual commands.
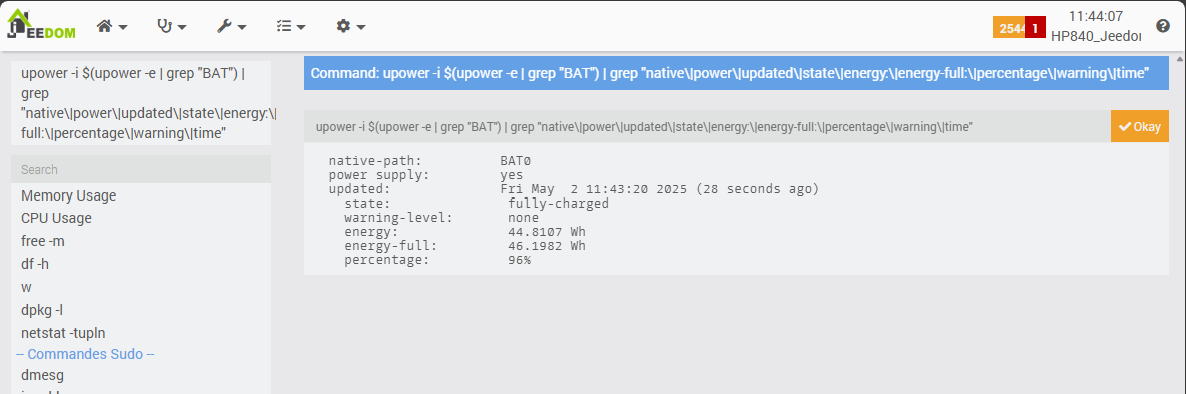
The command used is upower -i $(upower -e | grep "BAT") | grep "native|power|updated|state|energy:|energy-full:|percentage|warning|time"
This command extracts the relevant laptop battery information. You can test it in Jeedom’s system administration menu, which lets you send OS commands and view their outputs.
The output is typically seven lines of text—but if the battery isn’t fully charged, there’s sometimes an eighth row. To parse the ouput, we use a set of Jeedom commands like the following:
cmd::byString('#[Bureau][Batterie Laptop][ID]#')->event(trim(explode(":",$output[0],2)[1]));- The
explode()function splits the first line (e.g. “native-path: BAT0”) and selects the second value after the colon. - The
trim()command eliminates any extra spaces. - Then,
cmd::byString(...)->event(...)updates the corresponding Virtual command.
Repeat this process for every output line. Be sure to also process the “state” data, so you can update “Time to empty” and “Percentage” fields accurately in your Virtual component.
Once activated, this scenario provides up-to-date laptop battery data to the Virtual component every 5 minutes. Now you can set up your monitoring and alerting scenario for the laptop’s battery —almost identical in logic to the UPS scenario above.
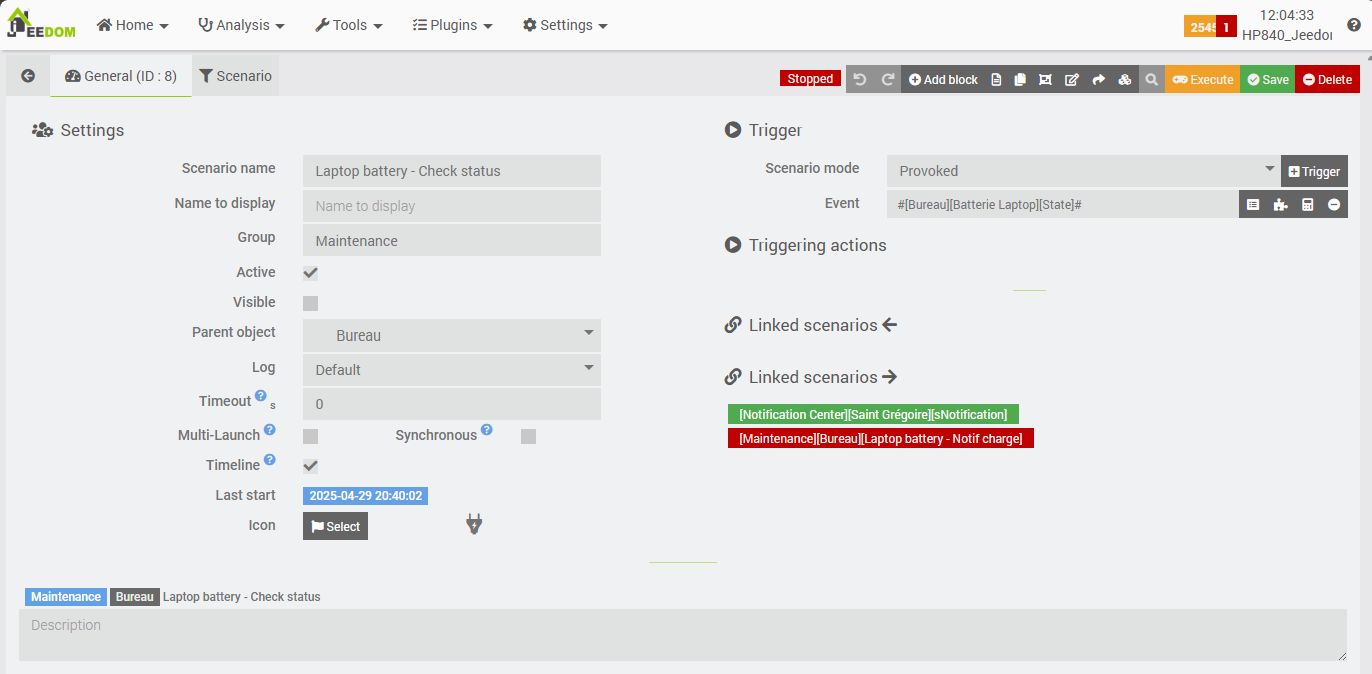
Note: This scenario is “Provoked” (event-driven), and its trigger is set to “State” in the Virtual component.
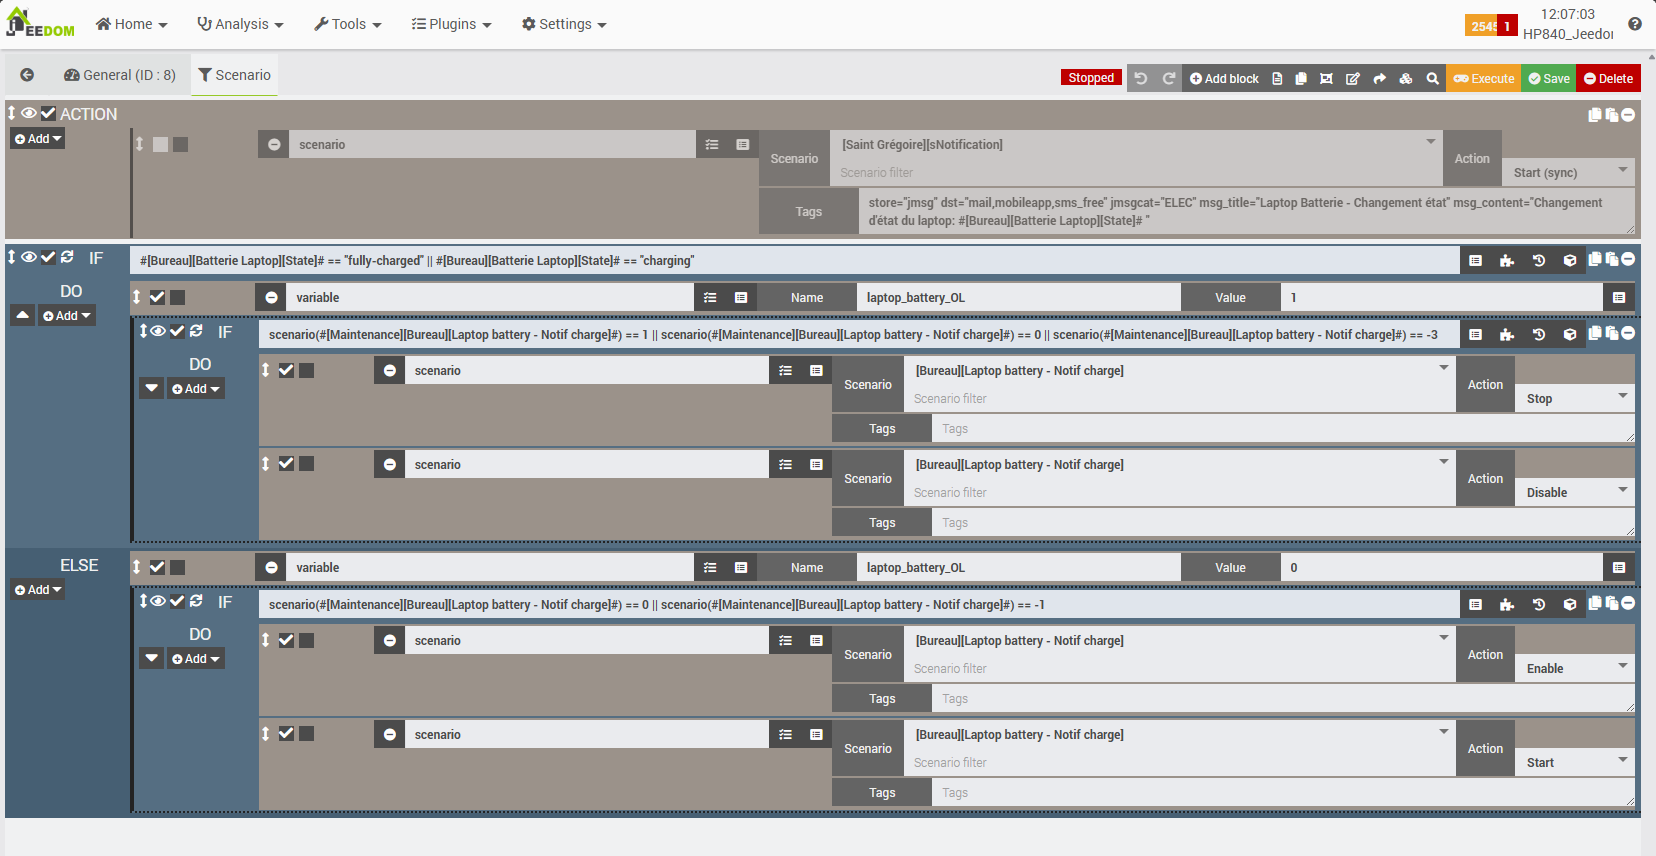
The logic is straightforward and similar to the UPS scenario:
- If the battery state is “fully charged” or “charging”, it stops and disables the “Laptop battery – Notif charge” alerting scenario.
- Otherwise, it enables periodic notifications by activating and starting the “Laptop battery – Notif charge” scenario.
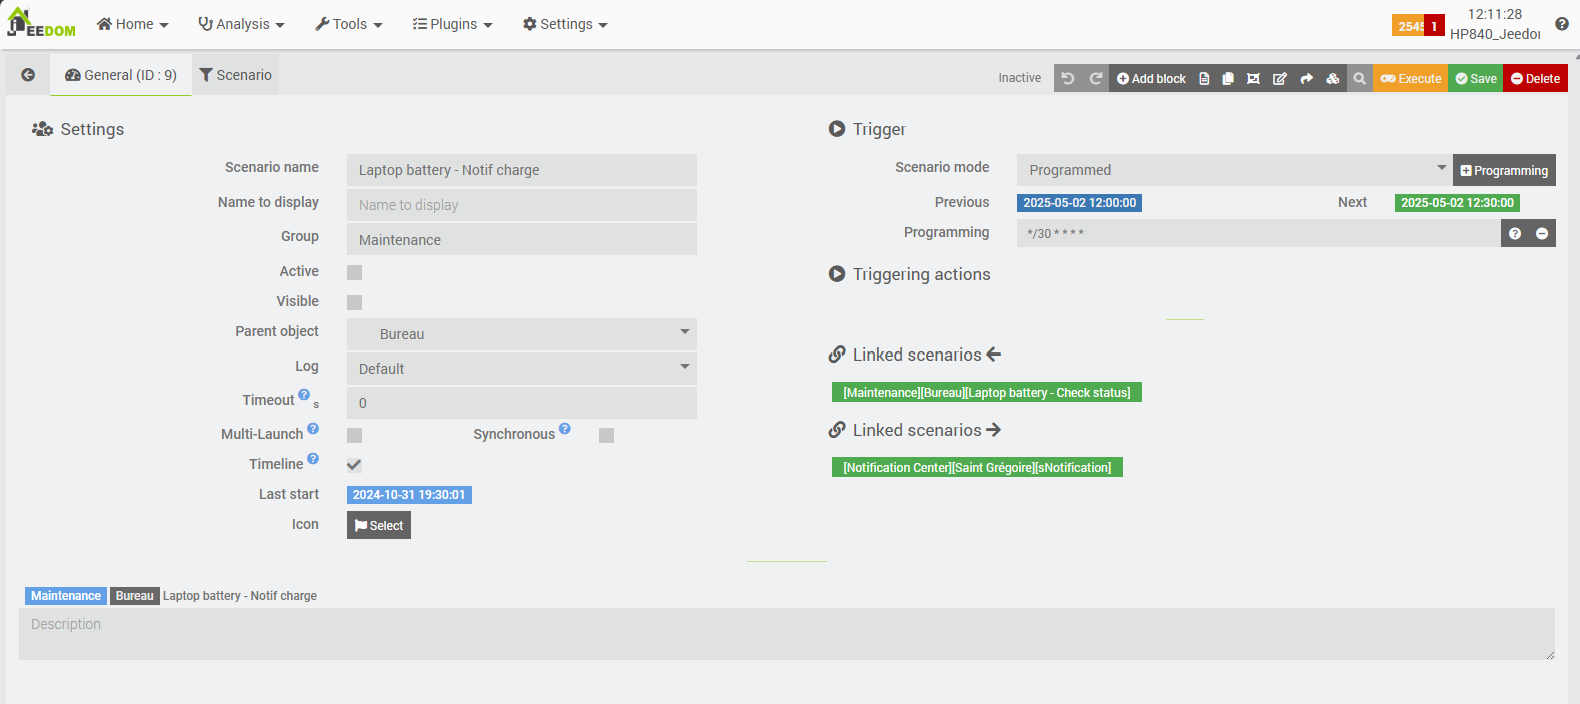
Once again, just as with the UPS, this scenario is not active by default (the “Activate” checkbox is not selected). When started, it’s programmed to run every 30 minutes.
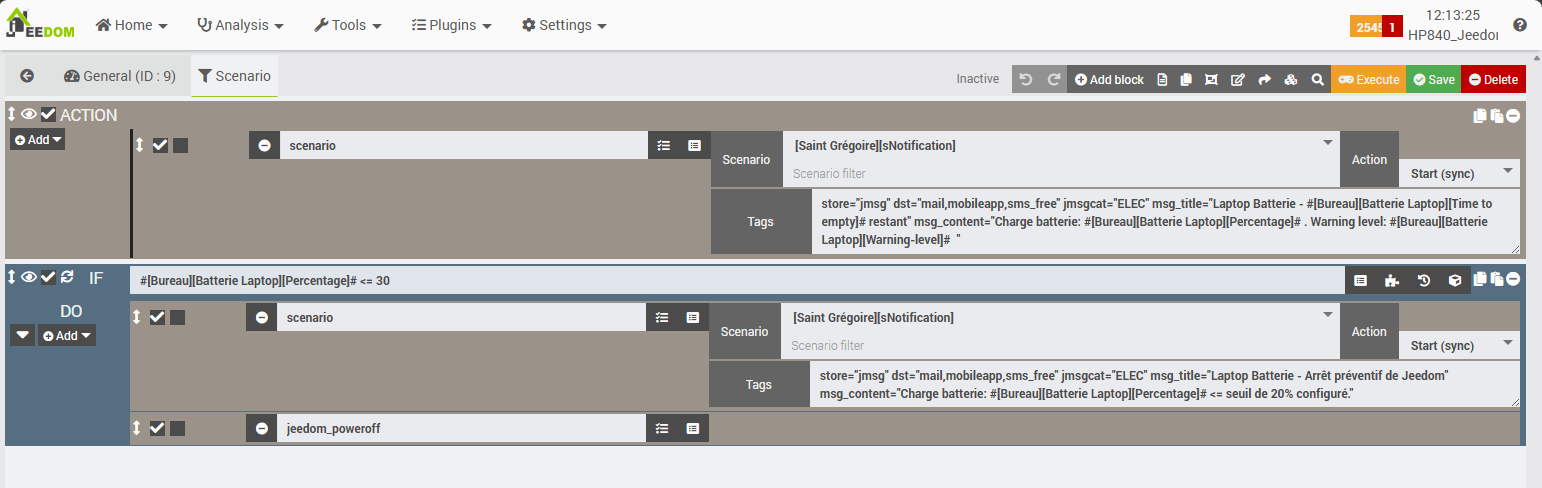
The alerting logic is simple: it sends a notification via email, SMS, and the Jeedom mobile app. Importantly, we can see here that if the laptop battery begins to discharge—because the UPS is exhausted—this scenario will safely shut down Jeedom when its battery level drops below 30%.
Conclusion & Wrap-up
By following this guide, you now have a robust and intelligent configuration for monitoring both the UPS and the battery of the laptop running Jeedom. This allows your home automation system to continue operating safely in the event of a power outage, with automatic notifications and proper shutdown procedures to protect your data and equipment.
This solution can easily be adapted to other scenarios:
- Monitoring remote UPS units via NUT (see future articles)
- Combining with electricity consumption tracking (How to monitor electricity with Jeedom & USB over IP)
- Adding more alerting or shutdown logic as your smart home grows
Related tutorials on this blog:
- Monitor electricity with Jeedom & USB over IP
- Jeedom: Bluetooth extension with Raspberry Pi Zero
- Quick install: Raspbian on Pi Zero
Further reading and resources:
Have you tried a similar setup or do you use Jeedom for power monitoring? Share your experience, improvements, or questions in the comments below!
Thank you for your attention.