We tried Gekkoga’s backtesting and noticed it is CPU intensive. I never used Amazon EC2 and its ability to quickly deploy servers, but I was curious to test, as it could make a perfect fit for our needs: on-demand renting of high capacity servers, by using Amazon’s “Spot instance” feature. Beware, on EC2 only the smallest VM can be used for free (almost). The target servers I would like to use are not free (next article).
Curious about leveraging Amazon EC2 to run Gekko & Gekkoga backtests at scale without burning your local CPU?
This guide will show you, step-by-step, how to deploy a free (or nearly free) EC2 micro instance, install all needed packages, and automate running your own trading strategy backtests. We will create a new customized AMI based on the standard Amazon’s AMI we will first deploy, including custom software and part of their configuration. Next we will automate in a simple batch file the request, ordering, and execution of a new instance based on our customized AMI, with automatic Gekkoga’s backtests launching & results gathering. This batch file will be used from my own personal/home gekko server (also sometimes referred to below as the reference server or “command & control” server) that I use to quickly modify and test new strategies. You can do the same from home.
By the end, you’ll know exactly how to build, snapshot, and multiply your own cloud-based backtesting environments—even if you’re new to AWS or algo trading bots!
Step 1: creating a new free Amazon EC2 t2.micro test virtual machine
First, you need to create an AWS account. Yes, you’ll have to enter credit card details. An EC2 t2.micro is free, most services are also free at first, but some actions (like allocating then releasing an Elastic IP) may incur small charges. Even the free-tier EC2 micro instance can only be run for a limited number of hours per month. That’s why we’re only using it here to create a “reference” Virtual Machine (an AMI = Amazon Machine Image) that we will clone. So, remember to stop your instance when not using it. That’s the “on-demand” policy at Amazon: use it when needed, pay only for what you consume.
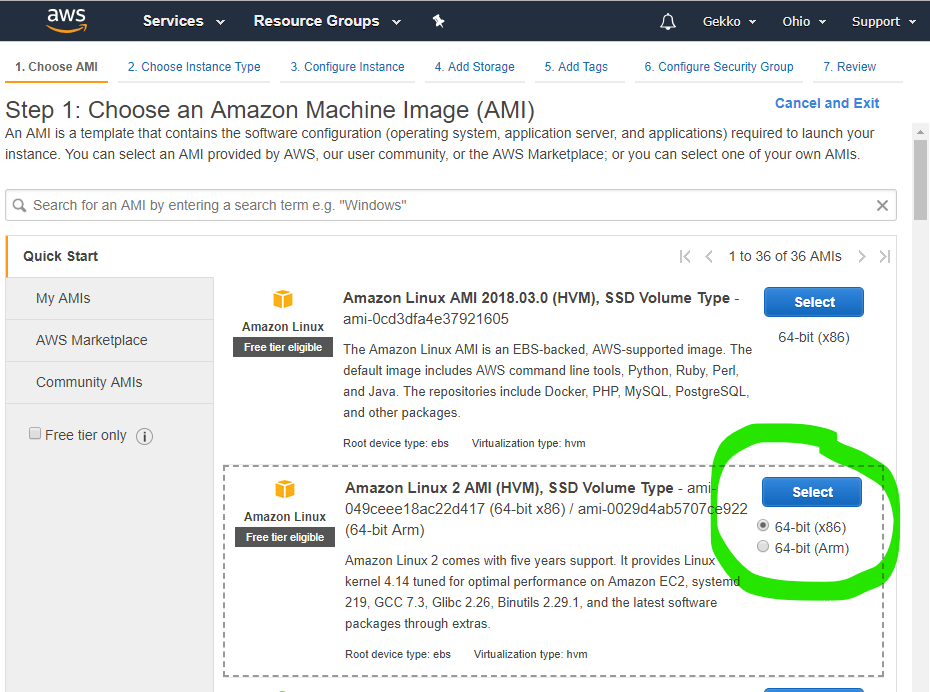
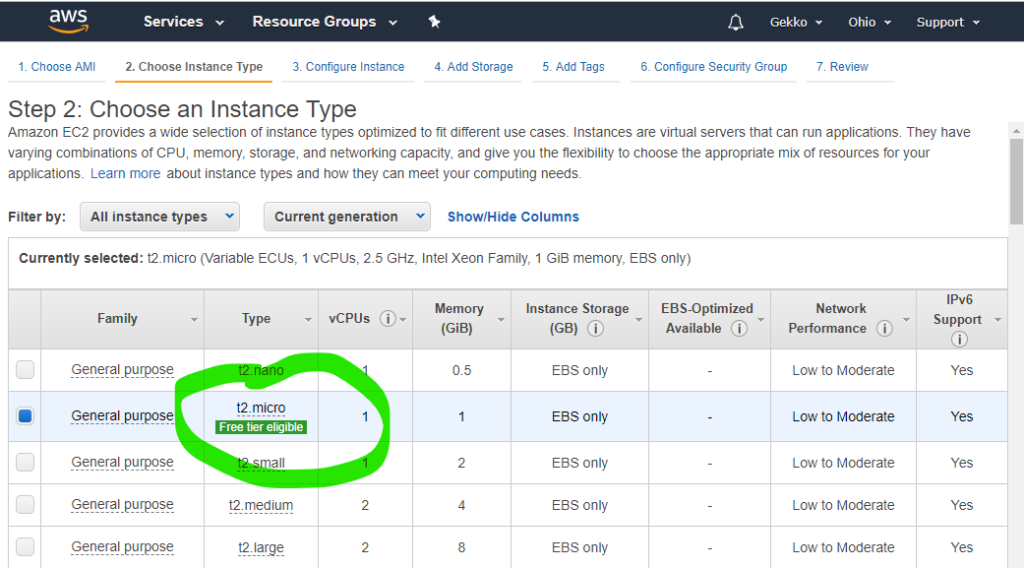
Then we choose the AMI and then the smallest VM available, as it is allowed in the “free” Amazon package.
At the bottom of the page, click “Next: configure instance details”. On the following page, you can use all default values, but check:
- Purchasing option: you can request a Spot Instance. This is Amazon’s marketplace where you set your maximum price,
- The Advanced Details at the bottom.

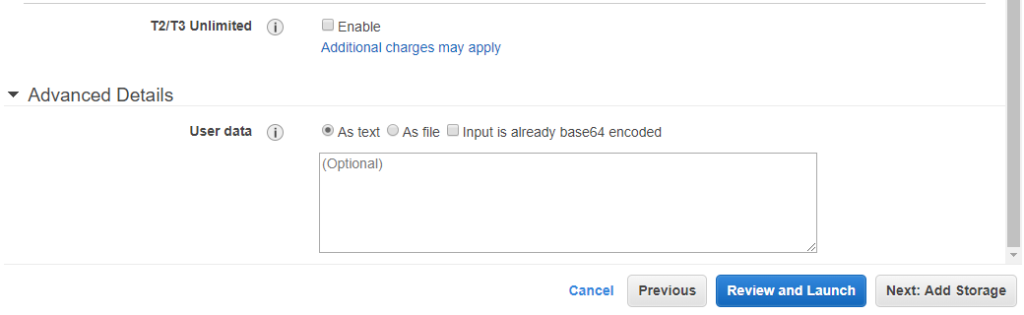
The User data field is a place where we can use a shell script which be executed at boot by the VM. As sometime the VM can be started when Amazon detects it should be (eg. Spot instances and requested price is reached), this is a very nice feature we can use to automatically make your instance download some specific configuration stuff when it boots, for example our Gekko strategy and configuration files to automatically launch our backtests. We will try this later (I did not try it yet myself at the moment I’m writing this but this is well documented by Amazon).
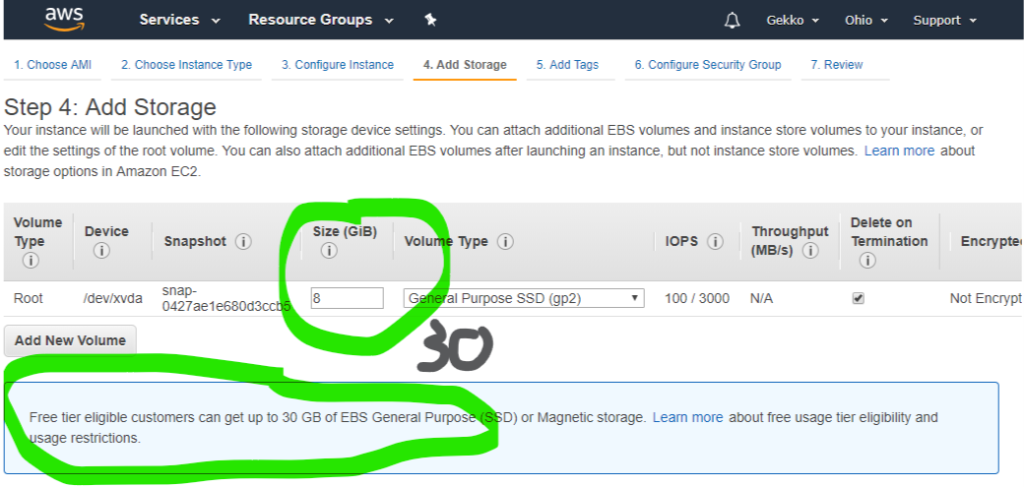
Next we want to configure the storage, as Amazon allows us to use 30Gb (as I write this article) on the free VM instead of the default 8gb.
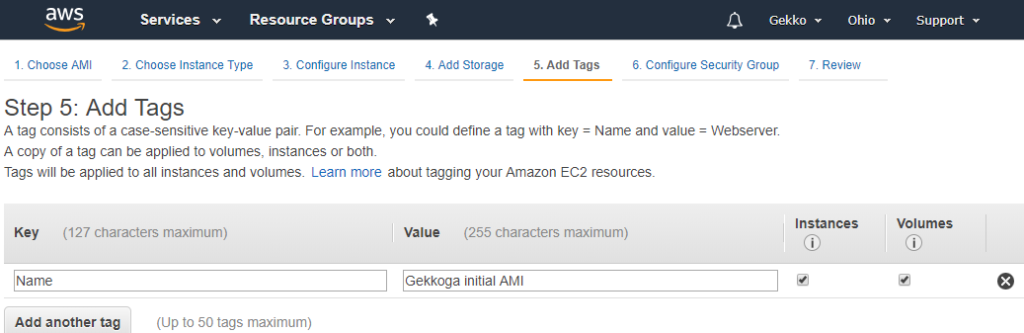
Next, I add a tag explaining the purpose of this VM and storage (I don’t know yet if we’ll actually use it in the future, but it doesn’t matter…).
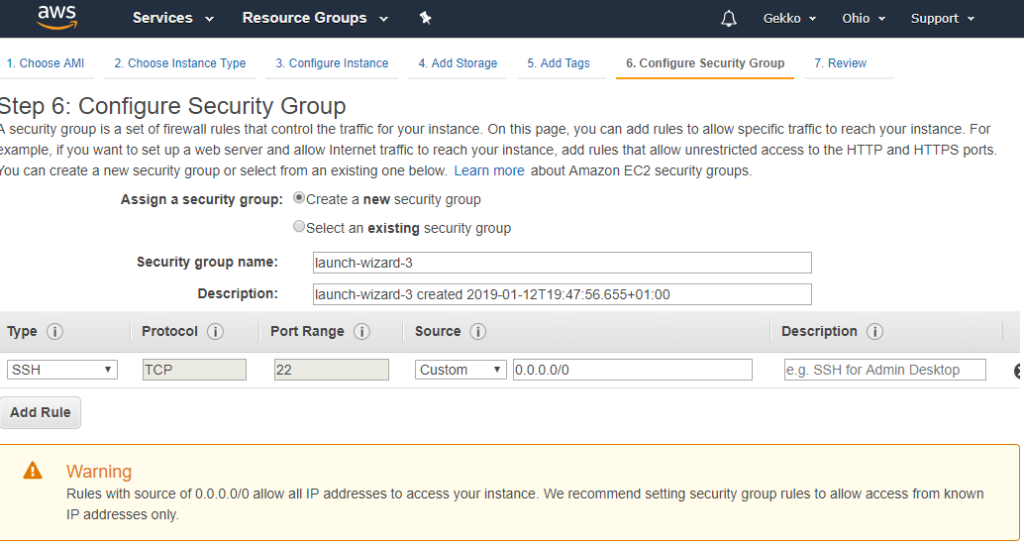
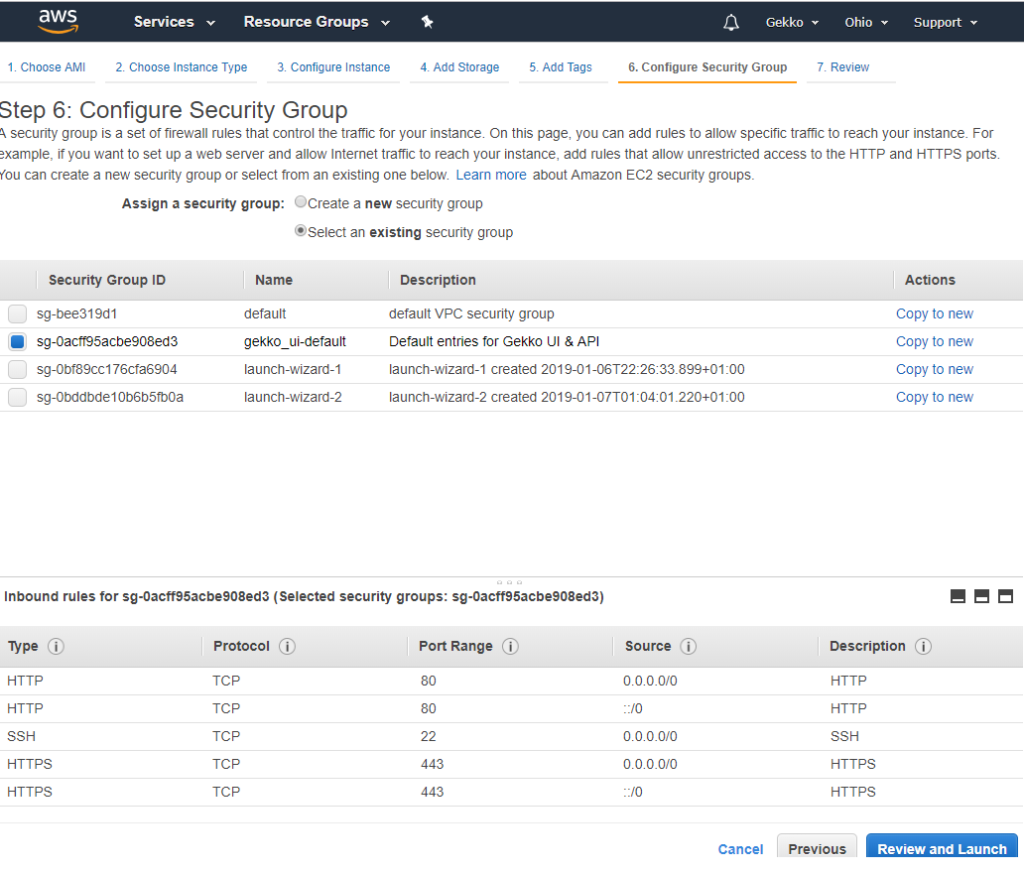
Next, we configure a security group. As I already played a little bit with another VM, I created a customized Security Group which allows ports 22 (SSH), 80 (HTTP) and 443 (HTTPS). I choose it here, but you will be able to do the same thing and map your own security group to your VM.
Next screen is a global review before VM creation and launching by Amazon. I won’t copy/paste it, but click on Launch at the bottom.
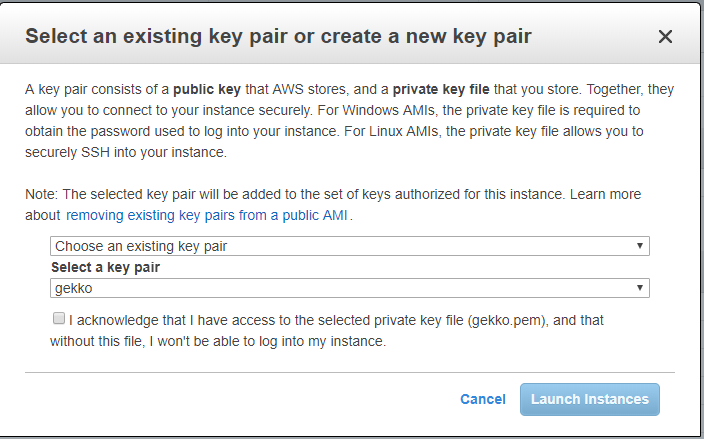
Next is a CRITICAL STEP. Amazon will create you some SSH keys that you need to store and to use to connect on the VM through SSH. Do not lose them. You will be able to use the exact same key for other VMs you would want to create, so one key can match all your VMs.
As I already generated one for my other VM (called gekko), I reuse it.
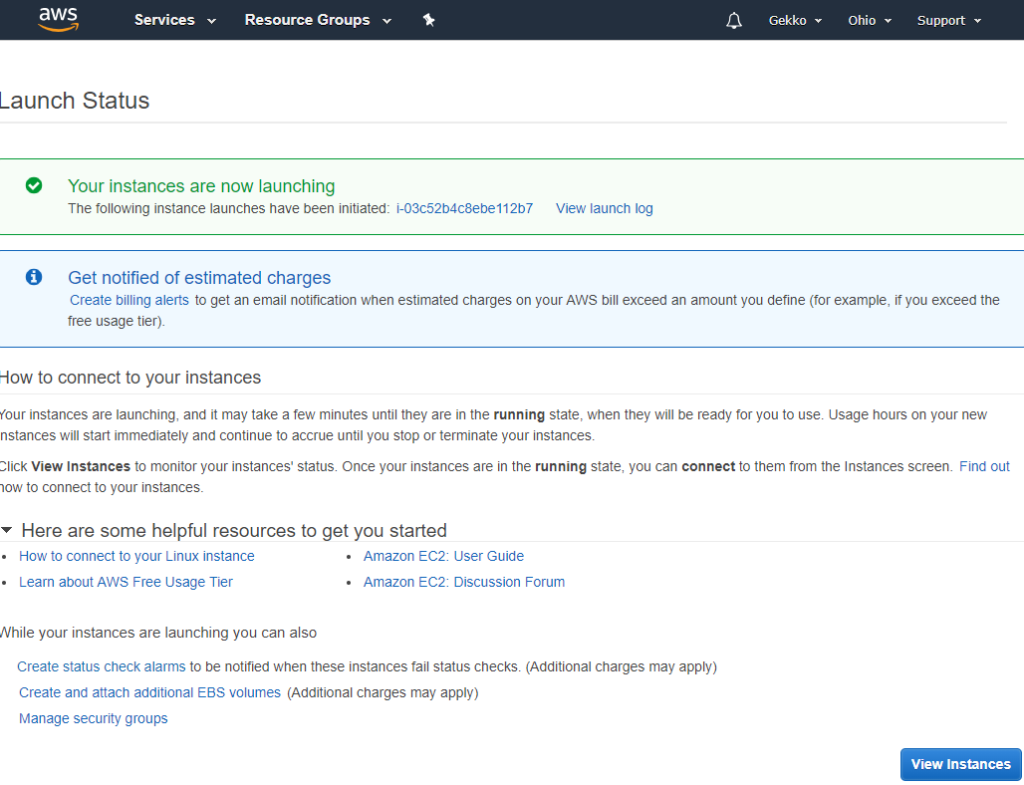
And next is a simple status page explaining the instance is launching and linking to a few documentation pages, that you should of course read.
Step 2: remote connection to the instance
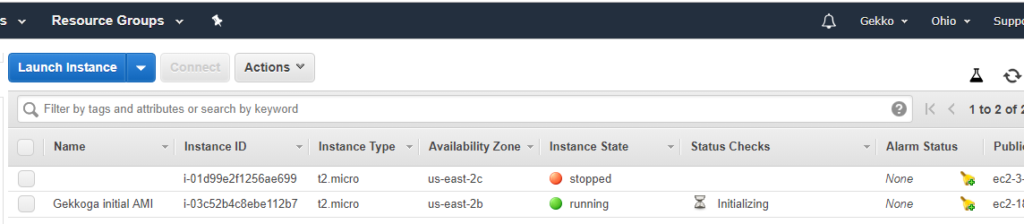
When we click on the blue “View instances” button, we are redirected on EC2 console (you will use it a lot) and we can see that our new instance is launched, and its name is the tag we defined earlier during setup (you also see my other test VM, without any name tag, stopped).
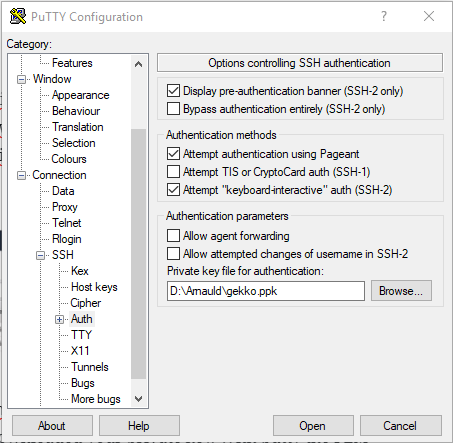
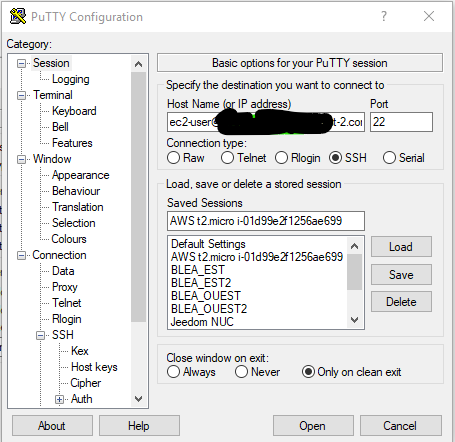
Next we will connect to the VM shell by SSH. On my Windws laptop I’ll use putty. I assume you downloaded your private key previously created on Amazon’s console. With putty the PEM file needs to be converted using PuttyGen to generate a .ppk file it will be able to use.
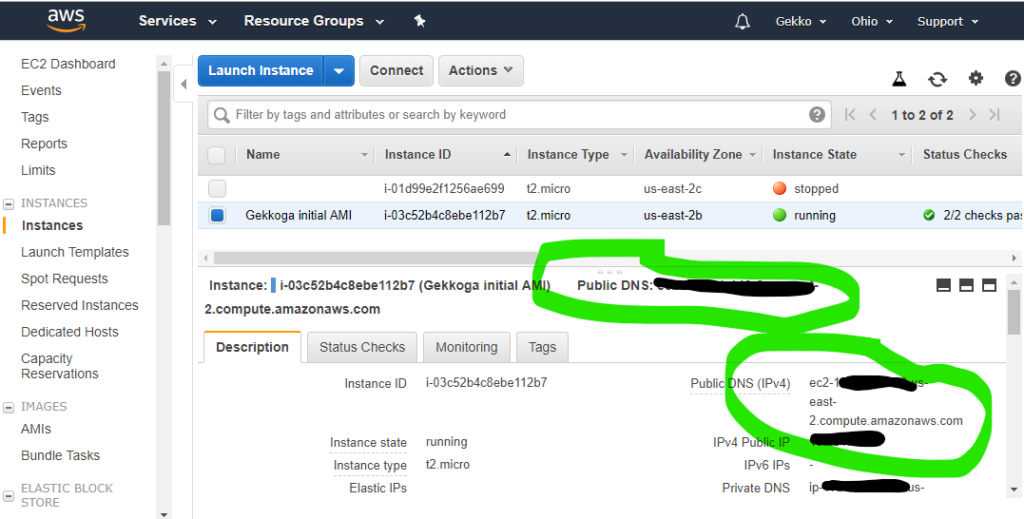
You’ll also need to copy the public IPv4 address from the EC2 console. Just select your instance and grab the value displayed in the “Public IPv4 address” field.
Now in Putty you just have to save a session with your private .ppk key configured and ec2-user@<public hostname grabbed from the console> as host. Keep in mind that this hostname and associated IP could (and probably -will-) change. If you can’t connect anymore to your VM, the first thing to do is to check your EC2 console to check its hostname. We will automate this later.
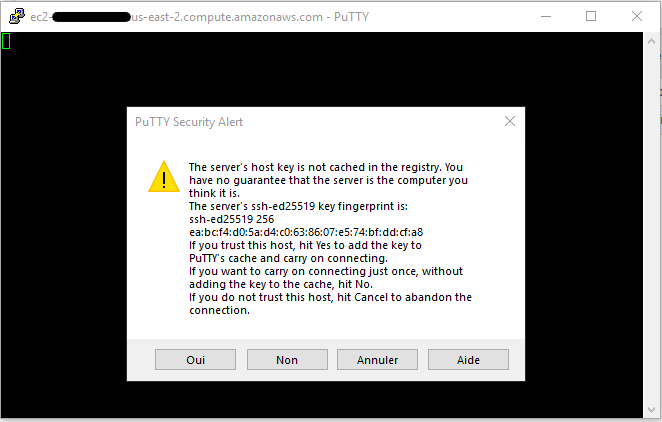
We launch the session. Putty will ask you if you want to trust the host, click Yes.
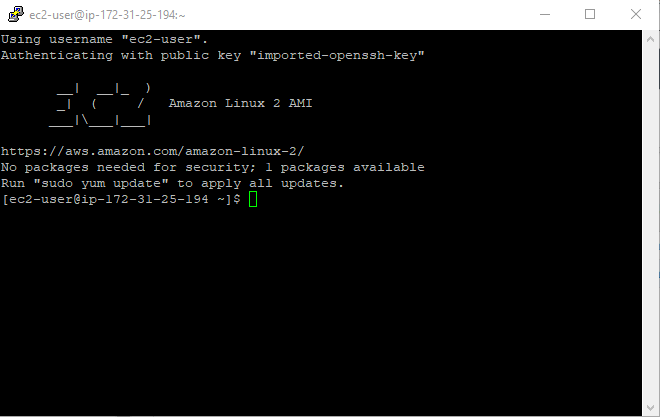
Woohoo ! we are connected ! This was fast and simple.
Step 3: updating the VM & deploying our software
Now we need to deploy all the basic things we saw in previous posts, but also more things like NGinx to protect the access to Gekko’s UI. Later, we’ll look at how the VM can automatically download and update strategies each time it boots, ensuring everything stays up-to-date before running.
The goal is to deploy all what we need to launch a functionnal Gekkoga VM, and then we will “snapshot” this virtual machine in order to create a customized AMI, to be reused on a better virtual machine, specialized in CPU computations. Note that EC2 can also supply VMs with specific hardware like GPU’s if you need to run software able to offload the computation on GPU cards, this is not our case here unfortunately but it might somedays as I would like to start to experiment AI.
Below you will find step by step bash commands I used, most of them are a reuse from my previous articles about Gekko & Gekkoga. You can use the links to my files to download a few standard things (not compromising security), but there are some private parts that you will need to tweak by yourself, especially the ssh connection to your home “command & control” server of course.
First we update the VM and deploy generic stuff.
#############################
### AWS AMI General Setup ###
#############################
##Base packages
#general OS updates
sudo yum update -y
sudo yum install curl wget git -y

#Declare & activate an additional repo for third parties software
sudo wget -r --no-parent -A 'epel-release-*.rpm' http://dl.fedoraproject.org/pub/epel/7/x86_64/Packages/e/
sudo rpm -Uvh dl.fedoraproject.org/pub/epel/7/x86_64/Packages/e/epel-release-*.rpm
sudo yum-config-manager --enable epel*

#My favorite text editor
sudo yum install joe -y

##install npm & nodejs
curl -o- https://raw.githubusercontent.com/creationix/nvm/v0.33.11/install.sh | bash
source ~/.bashrc
nvm install node

#install pm2
npm install pm2 -g

#Allow pm2 to restart at boot time, by using 'pm2 save' to save running sessions
sudo env PATH=$PATH:/home/ec2-user/.nvm/versions/node/v11.6.0/bin /home/ec2-user/.nvm/versions/node/v11.6.0/lib/node_modules/pm2/bin/pm2 startup systemd -u ec2-user --hp /home/ec2-user

############################
#### Gekko installation ####
############################
#gekko & PM2 launch script
git clone git://github.com/askmike/gekko.git -b stable && cd gekko
#do NOT run npm audit fix as suggested by npm or you will break Gekko
npm install --only=production
cd exchange && npm install --only=production && cd ..

#Install emailjs if you want to activate mails notifications
npm install emailjs

#Create a startup script for UI
echo '#!/bin/bash' > start_ui.sh
echo "rm ui_logs/" >> start_ui.sh
echo "pm2 start gekko.js --name gekko_ui --log-date-format=\"YYYY-MM-DD HH:mm Z\" -e ui_logs/ui_err.log -o ui_logs/ui_out.log -- --ui max_old_space_size=8096" >> start_ui.sh
chmod 755 start_ui.sh

#Download some kraken history for EUR/ETH
wget https://blog.sinecu.re/files/backup_0.1.db
mkdir history
mv backup_0.1.db history/kraken_0.1.db

#Update Gekko's UI conf with extended timeouts
cd $HOME
wget https://blog.sinecu.re/files/gekko_confUI.tgz
tar zxfp gekko_confUI.tgz && rm gekko_confUI.tgz

############################
### GekkoGA installation ###
############################
git clone https://github.com/gekkowarez/gekkoga.git && cd gekkoga
#Install the fix to handle Gekko v0.6x new API
git fetch origin pull/49/head:49 && git checkout 49
#download the fix to flatten parameters and fix mutation
mv index.js index.js.orig
curl -L -O https://raw.githubusercontent.com/gekkowarez/gekkoga/stable/index.js
#download the fix to support nested config-parameters
mv package.json package.json.orig
curl -L -O https://raw.githubusercontent.com/gekkowarez/gekkoga/stable/package.json
#Install it, but don't run npm audit fix as requested by the line below or it will break everything !
npm install
#Install emailjs if you want to activate mails notifications
npm install emailjs
#create a PM2 script
echo '#!/bin/bash' > start.sh
echo "rm logs/" >> start.sh
echo "pm2 start run.js --name gekkogaMyMACD --log-date-format=\"YYYY-MM-DD HH:mm Z\" -e logs/err.log -o logs/out.log -- -c config/config-MyMACD-backtester.js max_old_space_size=8192" >> start.sh
chmod 755 start.sh
cd $HOME
Next we deploy NGinx which will act as a Reverse Proxy to authenticate requests made to Gekko’s UI. Beware to lines 8 & 15: some things need to be configured according to your own setup.
###########################################################################
## Deploy & configure Nginx for Reverse Proxy setup in front of Gekko UI ##
###########################################################################
#install nginx
sudo amazon-linux-extras install nginx1.12 -y
sudo service nginx stop

#You need to change your host inside nginx.conf, IT IS CONFIGURED FOR MY DOMAIN, CUSTOMIZE IT
wget https://blog.sinecu.re/files/nginx.conf
sudo mv ./nginx.conf /etc/nginx/nginx.conf

#certbot certificate generation, thanks to https://coderwall.com/p/e7gzbq/https-with-certbot-for-nginx-on-amazon-linux
sudo yum install -y certbot python2-certbot-apache

#beware the script downloaded below IS CONFIGURED FOR MY DOMAIN, CUSTOMIZE IT
wget https://blog.sinecu.re/files/cli.ini
sudo mv cli.ini /etc/letsencrypt/

#Here be sure that ports 80 and 443 are mapped to your instance in your EC2 Security Group
#And the FQDN you previously changed in cli.ini needs to point on your EC2 IP ! Will fail otherwise.

#If you have troubles please read certbot docs as there are other ways to generate a certificate
sudo certbot certonly

#run a daily crontab to eventually renew our certificate
wget https://blog.sinecu.re/files/certbot-renewal
sudo mv certbot-renewal /etc/cron.daily/
From here on, things get a little more advanced—basic sysadmin skills are recommended. Don’t worry, I’ll briefly explain each step for clarity.
- Create a user/passwd to be used by Nginx reverse proxy
sudo printf "USERNAME_TO_CHANGE:$(openssl passwd -crypt PASSWORD_TO_CHANGE!)\n" > /etc/nginx/.htpasswd- To automate downloading of stuff from our home “command & control” server using scp or automate launching of actions on our home server through ssh (to automatically make a tarball of our gekko’s strats for exemple before downloading them) we need to import our home server/user SSH key in /home/ec2-user/.ssh/ and change its permissions with
chmod 600.
- Once your home server SSH key is imported (remember to set secured permissions with
chmod 600), use the following commands to synchronize your Gekko directory between your local and EC2 environments:
##Sync Gekko strats & scripts with the one on my local/home server mainly use for dev and quick testing (REQUIRES SSH AUTHENT TO BE SETUP BETWEEN BOTH HOSTS)
#nota: We could use rsync too
cd $HOME
ssh <user>@<fqdn> tar czfp gekko_strats.tgz gekko/SECRET-api-keys.json gekko/config gekko/.sh gekko/.js gekko/strategies gekko/gekkoga
scp <user>@<fqdn>:/home/gekko/gekko_strats.tgz ./
tar zxfp gekko_strats.tgz
rm gekko_strats.tgz
cd gekko && ./start_ui.sh- Now we need to launch nginx .. and enable the service so it will be relaunched at boot. We will also save the pm2 sessions, since we started gekko with our start_ui.sh script in the commands above. This way, pm2 will also restart it at VM boot time.
sudo systemctl enable nginx
sudo systemctl start nginx
pm2 save
Step 4: testing Gekko on the virtual machine
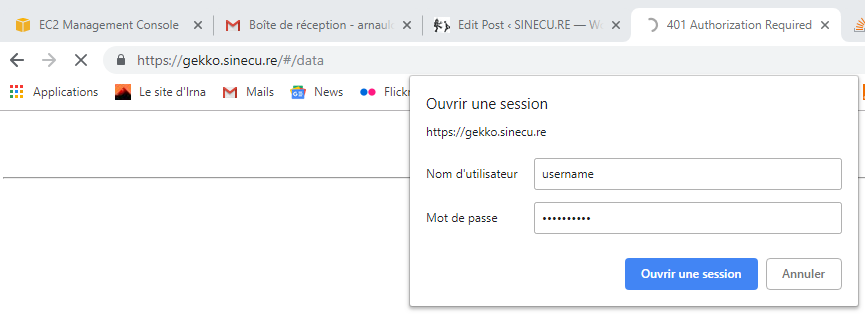
If everything was OK, you should be able to launch your favorite web browser and target https://<Your EC2 VM FQDN> and see a login prompt. You need to enter the login/password you defined (step 3) in /etc/nginx/.htpasswd

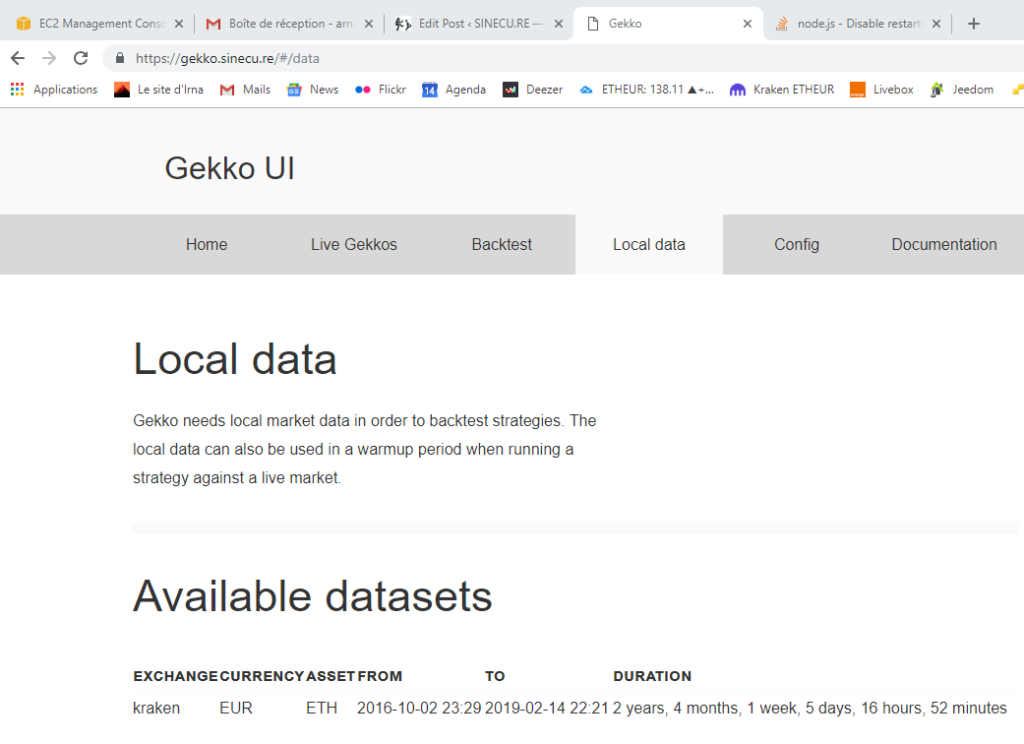
You should now see this …
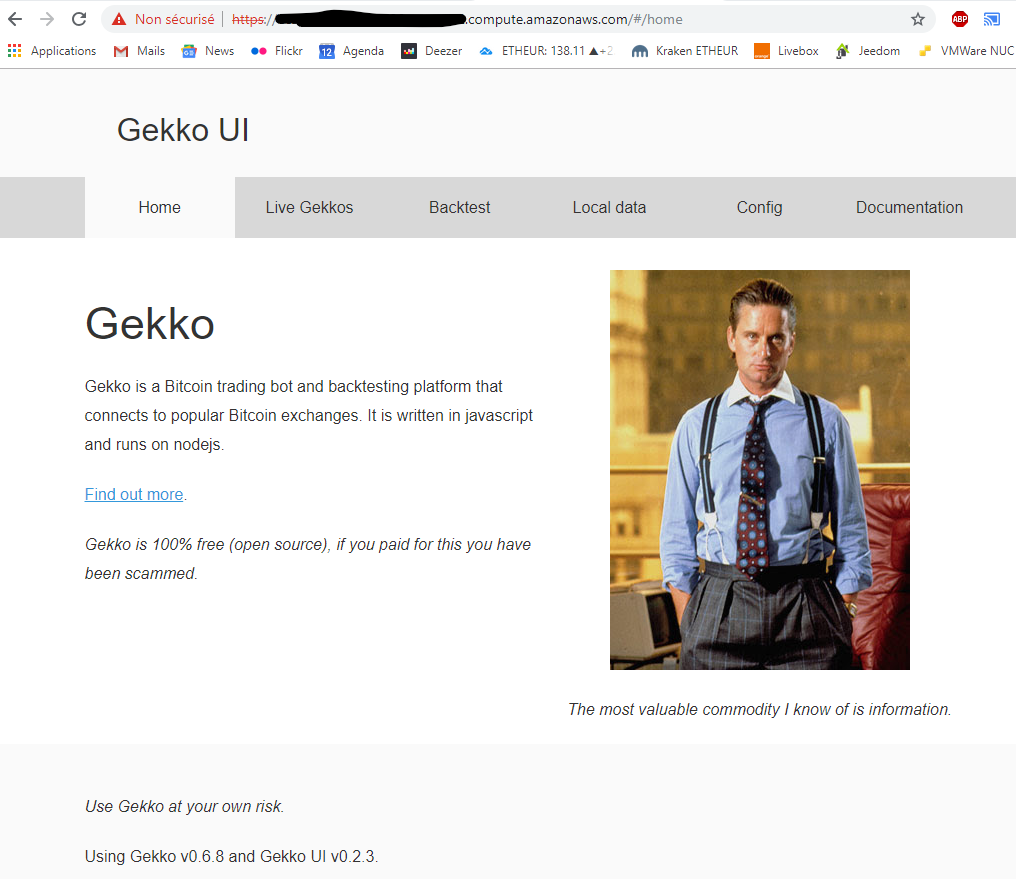

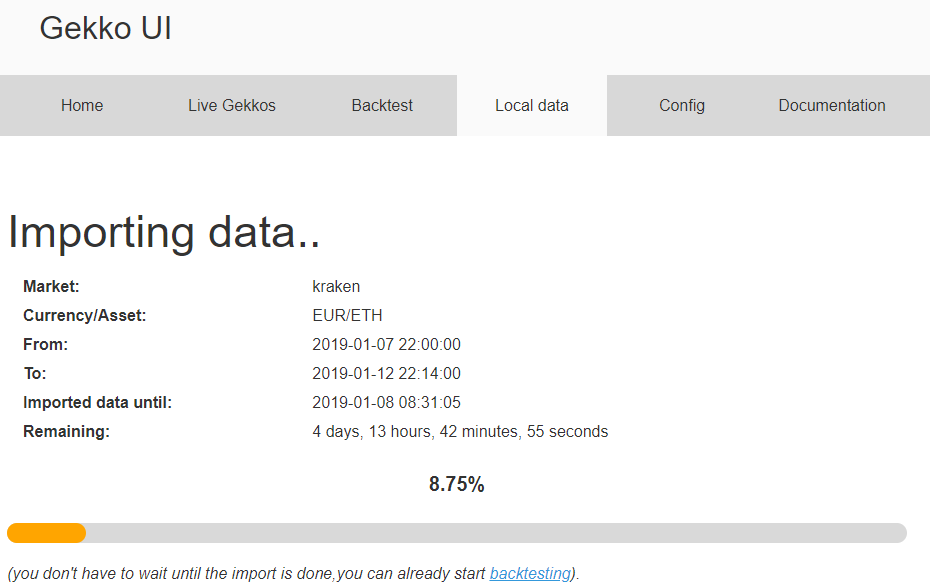
My test dataset was correctly downloaded, it is well detected by Gekko. I will just give it a little update by asking gekko to download data from the 2019-01-07 22:30 to now and then upload it back on my reference server at home.
Next, let’s give a try to the strategie we downloaded from our reference server at home.
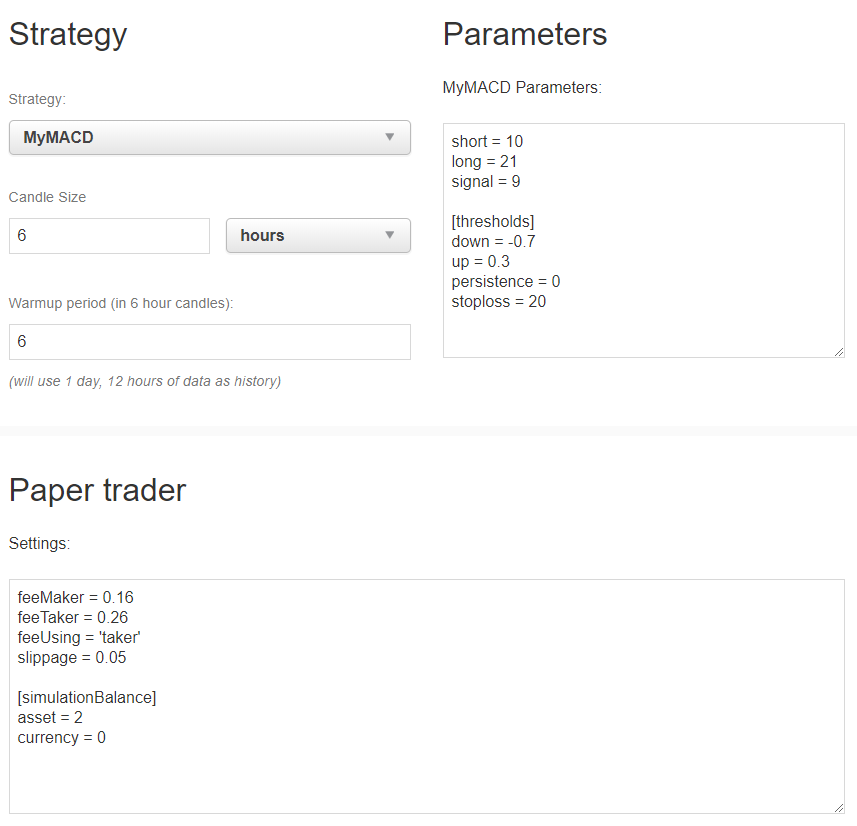
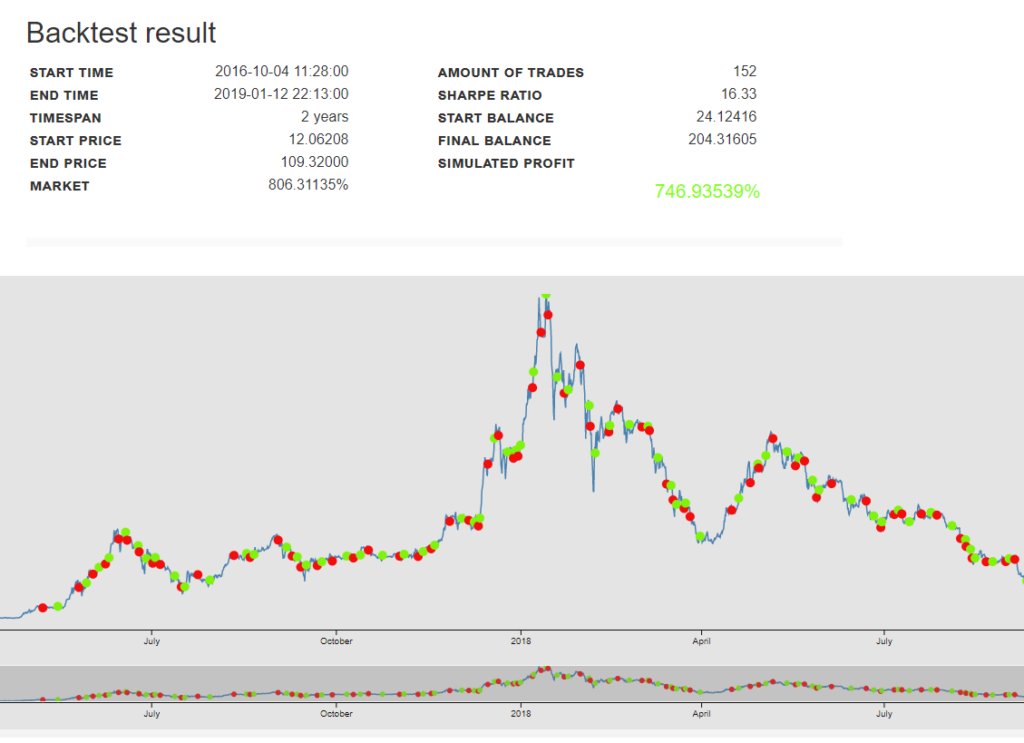
All is running well … We now have a good base to clone this virtual machine and make it an AMI template for higer-end Virtual Machines. We will need to make it:
- Able to download uptodate data from markets
- Able to download up to date strategies from our reference server@home
- Able to launch one particular Gekkoga startup script
- Able to upload or send the results to our reference server@home
Note: Please remember to stop your VM either from command line or from Amazon EC2 console so that it won’t drain all your “free” uptime credits !
Step 5: using AWS CLI from our home server
We need to install AWS CLI (Amazon Command Line Interface) on our local/home “command & control” server. I first had to install pip for Python.
sudo apt-get install python-pipNow we can install AWS CLI using pip, as explained in Amazon’s documentation. The –user will install it in your $HOME.
pip install awscli --upgrade --userWe add the local AWS binary directory to our user PATH so that we can launch it without having to use its full path. I’m using a Debian based AMI so i’ll add it in .profile
cd $HOME
echo 'export PATH=~/.local/bin:$PATH' >> .profile
Now, we need to create an IAM (Identity & Access Management) “Admin” User & Groups from our EC2 console, to be able to use AWS CLI. Please follow Amazon’s documentation “Creating an Administrator IAM User and Group (Console)“. Basically you will create a Groupe, a Security Policy, and an Administrator user. At the end, you must obtain and use an Access Key ID and a Secret Access Key for your Administrator user. If you lose it, you won’t be able to retrieve those keys, but you will be able to spend time in order to re-create a new one for this user from the EC2 console (and propagate the change on every system using it). So keep those keys safe.
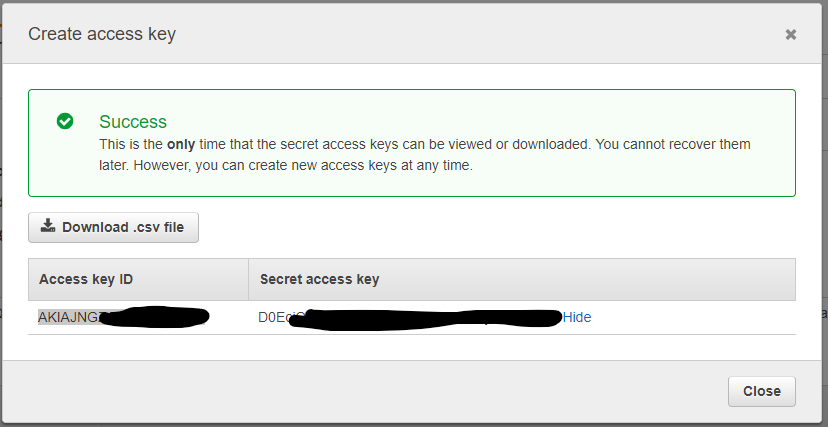
Then we will use those keys on our VM, and on our home/reference “command & control” server from which we want to control our instances. You can specify the region that Amazon attributed to you also if you want (hint: do not use the letter at the end of the region, eg. if your VM is running in us-east-2c, enter ‘us-east-2’).


Let’s test it with a few examples I got in the docs:
- Fetch a JSON list of all our instances, with a few key/value requested (remember the tags we can define in EC2’s console when we create a VM ?):
aws ec2 describe-instances --query 'Reservations[].Instances[].[InstanceId,State.Name,Tags[?Key==`Name`] | [0].Value]'
- Stopping an instance (or several ones) … Absolutely mandatory to not spend all our free tokens, or be billed much more than what we will really use bigger VMs. Note that we reuse here, the ID obtained through the command-line above.
aws ec2 stop-instances --instance-ids <instanceId>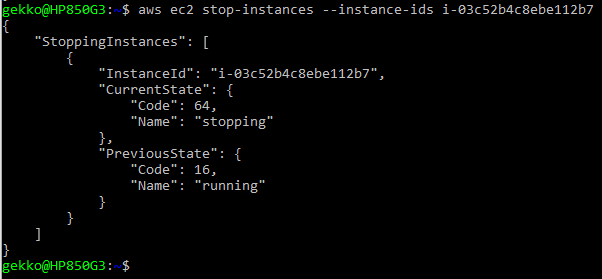
- Starting an instance, from its ID (we can start several ones)
aws ec2 start-instances --instance-ids <instanceId>
- Ask the public IP of our running VM (we need to know its InstanceID, we can get several ones):
aws ec2 describe-instances --instance-ids <instanceId> --query 'Reservations[*].Instances[*].PublicIpAddress' --output text
- To send remote Linux shell (not AWS CLI) commands to be executed on a specific VM, you will need to create a new IAM role in your EC2 Console, and make your VM use it, so that your remote calls will be authorized.
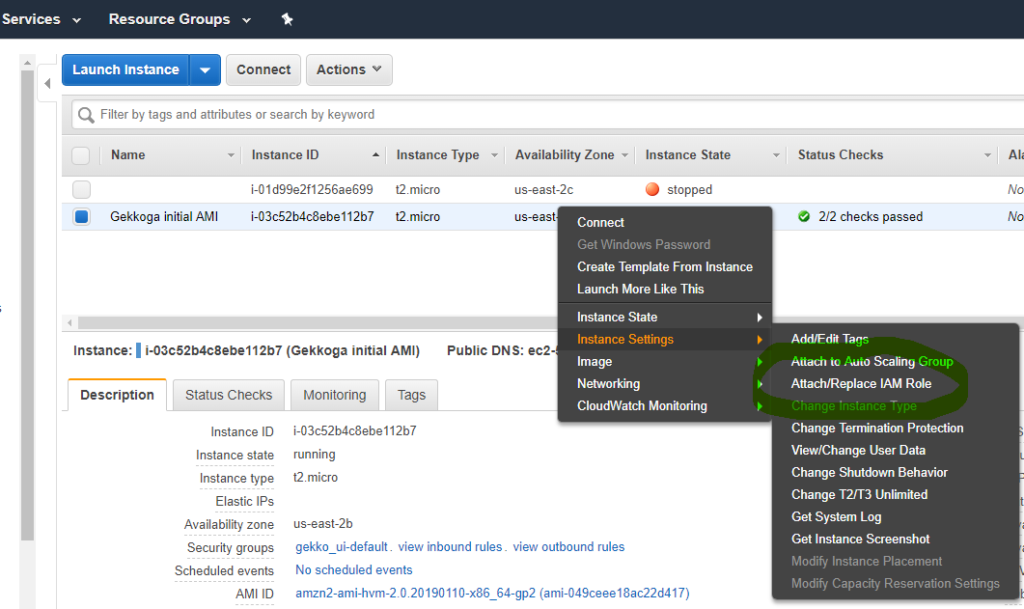
Give your VM the IAM role with the Administrator Group you defined before, and in which there is also the Administrator user we are using the AWS CLI keys. Now we should be able to access the VM and send it informations and request data.
- To make the vm execute ‘ifconfig’ we run a first CLI request, and we need to check the CommandID returned in this first call:
aws ssm send-command --instance-ids <instanceId> --document-name "AWS-RunShellScript" --comment "IP config" --parameters commands=ifconfig
- To check the output we use the commandID in another request:
aws ssm list-command-invocations --command-id "69245d54-3be9-483f-981a-00af7abd2004"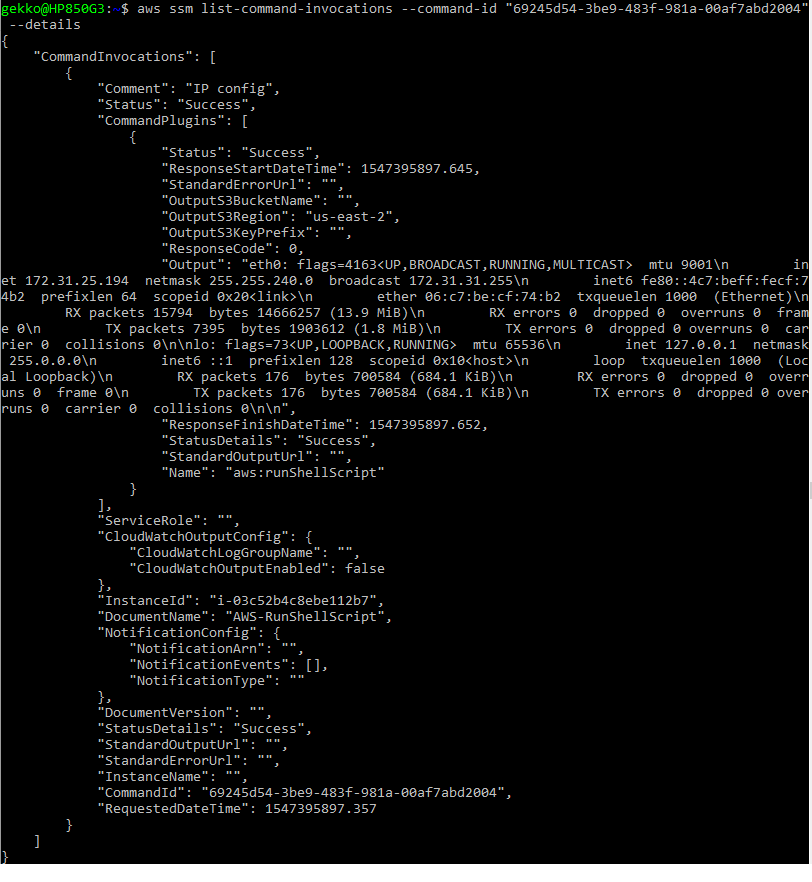
- And … -took from the doc, I just added the jq at the end-, If we want to combine both queries:
sh_command_id=$(aws ssm send-command --instance-ids "<instanceId>" --document-name "AWS-RunShellScript" --comment "IP config" --parameters commands='ifconfig' --output text --query "Command.CommandId") sh -c 'aws ssm list-command-invocations --command-id "$sh_command_id" --details --query "CommandInvocations[].CommandPlugins[].{Status:Status,Output:Output}"' | jq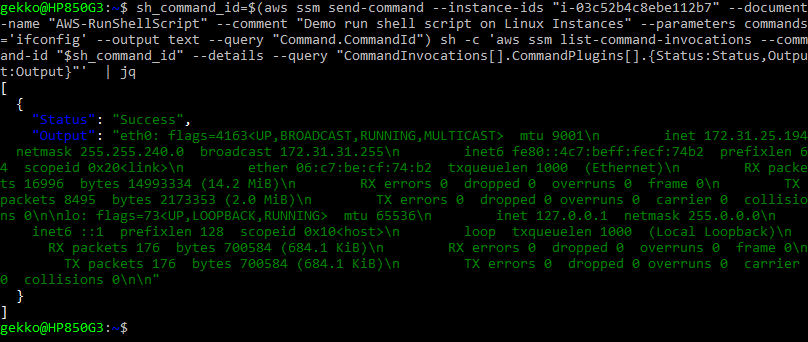
Note that with the CLI we can also simulate the execution of bash scripts by sending their content through the send-command parameters as explained in chapter 5 here.
Step 6: create a new AMI from our base VM
First we stop our running base VM.
aws ec2 stop-instances --instance-ids i-03c52b4c8ebe112b7Now in EC2 Console we will create a new AMI from our instance (official doc).
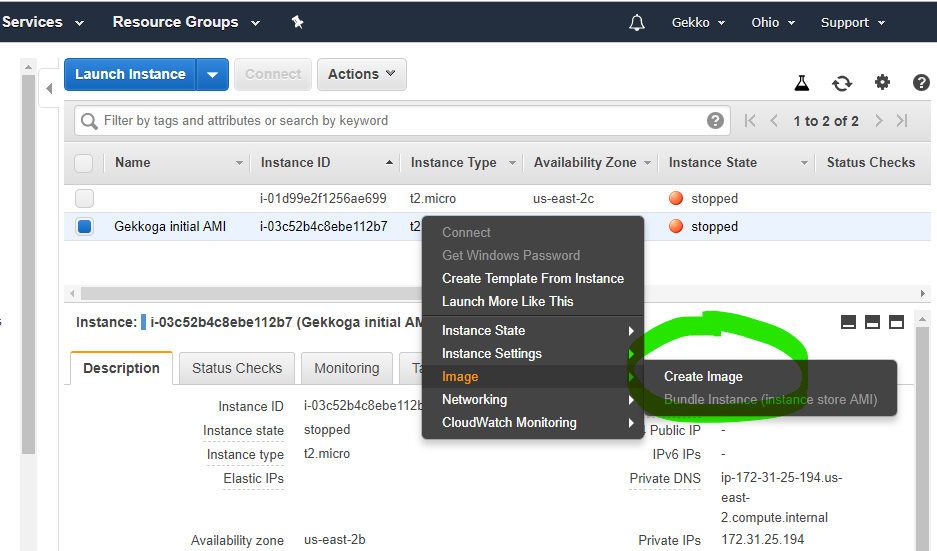

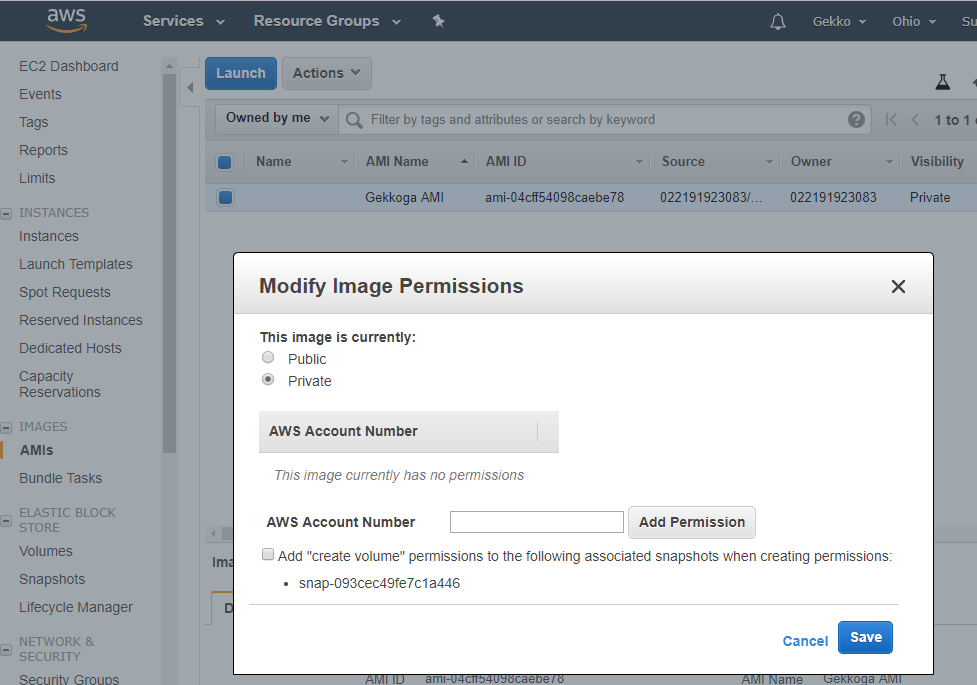
Once you click on “Create Image”, the dashboard will show you its new ID, we will use it later to launch new instances. By default the images you create are private, you can change it if you want and share your AMI to the region you are using in Amazon’s cloud.
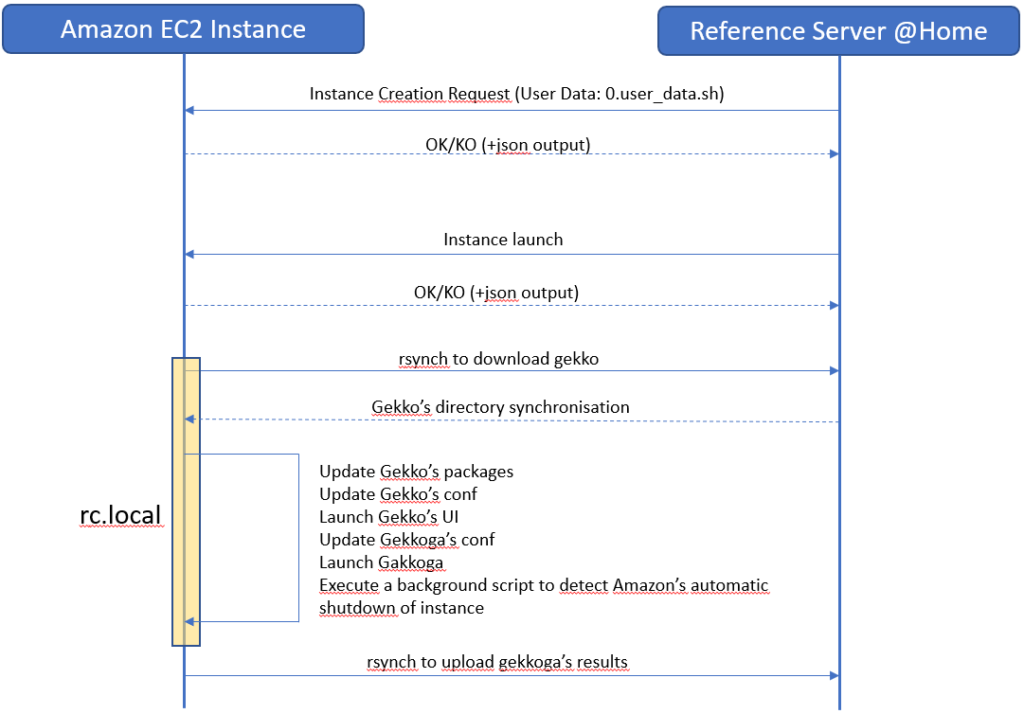
The Big Picture: complete deployment scenario
The scenario is simple: from our command & control home server, we first request an instance creation based on this image, then we will launch and stop our VM remotely.
When a new instance is created, we would like it to automatically execute a script at boot, using the AWS “user-data” function, to download fresh data from our command & control server. User-data is nothing more than a shell script which is executed once. This is pretty well documented by Amazon. The “User-data” script is only executed once at the very first boot of your newly created instance, not at subsequent boots.
Therefore, we will also need to include something else to make our instance execute some stuff each time it will boot: we will use a basic /etc/rc.local script which will use rsync to download our whole Gekko’s installation directory from our command & control server, tweak it a little bit, and then launch Gekkoga.
We will also need to make a background script to carefully monitor Amazon’s indicators about the incoming shutdown of our instance. Spot instances are automatically shutdown by Amazon, and there is at most a two‑minute delay between the termination notice and the actual shutdown. This will be detailled in the next article.
The whole process is:
Step 7: Instantiating & executing actions at first boot
We want to tell a new instance of this image to execute a shell script at its very first boot. First we will create this script on our local command & control server and put a few commands in it, but also activate logging on the VM (outputs will be available both to the /var/log/user-data.log and to /dev/console).
First, I create a “minimal” script called 0.user_data.sh in a $HOME/AWS directory on my command & control server, and put this inside:
#!/bin/bash
exec >> >(tee /var/log/gekko_packages.log | logger -t user-data -s 2>/dev/console) 2>&1
d=$(date +%Y%m%d_%H%M%S)
echo "===== Entering Gekko User Data First Boot Execution ====="
echo "$d"
echo "===== End of Gekko User Data First Boot Execution ====="
Next, I request the creation & launch of a new instance based on our new Image ID. Note that I use the name of the key I defined earlier (gekko), I used the same subnet as my previous VM (don’t really know if that is mandatory, have to test), the security group ID can be checked on EC2 console “Security Groupes” menu, and we also specify what IAM role we want to allow to control the VM with AWS CLI (you created it earlier as it was mandatory for some CLI commands to run).
Also note that we pass our previously created 0.user_data.sh bash script as a parameter: its content will be transmitted to Amazon, which will make it launched at the first boot of the instance. If you want anything to be performed at the very first boot, just think to add it in this script.
aws ec2 run-instances --image-id ami-04cff54098caebe78 --count 1 --instance-type t2.micro --key-name gekko --security-group-ids sg-0acff95acbe908ed3 --iam-instance-profile Name="Administrator" --tag-specifications 'ResourceType=instance,Tags=[{Key=Name,Value=Gekkoga Test 1}]' --user-data file://0.user_data.sh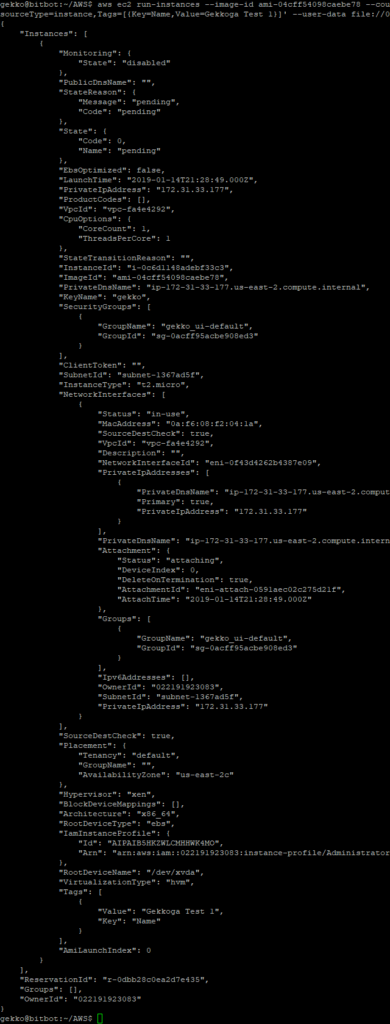
We can see that our new InstanceId is i-0c6d1148adebf33c3 . From EC2 console I can see the VM is launched. Now I want to check if my user-data script was executed.
aws ec2 get-console-output --instance-id i-0c6d1148adebf33c3 --output text | grep user-data:
This is quite good ! I also double checked on my reference server if I could see incoming ssh connections by adding an ssh execution + scp downloading request command to the script, and it’s ok: 2 connections as expected (one for the ssh, the other one for the scp).

We have a working “first time script” that the VM will execute upon its first instantiation, and that we could customize later on to perform one-shot specific actions. Now, we want our VM to connect to our reference server at each boot, to make it prepare a package, then download it, then untar it, and execute a start.sh script that may be embedded inside.
Step 8: download a Gekko+GekkoGA installation, tweak it, launch it, at each boot
First, on our EC2 reference VM (the one from which we created a new AMI so yes either we will have to later on create a new AMI, or you can perform this step while you are still preparing the first AMI), we will perform this:
cd $HOME
sudo chmod +x /etc/rc.d/rc.local
mkdir AWS
mkdir AWS/logs
mkdir AWS/logs/old
mkdir AWS/archives
Then we will edit /etc/rc.local (which is a symlink to /etc/rc.d/rc.local) and add this. Beware you need to modify a few lines (22 & 25) to reach your own command&control server :
# Needed to use pm2 at boot time
export NVM_DIR="/home/ec2-user/.nvm"
[ -s "$NVM_DIR/nvm.sh" ] && . "$NVM_DIR/nvm.sh" # This loads nvm
[ -s "$NVM_DIR/bash_completion" ] && . "$NVM_DIR/bash_completion" # This loads nvm bash_completion

d=$(date +%Y%m%d_%H%M%S)
#save every output in a dated logfile & system console
exec >> >(tee /home/ec2-user/AWS/logs/${d}_package.log | logger -t user-data -s 2>/dev/console) 2>&1
echo "===== Entering Gekko Packaging Retrieval ====="
echo "$d"

#Activates extended pattern matching features from Bash
shopt -s extglob

echo "Moving potential old logs to AWS/logs/old"
sudo mv /home/ec2-user/AWS/logs/!(${d}_package.log|old) /home/ec2-user/AWS/logs/old/

echo "moving potential old gekko dir to AWS/archives/"
su ec2-user -c "mv /home/ec2-user/gekko /home/ec2-user/AWS/archives/${d}_gekko"

echo "Safe remote backup of Command&Control_Server gekko's sqlite db"
su ec2-user -c ssh <YOUR_C2C_SERVER> "sqlite3 /home/gekko/gekko/history/kraken_0.1.db \".backup '/home/gekko/gekko/history/kraken_0.1.db.backup'\""

echo "Syncing gekko's dir from remote Command&Control_Server ..."
su ec2-user -c "rsync -azh <YOUR_C2C_SERVER>:/home/gekko/gekko /home/ec2-user/"

echo "Replacing sqlite db with its safe backup"
su ec2-user -c "mv /home/ec2-user/gekko/history/kraken_0.1.db.backup /home/ec2-user/gekko/history/kraken_0.1.db"

echo "Tweak Gekko's UIconfig files ..."
su ec2-user -c cp -f /home/ec2-user/dist_UIconfig.js /home/ec2-user/gekko/web/vue/dist/UIconfig.js
su ec2-user -c cp -f /home/ec2-user/public_UIconfig.js /home/ec2-user/gekko/web/vue/public/UIconfig.js

echo "Relaunching Nginx ..."
sudo service nginx restart

echo "Rebuilding Gekko dependancies ..."
su ec2-user -c rm -rf /home/ec2-user/gekko/node_modules/*
su ec2-user -c "source /home/ec2-user/.bashrc && cd /home/ec2-user/gekko && npm install --only=production"
echo "Rebuilding GekkoGA dependancies ..."
su ec2-user -c "rm -rf /home/ec2-user/gekko/gekkoga/node_modules/*"
su ec2-user -c "source /home/ec2-user/.bashrc && cd /home/ec2-user/gekko/gekkoga && npm install"

echo "Launching Gekko's UI from /home/ec2-user/gekko/start_ui.sh ..."
su ec2-user -c "/home/ec2-user/gekko/start_ui.sh"

echo "Launching GekkoGA from /home/ec2-user/gekko/gekkoga/start_gekkoga.sh ..."
su ec2-user -c "/home/ec2-user/gekko/gekkoga/start_gekkoga.sh"

echo "Launching background script to handle termination events ..."
/etc/rc.termination.handling &
echo "Done."
echo "===== End of Gekko Packaging Retrieval ====="

exit 0
A few comments:
- During my tests I encoutered a problem with sqlite, it seems linked to the type of platform used. To avoid this, I automatically rebuild the dependancies after rsync synchronization
- I update the UIConfig files as on the EC2 instance I use NGinx, which I don’t use on my reference server @home
- I added a line to restart NGinx as I noticed that I had to relaunch it manually before I could access Gekko’s UI. I didn’t investigate further to understand why, maybe later.
- As some of you may have noticed, we are syncing a remote Gekko’s installation in a local $HOME/gekko one. Therefore in the script we need to delete (or move) the Gekko’s installation we previously made on our EC2 instance. Previously it was just deployed to test it.
On our Reference server @home:
- We create a $HOME/gekko/start_ui.sh script which contains, if this is not already the case (see my previous guides):
#!/bin/bash
cd $HOME/gekko
rm -rf ui_logs/*
pm2 start gekko.js --name gekko_ui --log-date-format="YYYY-MM-DD HH:mm Z" -e ui_logs/ui_err.log -o ui_logs/ui_out.log -- --ui max_old_space_size=8096- We create a $HOME/gekko/gekkoga/start_gekkoga.sh which contains critical instructions in order to specify to GekkoGA :
- The strategy to optimize
- The number of CPU to use
#!/bin/bash
TOLAUNCH="config-MyMACD-backtester.js"

cd $HOME/gekko/gekkoga
# Get the number of CPU on the machine and reduce it by one to keep a little bit of responsibility
NBCPU=`getconf _NPROCESSORS_ONLN`
NBCPU="$(($NBCPU-1))"
NBCPU="parallelqueries: $NBCPU,"

# replace the number of concurrent threads in gekkoga's conf
sed -i "/parallelqueries:/c $NBCPU" config/config-MyMACD-backtester.js

# start Gekkoga !
rm -rf logs/*
pm2 start run.js --no-autorestart --name $TOLAUNCH --log-date-format="YYYY-MM-DD HH:mm Z" -e logs/err.log -o logs/out.log -- -c config/$TOLAUNCH max_old_space_size=8192
Remarks:
- You shouldn’t have to modify anymore the start_ui.sh script.
- In the start_gekkoga.sh script:
- You should only have to modify the TOLAUNCH variable, and pass it the name of your Gekkoga’s config file to be used, that all.
- I wanted to keep one vCPU free to handle synchronization stuff, or other tasks required by the OS, so I dynamically check the number of CPU on the machine, reduce it by 1, and change the appropriate line in Gekkoga’s config file.
- This has a side effect: on a 1 CPU machine, and this is the case of the smaller EC2s VMs, it will become “0”, and Gekkoga will fail to start, but pm2 will keep trying to relaunch it. This is why I added the pm2 “–no-autorestart” option to this script on the last line.
We reboot our EC2 reference instance:
aws ec2 reboot-instances --instance-ids i-03c52b4c8ebe112b7After a few seconds, we check the rc.local log on our EC2 instance to verify the downloading sequence of our reference package from our control&command server. In rc.local, we redirected the logs to $HOME/AWS/logs/<date>_package.log :

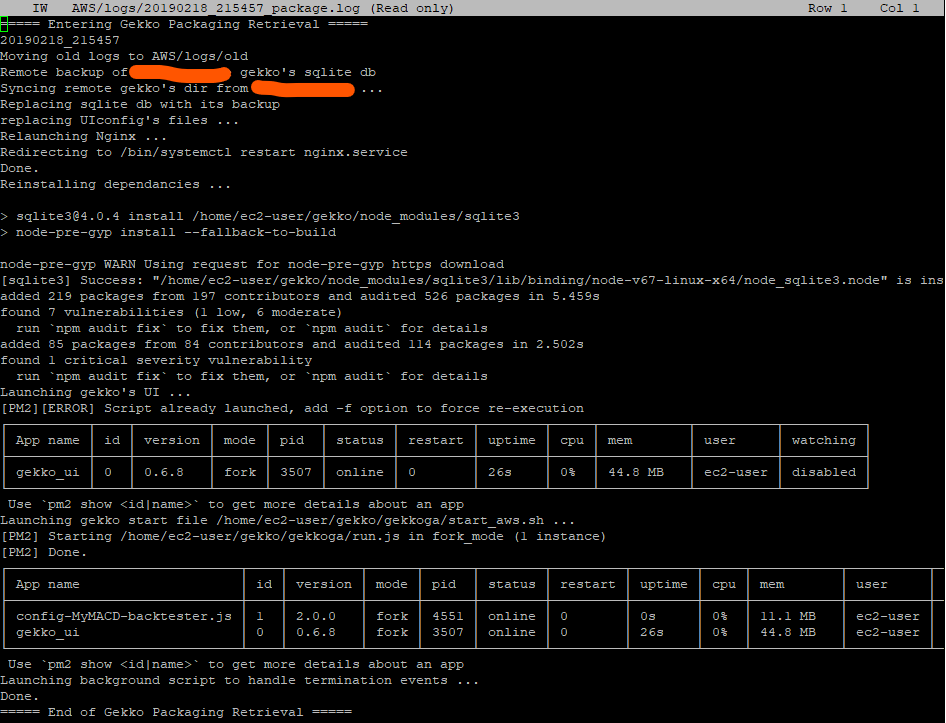
Seems all good. Let’s check pm2’s status:

Gekkoga’s error is probably normal as as we saw before, we requested it to run with 0 parrallel queries … Let’s check its logs:
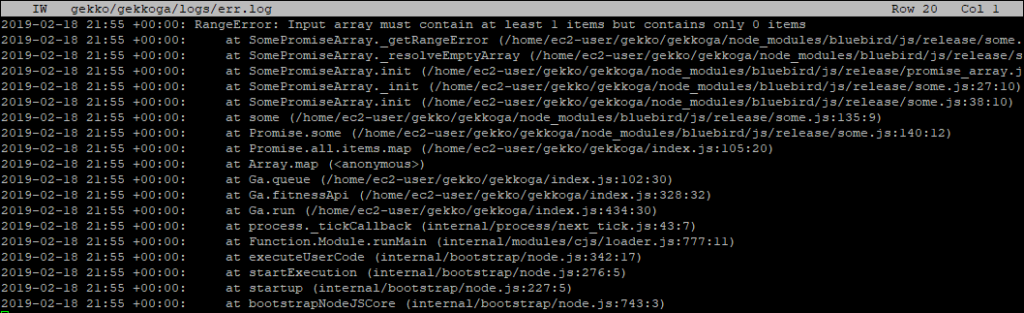

And yes, I can confirm after a quick test with 0 parralelqueries on my Reference server @home that this error is raised in this case. Good ! It should be OK with more CPUs or if we alter the start_gekkoga.sh file to handle this “One CPU machine” special case.
One more thing, let’s check if Gekko’s UI is remotely reachable:
Seems Perfect !
Final step 9: creating a new reference AMI
Now, before we make a new version of our reference AMI (it won’t be the last one :)), I recommand to:
- Make some cleaning in AWS/logs, AWS/logs/old, but also (on my Reference server @home) in gekko/history, gekko/strategies and gekko/gekkoga/config and /gekko/gekkoga/results, as I (and I hope, you) made a lot of tests.
- Add a shellscipt to automatically update a Dynamic DNS pointing to the VM. As it is 99% personal, I won’t detail it here. What it does is checking the external IP of the machine, check if it is different than the latest knew one, if yes update the A record of the FQDN on the DNS server.
Final step is to create a new reference AMI from this fully functionnal VM, you know the procedure, we already did it above, as well as for instantiating it through your AWS CLI installed on your own computer.
Next step will be to try to launch a Gekkoga backtesting session by instantiating our AMI on a much better VM in terms of CPU and memory. But, be warned, this will be charged by Amazon !
This will be next article’s topic.
Conclusion & Further Resources
You’ve now built a scalable, reproducible workflow to launch Gekko/Gekkoga testing environments in the cloud—with full automation from provisioning to strategy execution. The same steps can be adapted for other trading bots or cloud-backed projects.
Before you go:
- Remember to regularly clean up unused logs and AMIs to avoid unnecessary AWS costs.
- For more advanced usage, such as backtesting on high CPU (or future GPU) instances, see my follow-up:
Launching Gekkoga on high-end EC2 Spot machine - For lessons on other automation and infrastructure topics, check out:
External resources you may find valuable:
- AWS Documentation: User Data and Cloud Init
- AWS EC2 Spot Instances Guide
- Official Gekko GitHub
- Gekkoga Optimization (community repo)
- Secure SSH Key Management Best Practices (AWS Blog)
If this helped you, share your experience or improvements in the comments!
Did you run into any gotchas or have tips for automating Gekko at scale? Let’s discuss below.